
1. შესავალი
This manual provides detailed instructions for the installation, operation, and maintenance of your Docooler Digital Tachometer K975. This 52mm (2-inch) LCD gauge is designed for automotive applications, providing accurate engine RPM readings from 0 to 9999 RPM with an integrated warning light feature. Please read this manual thoroughly before installation and use to ensure proper function and safety.
2. პროდუქტის მახასიათებლები
- Diameter: 52mm (2 inches)
- Power: DC 10-15V (12V Professional)
- Display: Blue Digital LED Readout
- Measurement Range: 0-9999 RPM
- Warning Point: Activates at 5000 RPM
- High accuracy and easy operation
- მოყვება ინსტალაციის ინსტრუქცია
3. სპეციფიკაციები
| ერთეული | RPM |
| გაზომვის დიაპაზონი | 0-9999 RPM |
| Warning Point | 5000 RPM |
| ძალაუფლება | 12 ვოლტი, მაქს. 0.3 ა |
| LCD ზომა | დაახლოებით 52 მმ / 2 ინჩი |
| Tachometer Size (Dia.*H) | 5.7 x 5.5 სმ / 2.2 x 2.2 ინჩი |
| საერთო ზომები (L x W x H) | 17 x 12 x 7.8 სმ / 6.7 x 4.7 x 3.1 ინჩი |
| ფერი | შავი |
| მასალა | პლასტიკური |
| მოდელის ნომერი | K975 |
| UPC | 519752202711 |
4. პაკეტის შიგთავსი
შეფუთვის გახსნის შემდეგ, დარწმუნდით, რომ ყველა ნივთი ადგილზეა და დაუზიანებელია:
- 1x Docooler Digital Tachometer K975
Note: Additional mounting hardware or wiring may be included depending on the specific kit. Refer to the packaging for a complete list.
5. დაყენება და ინსტალაცია
Installation of the Docooler Digital Tachometer K975 requires basic automotive electrical knowledge. If you are unsure about any steps, it is recommended to seek professional assistance.
5.1 უსაფრთხოების ზომები
- ნებისმიერი ელექტრო სამუშაოების დაწყებამდე გამორთეთ ავტომობილის აკუმულატორი.
- დარწმუნდით, რომ ყველა შეერთება უსაფრთხოდ და სათანადოდ იზოლირებულია მოკლე ჩართვის თავიდან ასაცილებლად.
- Mount the gauge in a location that does not obstruct the driver's view ან ხელი შეუშალოს მანქანის კონტროლს.
5.2 ტაქომეტრის დამონტაჟება
The tachometer is designed for a 52mm (2-inch) diameter mounting hole. It can be dash-mounted or mounted using the included stand.
- Choose a suitable, flat surface for mounting.
- If flush mounting, cut a 52mm diameter hole. If using the stand, secure the stand to the desired location using appropriate fasteners.
- Insert the tachometer into the mounting location or attach it to the stand.
- Secure the tachometer firmly in place.
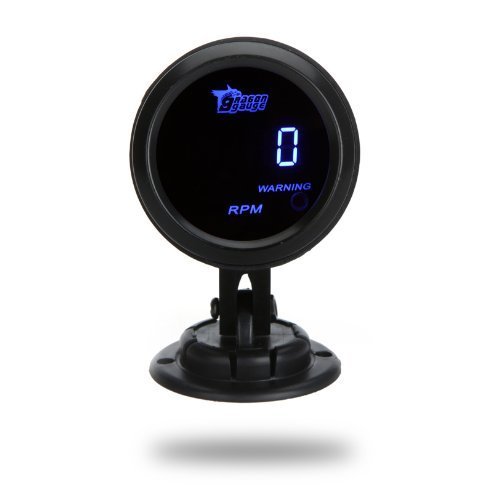
Image shows the front view of the Docooler Digital Tachometer K975. The circular gauge features a black casing and a blue digital LCD screen displaying '0' RPM. Below the RPM reading, 'WARNING' and 'RPM' are visible. The gauge is mounted on a black stand.
5.3 გაყვანილობის ინსტრუქციები
The tachometer typically has three wires for connection:
- წითელი მავთული: Connect to a switched 12V DC power source (e.g., ignition switch ACC).
- შავი მავთული: შეაერთეთ ავტომობილის საიმედო დამიწების წერტილთან.
- Green/Yellow/White Wire (Signal): Connect to the engine's RPM signal wire. This is typically found at the ignition coil negative terminal, ECU tachometer output, or specific engine sensor. Consult your vehicle's service manual for the exact location of the RPM signal wire.
Ensure all connections are soldered or crimped securely and insulated with electrical tape or heat shrink tubing.
6. საოპერაციო ინსტრუქციები
Once properly installed and wired, the Docooler Digital Tachometer K975 operates automatically when the vehicle's ignition is turned on.
- ჩართვა: When the ignition is turned to the ACC or ON position, the tachometer will power on, and the blue digital LED display will illuminate.
- RPM ჩვენება: The display will show the current engine RPM in numerical format.
- Გამაფრთხილებელი ნათება: The integrated warning light will activate when the engine RPM reaches or exceeds 5000 RPM. This serves as a visual alert for high engine speeds.
7. მოვლა
The Docooler Digital Tachometer K975 is designed for durability and requires minimal maintenance.
- დასუფთავება: ეკრანის და მისი გასაწმენდად გამოიყენეთ რბილი, მშრალი ქსოვილიasinზ. მოერიდეთ აბრაზიული საწმენდი საშუალებების ან გამხსნელების გამოყენებას, რომლებმაც შეიძლება დააზიანოს პლასტმასი ან ეკრანი.
- კავშირის შემოწმება: Periodically inspect wiring connections to ensure they remain secure and free from corrosion.
- გარემოს დაცვა: While designed for automotive use, avoid exposing the gauge to extreme moisture or direct, prolonged sunlight when possible to extend its lifespan.
8. Დიაგნოსტიკა
If you encounter issues with your tachometer, refer to the following common problems and solutions:
| პრობლემა | შესაძლო მიზეზი | გამოსავალი |
|---|---|---|
| Tachometer does not power on. | No power to the red wire; poor ground connection. | Check 12V power supply and ground connections. Ensure ignition is on. |
| Display shows "0" or incorrect RPM. | Incorrect or loose signal wire connection; incompatible signal type. | Verify the signal wire is correctly connected to the RPM source. Ensure the signal source is active. Some vehicles may require a tach adapter. |
| RPM reading is sluggish or jumps erratically. | Interference in the signal wire; poor signal quality; loose connections. | Ensure signal wire is routed away from high-voltage cables. Check all wiring connections for tightness and proper insulation. |
| Warning light does not activate at 5000 RPM. | Faulty internal component; incorrect RPM signal. | Verify RPM reading accuracy. If RPM is correct and light still fails, the unit may be faulty. |
9. გარანტია და მხარდაჭერა
Docooler products are manufactured to high-quality standards. For specific warranty information, please refer to the documentation included with your purchase or contact your retailer. For technical support or inquiries, please visit the official Docooler webსაიტი ან დაუკავშირდით მათ მომხმარებელთა მომსახურების განყოფილებას.
Docooler Store Link: Visit the Docooler Store on Amazon