
1. შესავალი
This manual provides detailed instructions for the safe and effective use of the SMART SENSOR AS8805 Digital Sulfur Dioxide Gas Monitor. This device is designed for high-sensitivity detection of sulfur dioxide (SO2) gas, featuring sound and light alarms, and a rechargeable Li-battery for portable operation. Please read this manual thoroughly before operating the device and retain it for future reference.
2. უსაფრთხოების ინფორმაცია
მოწყობილობის დაზიანების ან დაზიანების თავიდან ასაცილებლად, ყოველთვის დაიცავით შემდეგი უსაფრთხოების ზომები:
- ნუ ეცდებით მოწყობილობის შეცვლას ან დაშლას.
- დარწმუნდით, რომ მოწყობილობა გამოიყენება მითითებული სამუშაო ტემპერატურისა და ტენიანობის დიაპაზონში.
- შეინახეთ მოწყობილობა ძლიერი ელექტრომაგნიტური ველებისგან.
- რეგულარულად შეამოწმეთ მოწყობილობა დაზიანების ან გაუმართაობის ნიშნებისთვის.
- Perform zero calibration in a clean air environment, free from SO2 or other interfering gases.
- Recharge the battery promptly when the low power indicator is active to maintain optimal performance and safety.
- This device is designed for detecting SO2 gas. Do not use it for other gas types without proper calibration and verification.
3. პროდუქტი დასრულდაview
The SMART SENSOR AS8805 is a compact and portable sulfur dioxide gas detector. Familiarize yourself with its components:

სურათი 3.1: წინა View of the AS8805 Detector. This image shows the front of the device, highlighting the digital LCD display, power on/off key, up key (addition), down key (subtraction), and enter key. The alarm light is visible at the top left, and the sulfur dioxide gas sensor is at the top right.
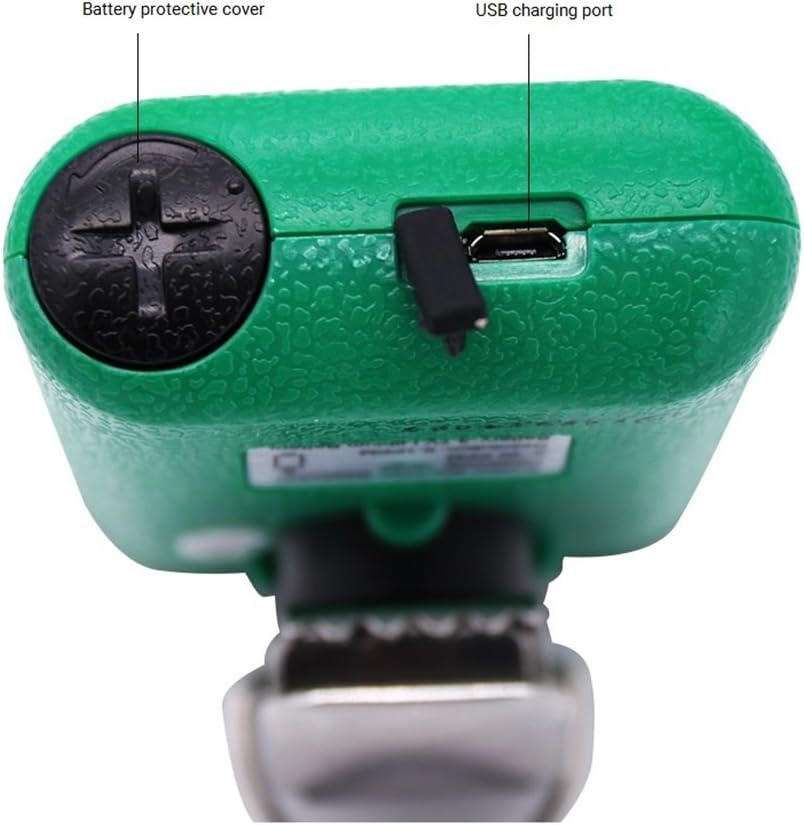
სურათი 3.2: ზედა View of the AS8805 Detector. This image displays the top section of the device, indicating the battery protective cover and the USB charging port.

სურათი 3.3: მხარე View of the AS8805 Detector. This image illustrates the side of the device, pointing out the gas sensor inside and the alarm light.
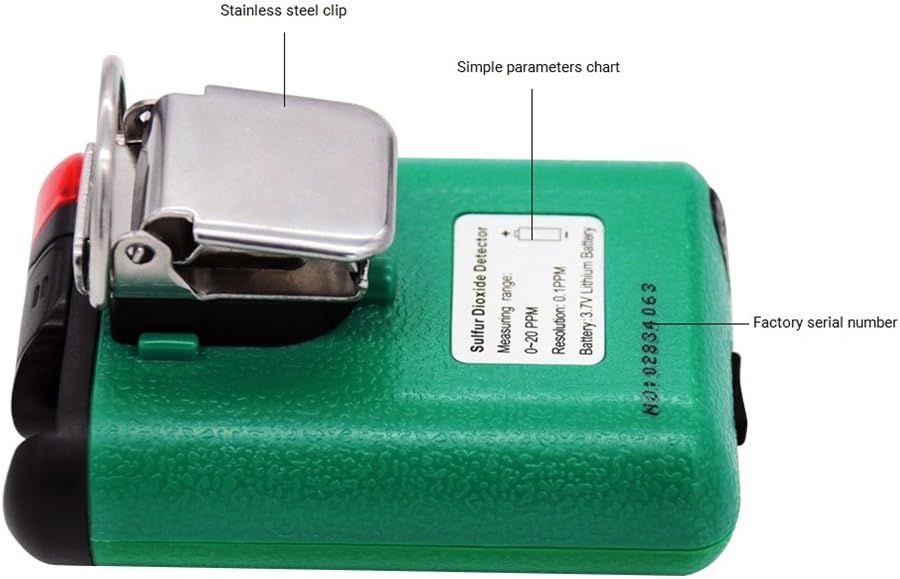
სურათი 3.4: უკან View of the AS8805 Detector. This image shows the back of the device, featuring the stainless steel clip, a simple parameters chart, and the factory serial number.
3.1 ძირითადი კომპონენტი
- Sulfur Dioxide Gas Sensor: Detects SO2 concentration in the air.
- სიგნალიზაციის შუქი: Provides visual indication during an alarm event.
- ციფრული LCD ეკრანი: Shows real-time gas concentration, battery status, and other operational information.
- ჩართვის/გამორთვის გასაღები: გამოიყენება მოწყობილობის ჩასართავად ან გამოსართავად.
- Up Key (Addition): გამოიყენება მენიუებში ნავიგაციისთვის ან გასაზრდელადasing მნიშვნელობები.
- Down Key (Subtraction): გამოიყენება მენიუში ნავიგაციისთვის ან დეკრეტებში გადასასვლელადasing მნიშვნელობები.
- შეიყვანეთ გასაღები: გამოიყენება არჩევანის დასადასტურებლად ან მენიუში შესასვლელად.
- Battery Protective Cover: Secures the internal battery.
- USB დატენვის პორტი: For recharging the device's internal Li-battery.
- Stainless Steel Clip: Allows for convenient carrying and attachment.
4. დაყენება
4.1 ყუთის გახსნა და შეფუთვის შიგთავსი
Carefully unpack the device and verify that all standard accessories are present:

Figure 4.1: Standard Package Contents. This image shows the items included in the standard package: the AS8805 gas monitor, power charger and cable, user manual, explosive-proof certificate, certificate of calibration, and warranty card.
- 1x Sulfur Dioxide Gas Monitor (AS8805)
- 1x მომხმარებლის სახელმძღვანელო
- 1x Explosive-proof Certificate
- 1x საგარანტიო ბარათი
- 1x Power Charger
- 1x დენის კაბელი
4.2 ბატარეის დატენვა
The device is powered by a 3.7V Li-battery. Before first use, or when the low power indicator appears, charge the device:
- Connect the provided power cable to the USB charging port on the top of the device (refer to Figure 3.2).
- Connect the other end of the cable to the power charger, and then plug the charger into a suitable power outlet.
- LCD ეკრანზე ბატარეის ხატულა მიუთითებს დატენვის სტატუსზე.
- A full charge typically allows for approximately 60 hours of continuous operation without alarms.
4.3 საწყისი ჩართვა
მოწყობილობის ჩართვისთვის:
- დააჭირეთ და გააჩერეთ ჩართვის/გამორთვის გასაღები სანამ ეკრანი არ განათდება.
- The device will perform a self-test and warm-up sequence. During this time, the display may show various readings before settling.
5. ოპერაცია
5.1 ჩართვა/გამორთვა
- ჩართვა: დააჭირეთ და გააჩერეთ ჩართვის/გამორთვის გასაღები for a few seconds until the display turns on.
- Გამორთვა: დააჭირეთ და გააჩერეთ ჩართვის/გამორთვის გასაღები რამდენიმე წამის განმავლობაში, სანამ ეკრანი არ გამოირთვება.
5.2 ინფორმაციის ჩვენება
The digital LCD display shows the following information:
- Real-time SO2 Concentration: ნაჩვენებია მილიონ ნაწილებში (ppm).
- ბატარეის სტატუსის ინდიკატორი: აჩვენებს ბატარეის მიმდინარე დატენვის დონეს.
- განგაშის ინდიკატორები: Visual cues for high or low alarm conditions.
5.3 Alarm Functions and Settings
The device features adjustable high and low alarm values with three alarm methods: sound, light, and vibration. The alarm sound can reach up to 80dB.
- Default High Alarm: 10.0 ppm
- Default Low Alarm: 5.0 ppm
To adjust alarm values:
- With the device powered on, press the ზემოთ გასაღები or ქვემოთ გასაღები to enter the password interface.
- Enter the password (e.g., "123" as shown in the calibration video, though specific password should be confirmed in the full user manual). Use the Up და Down Keys to change digits and the შეიყვანეთ გასაღები to move to the next digit or confirm.
- After entering the correct password, navigate through the menu using the Up და Down Keys to find the alarm setting options.
- Adjust the high and low alarm thresholds as required using the Up და Down Keys, and confirm each setting with the შეიყვანეთ გასაღები.
5.4 ნულოვანი კალიბრაცია
Zero calibration ensures accurate readings by setting the baseline in a clean air environment. This procedure should be performed regularly or if you suspect inaccurate readings.
- Ensure the device is in a clean environment, free from any SO2 gas.
- ჩართეთ მოწყობილობა.
- Access the calibration menu by pressing the ზემოთ გასაღები or ქვემოთ გასაღები to enter the password interface.
- Enter the password (e.g., "123").
- After successful password entry, navigate to the calibration option (often labeled "CAL" or "ZERO CAL").
- Confirm the zero calibration selection with the შეიყვანეთ გასაღები. The device will then perform the zero calibration, displaying a changing number as it stabilizes.
- Wait for the device to stabilize and confirm the calibration. The display may show "F" or return to 0.0 ppm, indicating successful calibration.
5.5 Auto/Hand Power Off Function
The device includes an auto power-off feature to conserve battery life. This can be set manually.
- ავტომატური გამორთვა: If enabled, the device will automatically turn off after 10 minutes of no operation.
- Refer to the full user manual for specific instructions on how to enable or disable the auto power-off function.
6. მოვლა
6.1 ბატარეის მოვლა
- Recharge the 3.7V Li-battery when the low power indicator is displayed.
- ბატარეის ხანგრძლივობის გასახანგრძლივებლად, მოერიდეთ მის სრულ დაცლას ხშირად.
- გამოიყენეთ მხოლოდ მოწოდებული დამტენი და კაბელი.
6.2 სენსორის სიცოცხლის ხანგრძლივობა
The electrochemical sensor has an estimated life of 2 years. After this period, the sensor's accuracy may degrade, and replacement or professional calibration may be required.
6.3 დასუფთავება
- გაწმინდეთ მოწყობილობის გარე ზედაპირი რბილი, დamp ქსოვილი.
- არ გამოიყენოთ აბრაზიული გამწმენდები ან გამხსნელები.
- Ensure no liquid enters the sensor opening or charging port.
7. Დიაგნოსტიკა
| პრობლემა | შესაძლო მიზეზი | გამოსავალი |
|---|---|---|
| მოწყობილობა არ ჩაირთვება. | დაბალი ან დაცლილი ბატარეა. | დატენეთ მოწყობილობა მოწოდებული დამტენის და კაბელის გამოყენებით. |
| არაზუსტი წაკითხვები. | Sensor requires zero calibration; sensor lifespan exceeded. | Perform zero calibration in clean air. If issues persist, consider sensor replacement or professional service. |
| სიგნალიზაცია მუდმივად ისმის. | High SO2 concentration detected; alarm settings too low. | Evacuate the area and ventilate. Check and adjust alarm thresholds if necessary. |
| ეკრანი ცარიელია ან გაყინულია. | Software error or battery issue. | Try restarting the device. If problem persists, contact support. |
8. სპეციფიკაციები
| ფუნქცია | დეტალი |
|---|---|
| პროდუქტის მოდელის ნომერი | AS8805 |
| Gas Measurement Type | გოგირდის დიოქსიდი (SO2) |
| საზომი დიაპაზონი | 0 ~ 20 ppm |
| Testing Resolution | 0.1 ppm |
| გაზომვის პრინციპი | ელექტროქიმიური |
| სენსორის სიცოცხლის ხანგრძლივობა | 2 წელი |
| დაბალი/მაღალი სიგნალიზაცია | Supported, adjustable values |
| განგაშის მეთოდები | ხმა, სინათლე, ვიბრაცია |
| სიგნალიზაციის ხმის დონე | 80 დბ-მდე |
| ოპერაციული ტემპერატურა | -10 ~ 50 ℃ (14 ~ 122 ℉) |
| ოპერაციული ტენიანობა | 15 ~ 95% RH (Standard) |
| ბატარეის ტიპი | 3.7V Li-battery (754060p) |
| ბატარეის მუშაობის დრო | Approx. 60 hours (no alarm) |
| ავტომატური გამორთვა | Yes (after 10 minutes of no operation, if enabled) |
| პროდუქტის წმინდა წონა | 200 გ (7.1 უნცია) |
| პროდუქტის ზომა | 120 * 65 * 38 მმ |
| UPC | 785197913523 |
9. გარანტია და მხარდაჭერა
The SMART SENSOR AS8805 Digital Sulfur Dioxide Gas Monitor comes with a warranty as detailed in the included Warranty Card. Please refer to the card for specific terms and conditions.
For technical support, service, or inquiries regarding your device, please contact your retailer or the manufacturer directly. Keep your purchase receipt and warranty card handy when seeking support.