1. შესავალი
Thank you for choosing the Murray 18V Lithium-Ion Grass Trimmer IQ18GTK. This manual provides essential information for the safe operation, assembly, maintenance, and troubleshooting of your new grass trimmer. Please read this manual thoroughly before first use and keep it for future reference.
პაკეტის შიგთავსი:
- Murray 18V Lithium-Ion Grass Trimmer
- Briggs & Stratton 18V 2.5Ah Lithium-Ion Battery
- ბატარეის დამტენი
- Spool of Trimmer Line
- დამცავი მცველი
- დამხმარე სახელური
- მომხმარებლის სახელმძღვანელო

Image 1.1: The Murray 18V Lithium-Ion Grass Trimmer, including the 2.5Ah battery and charger.
2. უსაფრთხოების ინსტრუქციები
ამ პროდუქტის გამოყენებისას ყოველთვის დაიცავით უსაფრთხოების ძირითადი ზომები, რათა შეამციროთ ხანძრის, ელექტროშოკის და პირადი დაზიანების რისკი.
უსაფრთხოების ზოგადი გაფრთხილებები:
- გამოიყენეთ პირადი დამცავი აღჭურვილობა (PPE): Always wear eye protection (safety glasses or goggles), long pants, sturdy footwear, and hearing protection when operating the trimmer.
- Keep Clear of Debris: Be aware of flying debris. Ensure bystanders, children, and pets are at a safe distance (at least 15 meters/50 feet) from the operating area.
- სამუშაო არეალის შემოწმება: Before starting, clear the area of any objects that could be thrown by the trimmer line, such as rocks, broken glass, or wire.
- მოერიდეთ კანთან კონტაქტს: Do not touch the trimmer line or cutting head while the tool is running.
- უსაფრთხო მოჭერა: მუშაობის დროს ტრიმერი ყოველთვის ორივე ხელით მჭიდროდ დაიჭირეთ.
- Use in Good Conditions: Operate the trimmer only in daylight or good artificial light. Avoid using it in wet grass or rain.
- ბატარეის უსაფრთხოება: გამოიყენეთ მხოლოდ მითითებული აკუმულატორი და დამტენი. არ დაუშვათ აკუმულატორის წყალთან ან ექსტრემალურ ტემპერატურასთან შეხება.
- მოვლა: Disconnect the battery before performing any maintenance, cleaning, or when changing the trimmer line.
3. შეკრება
Follow these steps to assemble your grass trimmer before first use.
3.1 Attaching the Protective Guard
- Align the protective guard with the trimmer head.
- Secure the guard using the provided screws. Ensure it is firmly attached to prevent injury from flying debris.

სურათი 3.1: View of the trimmer head, showing the protective guard and line spool.
3.2 დამხმარე სახელურის დამონტაჟება
- Slide the auxiliary handle onto the main shaft.
- Adjust the handle to a comfortable working position and tighten the locking knob.

Image 3.2: The auxiliary handle attached to the trimmer shaft, showing the adjustment knob.
3.3 აკუმულატორის დატენვა და დაყენება
- Before first use, fully charge the 18V Lithium-Ion battery using the provided charger. Refer to the charger's manual for specific charging instructions.
- Once charged, slide the battery into the battery compartment on the trimmer handle until it clicks into place.
- ბატარეის ამოსაღებად დააჭირეთ გამოშვების ღილაკს და გამოაცალეთ ბატარეა გარეთ.
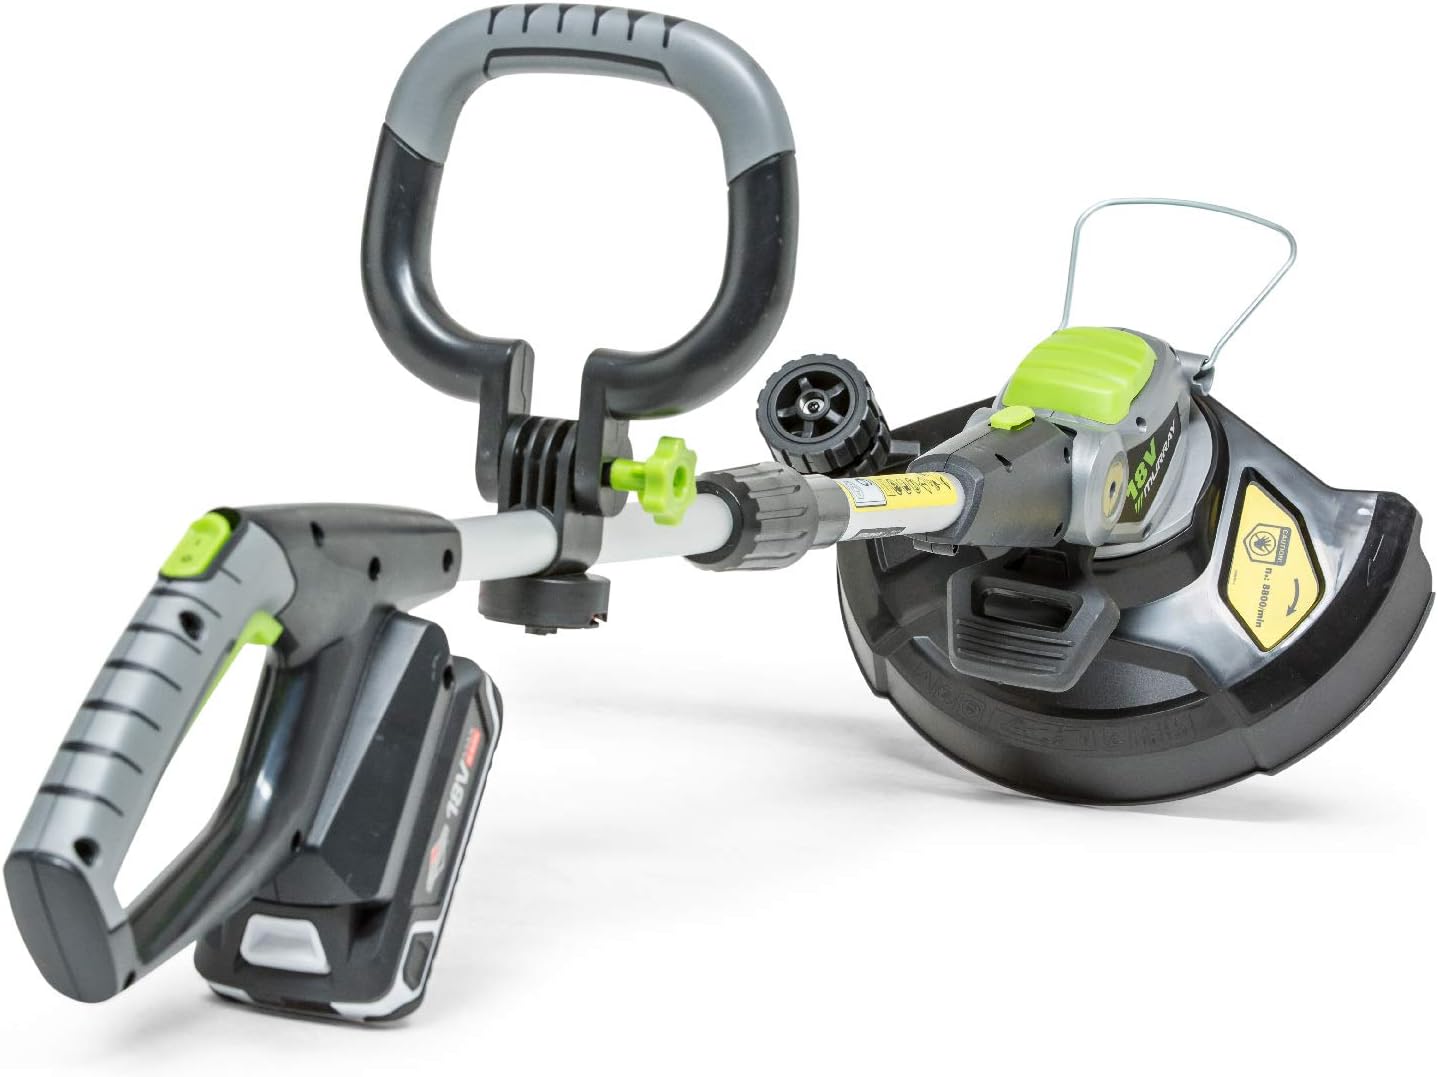
Image 3.3: The Murray 18V Grass Trimmer with the 18V Lithium-Ion battery correctly inserted into the handle.
4. ოპერაცია
This section details how to safely operate your Murray grass trimmer.
4.1 დაწყება და გაჩერება
- To start the trimmer, ensure the battery is fully inserted. Press and hold the safety lock-off button, then squeeze the trigger switch.
- ტრიმერის შესაჩერებლად, გაუშვით ჩამრთველი.

Image 4.1: The main handle of the trimmer, showing the green safety button and the trigger switch for operation.
4.2 Trimming and Edging
- ბალახის გასხვლა: Hold the trimmer with the cutting head parallel to the ground. Move the trimmer slowly and steadily across the area to be cut.
- Edging Function: The trimmer head pivots to easily switch from trimming to edging. Rotate the head 90 degrees for precise edging along pathways and flowerbeds.

Image 4.2: The trimmer head pivoted for edging, demonstrating its versatility.
4.3 Adjusting Shaft Length
The trimmer features an adjustable shaft length for user comfort. Loosen the shaft locking collar, extend or retract the shaft to the desired length, and then tighten the collar securely.
4.4 Automatic Line Feed
This trimmer is equipped with an automatic line feed system. When the line becomes too short, it will automatically extend during operation. Avoid intentionally bumping the head to feed line, as this can wear down the mechanism.
5. მოვლა
Regular maintenance ensures optimal performance and extends the life of your trimmer. Always disconnect the battery before performing any maintenance.
5.1 დასუფთავება
- After each use, clean the trimmer housing and protective guard with a damp ქსოვილი.
- Remove any grass clippings or debris from the cutting head and ventilation slots.
- არ გამოიყენოთ გამხსნელები ან აბრაზიული საწმენდები.
5.2 Trimmer Line Replacement
When the trimmer line is depleted, replace the spool with a new one. Refer to the product's specifications for the correct line diameter. Instructions for spool replacement are typically found on the spool packaging or can be obtained from customer support.
5.3 აკუმულატორის მოვლა და შენახვა
- შეინახეთ ბატარეა გრილ, მშრალ ადგილას, მოარიდეთ მზის პირდაპირ სხივებს და ექსტრემალურ ტემპერატურას.
- ხანგრძლივი შენახვისთვის, აკუმულატორი დაახლოებით 50%-მდე დატენეთ.
- Do not store the battery connected to the trimmer or charger.
6. Დიაგნოსტიკა
If you encounter issues with your trimmer, consult the following table before contacting customer support.
| პრობლემა | შესაძლო მიზეზი | გამოსავალი |
|---|---|---|
| ტრიმერი არ იწყება | ბატარეა სწორად არ არის ჩასმული ან დაცლილია. უსაფრთხოების ბლოკირება არ არის ჩართული. | Ensure battery is fully inserted and charged. Press safety lock-off button before squeezing trigger. |
| საპარსები ხაზი არ იკვებება | Line tangled or depleted. Debris in the feed mechanism. | Remove battery, inspect and clear any tangles or debris. Replace line spool if empty. |
| შემცირებული ჭრის შესრულება | Trimmer line too short or worn. | Allow automatic line feed to extend the line. Replace line spool if necessary. |
7. ტექნიკური მახასიათებლები
| ფუნქცია | სპეციფიკაცია |
|---|---|
| მოდელის ნომერი | IQ18GTK (1697120) |
| ბრენდი | მიურეი |
| დენის წყარო | 18V ლითიუმ-იონის ბატარეა |
| მოყვება ბატარეა | 1 x 2.5Ah ლითიუმ-იონური |
| პროდუქტის ზომები (L x W x H) | 89 x 24 x 12.7 სმ |
| ნივთის წონა | 2.1 კგ |
| ჭრის სიგანე | 30 სანტიმეტრი |
| სიჩქარე | 9000 ბრ/წთ |
| მწარმოებელი | ბრიგსი და სტრატონი |
| წარმოშობის ქვეყანა | ჩინეთი |
8. ინფორმაცია გარანტიის შესახებ
The Murray 18V Lithium-Ion Grass Trimmer is covered by the following warranty:
- პროდუქტის გარანტია: 5 years for non-professional use.
- ბატარეისა და დამტენის გარანტია: 3 წელი.
Please refer to the full warranty terms and conditions provided with your product or on the manufacturer's website for detailed application of the warranty.
9. მომხმარებელთა მხარდაჭერა
For technical assistance, spare parts, or warranty claims, please contact your local Murray dealer or visit the official Briggs & Stratton website. When contacting support, please have your product model number (IQ18GTK or 1697120) and serial number ready.