
1. შესავალი
This manual provides comprehensive instructions for the setup, operation, and maintenance of your NETUM NT-G5 Bluetooth Thermal Label Printer. Please read this guide thoroughly to ensure proper use and optimal performance of your device.
2. პროდუქტი დასრულდაview
2.1 პაკეტის შიგთავსი
პაკეტის გახსნის შემდეგ, დარწმუნდით, რომ ყველა ნივთი ხელთ არის:
- NETUM NT-G5 Thermal Label Printer
- USB დამტენი კაბელი
- სწრაფი დაწყების სახელმძღვანელო (თუ შედის)
- One roll of labels (pre-installed or separate)
2.2 პრინტერის კომპონენტები
Familiarize yourself with the main parts of the NT-G5 printer:

სურათი 2.2.1: დეტალურად view of the NETUM NT-G5 printer, highlighting key components such as the top cover open button, paper exit, OLED display, power/setting button, USB interface, power interface, and feed/OK button.
- Top Cover Open Button: Used to open the printer cover for label roll installation.
- ქაღალდის გასასვლელი: Where printed labels emerge. Maximum width: 57mm.
- Paper Tear-off Knife: For cleanly detaching printed labels.
- OLED ეკრანი: Shows printer status and settings.
- Power/Setting Button: Powers the device on/off and navigates settings.
- Feed/OK Button: Feeds labels or confirms selections. Controls print speed (20-50mm/s).
- USB ინტერფეისი: For charging and data connection (1500mAh battery).
- დენის ინტერფეისი: შეყვანა: 5V 2A.
3. დაყენების გზამკვლევი
3.1 პრინტერის დატენვა
Before first use, fully charge the printer. Connect the USB charging cable to the printer's USB interface and a 5V 2A power adapter. The OLED display will indicate charging status.
3.2 Loading the Label Roll
- Press the Top Cover Open Button to open the printer's top cover.
- Adjust the paper plate to match the width of your label roll. The adjustable paper plate supports label roll diameters from 20mm to 50mm, with a maximum paper width of 54mm and a largest print width of 48mm.
- Insert the label roll with the printing surface facing upwards. Ensure the leading edge of the labels extends slightly out of the paper exit.
- ზედა საფარი მჭიდროდ დახურეთ მანამ, სანამ არ დააწკაპუნებს თავის ადგილზე.
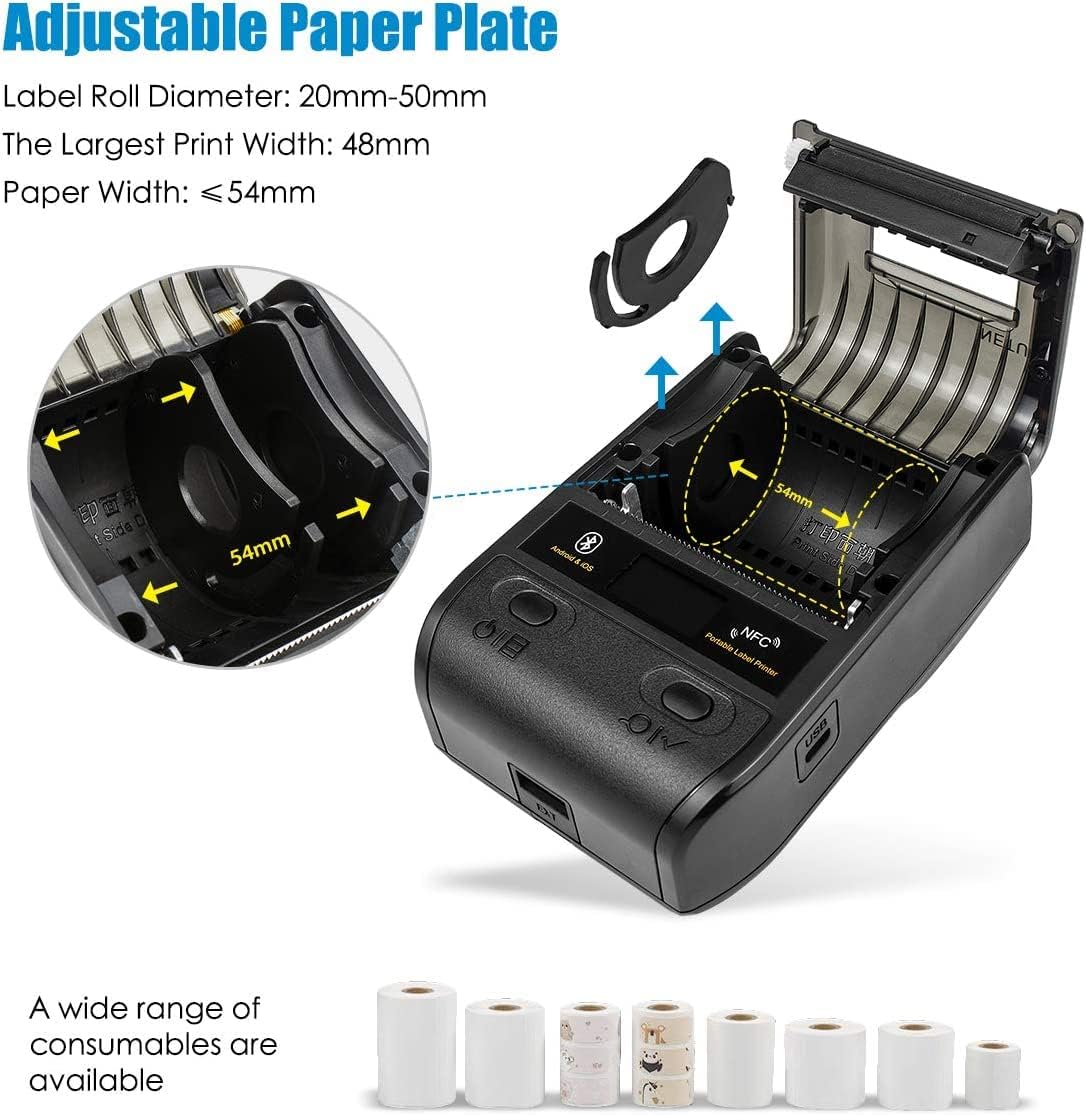
სურათი 3.2.1: Illustration of the adjustable paper plate mechanism and proper label roll insertion. The printer accommodates label rolls with diameters between 20mm and 50mm, and paper widths up to 54mm.
3.3 აპლიკაციის ინსტალაცია და Bluetooth კავშირი
The NETUM NT-G5 printer operates via Bluetooth connection with a dedicated mobile application.
- ჩამოტვირთეთ აპლიკაცია: ძიება the "WeiDa" barcode design app on the Apple App Store (for iOS devices) or Google Play Store (for Android devices).
- Bluetooth-ის ჩართვა: დარწმუნდით, რომ Bluetooth ჩართულია თქვენს სმარტფონზე ან პლანშეტზე.
- პრინტერის ჩართვა: Press and hold the Power/Setting Button to turn on the printer.
- დაკავშირება აპლიკაციის საშუალებით: Open the WeiDa app, navigate to the device connection section, and select your NT-G5 printer from the list of available Bluetooth devices. The app will guide you through the pairing process.

სურათი 3.3.1: Visual representation of the Bluetooth connection process between a mobile device and the NT-G5 printer, along with icons for downloading the companion app from major app stores.
4. ოპერაციის ინსტრუქცია
4.1 ბეჭდვის ძირითადი ნაბიჯები
Follow these general steps to print labels:

სურათი 4.1.1: A simplified three-step process for operating the NT-G5 printer, covering paper loading, Bluetooth pairing, and label printing.
- Ensure the paper roll is correctly installed (refer to Section 3.2).
- Connect the printer to your smartphone via Bluetooth using the WeiDa app (refer to Section 3.3).
- Within the WeiDa app, design your label using available templates or create a custom layout.
- Once your label design is complete, initiate the print command from the app.
- The printer will produce your high-quality thermal label.
4.2 მხარდაჭერილი ეტიკეტების ტიპები და გამოყენება
The NT-G5 printer is versatile and supports various label types for different applications:

სურათი 4.2.1: A collage demonstrating various label applications for the NT-G5 printer, such as jewelry tags, name labels, address labels, clothing tags, price tags, and cable labels.
- სამკაულები Tags: For pricing and product information.
- Name Labels: For organization and identification.
- მისამართის ეტიკეტები: For mailing and shipping.
- ტანსაცმელი Tags: For retail pricing and product details.
- ფასი Tags: General use for product pricing.
- Cable Labels: For organizing and identifying cables.
4.3 თავსებადი ოპერაციული სისტემები
The NETUM NT-G5 printer is compatible with a range of operating systems, primarily through its dedicated mobile application:
- iOS: Compatible with Apple iPhones and iPads.
- Android: Compatible with Android smartphones and tablets.
- Windows: Limited compatibility, typically requiring specific drivers or software.
- Linux: Limited compatibility, typically requiring specific drivers or software.
5. მოვლა
5.1 ბეჭდვის თავის გაწმენდა
To maintain print quality and extend the life of your printer, regularly clean the thermal print head. Use a soft cloth dampened with isopropyl alcohol. Gently wipe the print head surface. Ensure the printer is turned off and cooled down before cleaning.
The print head has an estimated life of 50KM of print.
5.2 ბატარეის მოვლა
The printer uses a Lithium Polymer battery. To maximize battery life:
- მოერიდეთ ბატარეის ხშირ სრულ დაცლას.
- შეინახეთ პრინტერი გრილ, მშრალ ადგილას, თუ დიდი ხნის განმავლობაში არ იყენებთ.
- Charge the printer regularly, even if not in frequent use, to prevent deep discharge.
6. Დიაგნოსტიკა
6.1 საერთო საკითხები და გადაწყვეტილებები
| საკითხი | შესაძლო მიზეზი | გამოსავალი |
|---|---|---|
| პრინტერი არ უკავშირდება Bluetooth-ის საშუალებით | Bluetooth is off on device; printer is off; app not recognizing printer. | Ensure Bluetooth is enabled on your mobile device. Turn the printer off and on again. Restart the WeiDa app. Ensure the printer is within range. |
| ცუდი ბეჭდვის ხარისხი / გაცვეთილი ეტიკეტები | Low battery; dirty print head; incorrect label type; print density settings. | Charge the printer fully. Clean the print head (refer to Section 5.1). Ensure you are using thermal labels. Adjust print density settings in the app. |
| ეტიკეტები სწორად არ იკვებება | Label roll incorrectly installed; paper plate not adjusted; labels jammed. | Re-install the label roll, ensuring it's properly seated and the paper plate is adjusted to the label width (refer to Section 3.2). Clear any jammed labels. |
| App issues / Crashes | აპლიკაციის მოძველებული ვერსია; პროგრამული კონფლიქტი. | Update the WeiDa app to the latest version. Restart your mobile device. Reinstall the app if issues persist. |
7. სპეციფიკაციები
| ფუნქცია | დეტალი |
|---|---|
| მოდელის ნომერი | NT-G5 |
| პროდუქტის ზომები | 4.33 x 3.15 x 2.36 ინჩი |
| ნივთის წონა | 10.9 უნცია |
| ბატარეები | 1 ლითიუმ პოლიმერული ბატარეა (შედის) |
| ქაღალდის მაქსიმალური სიგანე | 54 მმ |
| Largest Print Width | 48 მმ |
| ეტიკეტის რულონის დიამეტრი | 20მმ-50მმ |
| ბეჭდვის სიჩქარე | 20-50 მმ/წმ |
| ბეჭდვის ხელმძღვანელის ცხოვრება | 50კმ |
| დენის შეყვანა | 5V 2A |
| დაკავშირება | Bluetooth 4.0, NFC |
| ოპერაციული სისტემის თავსებადობა | iOS, Android, Windows, Linux (via app/drivers) |
8. გარანტია და მხარდაჭერა
NETUM products are manufactured to high-quality standards. For specific warranty details, please refer to the warranty card included with your product or visit the official NETUM webსაიტი. შეინახეთ თქვენი შესყიდვის ქვითარი შეძენის დასადასტურებლად.
For technical support, troubleshooting assistance, or inquiries regarding replacement parts and accessories, please contact NETUM customer service through the contact information provided on the official webადგილზე ან პროდუქტის შეფუთვაში.