
Panasonic HC-X1500
Panasonic HC-X1500 4K Professional Camcorder User Manual
Model: HC-X1500
1. შესავალი
This manual provides essential information for the proper operation and maintenance of your Panasonic HC-X1500 4K Professional Camcorder. Please read this manual thoroughly before using the camcorder to ensure safe and optimal performance.

სურათი 1.1: წინა view of the Panasonic HC-X1500 4K Professional Camcorder.
ძირითადი მახასიათებლები:
- 4K 60p ჩაწერა: Capable of high-quality 4K 60p video recording in a compact and lightweight body.
- 24x Optical Zoom & 25mm Wide-Angle Lens: Features a Leica Dicomar lens with a wide 25mm angle and powerful 24x optical zoom.
- 5-Axis Hybrid O.I.S.: Advanced Optical Image Stabilization for smooth footage.
- პროფესიონალური ფუნქციები: Includes manual rings, built-in ND filters, and 24-bit high-resolution linear PCM audio recording.
- 4:2:2 10-bit Internal Recording: Supports high-quality internal recording for professional workflows.
- Dual SD Card Slots: Allows for relay recording or simultaneous recording for backup.
- ჩამონტაჟებული Wi-Fi: Enables HD live streaming capabilities.
- 3.5-inch Touch Panel LCD: High-resolution display for monitoring and control.
2. დაყენება და მომზადება
2.1. Unpacking the Camcorder
Carefully unpack all components from the box. The standard package includes:
- Panasonic HC-X1500 Camcorder
- AC ადაპტერი
- AC კაბელი
- ბატარეა
- თვალის მიდამო
- ობიექტივი Hood
2.2. აკუმულატორის დატენვა და დაყენება
- Connect the AC adaptor to the camcorder's DC IN terminal and plug it into a power outlet.
- Insert the supplied battery into the battery slot on the rear of the camcorder until it clicks into place.
- The charge indicator will illuminate during charging. A full charge typically takes approximately 4 hours.

Figure 2.1: The camcorder's battery compartment, indicating the long battery life.
2.3. Inserting SD Cards
The HC-X1500 features dual SD card slots for flexible recording options.
- Open the SD card slot cover located on the side of the camcorder.
- Insert SDXC memory cards into Slot 1 and/or Slot 2 with the label facing the correct direction until they click into place.
- დახურეთ SD ბარათის სლოტის საფარი.

სურათი 2.2: ახლოდან view of the dual SD card slots (1 and 2) on the camcorder.
2.4. ლინზის დამცავის მიმაგრება
Attach the supplied lens hood to protect the lens and reduce flare.
- გაასწორეთ ლინზის დამცავი ლინზის ცილინდრის წინა მხარეს.
- Twist the lens hood clockwise until it locks securely into position.

Figure 2.3: The camcorder with its lens hood attached, providing protection and reducing glare.
3. ვიდეოკამერის მართვა
3.1. ჩართვა/გამორთვა
ვიდეოკამერის ჩასართავად, გადაწიეთ POWER ჩამრთველი ON პოზიციაზე. გამოსართავად, გადაწიეთ OFF პოზიციაზე.
3.2. Basic Controls and Ergonomics
The HC-X1500 is designed for comfortable handheld operation, with key controls easily accessible.
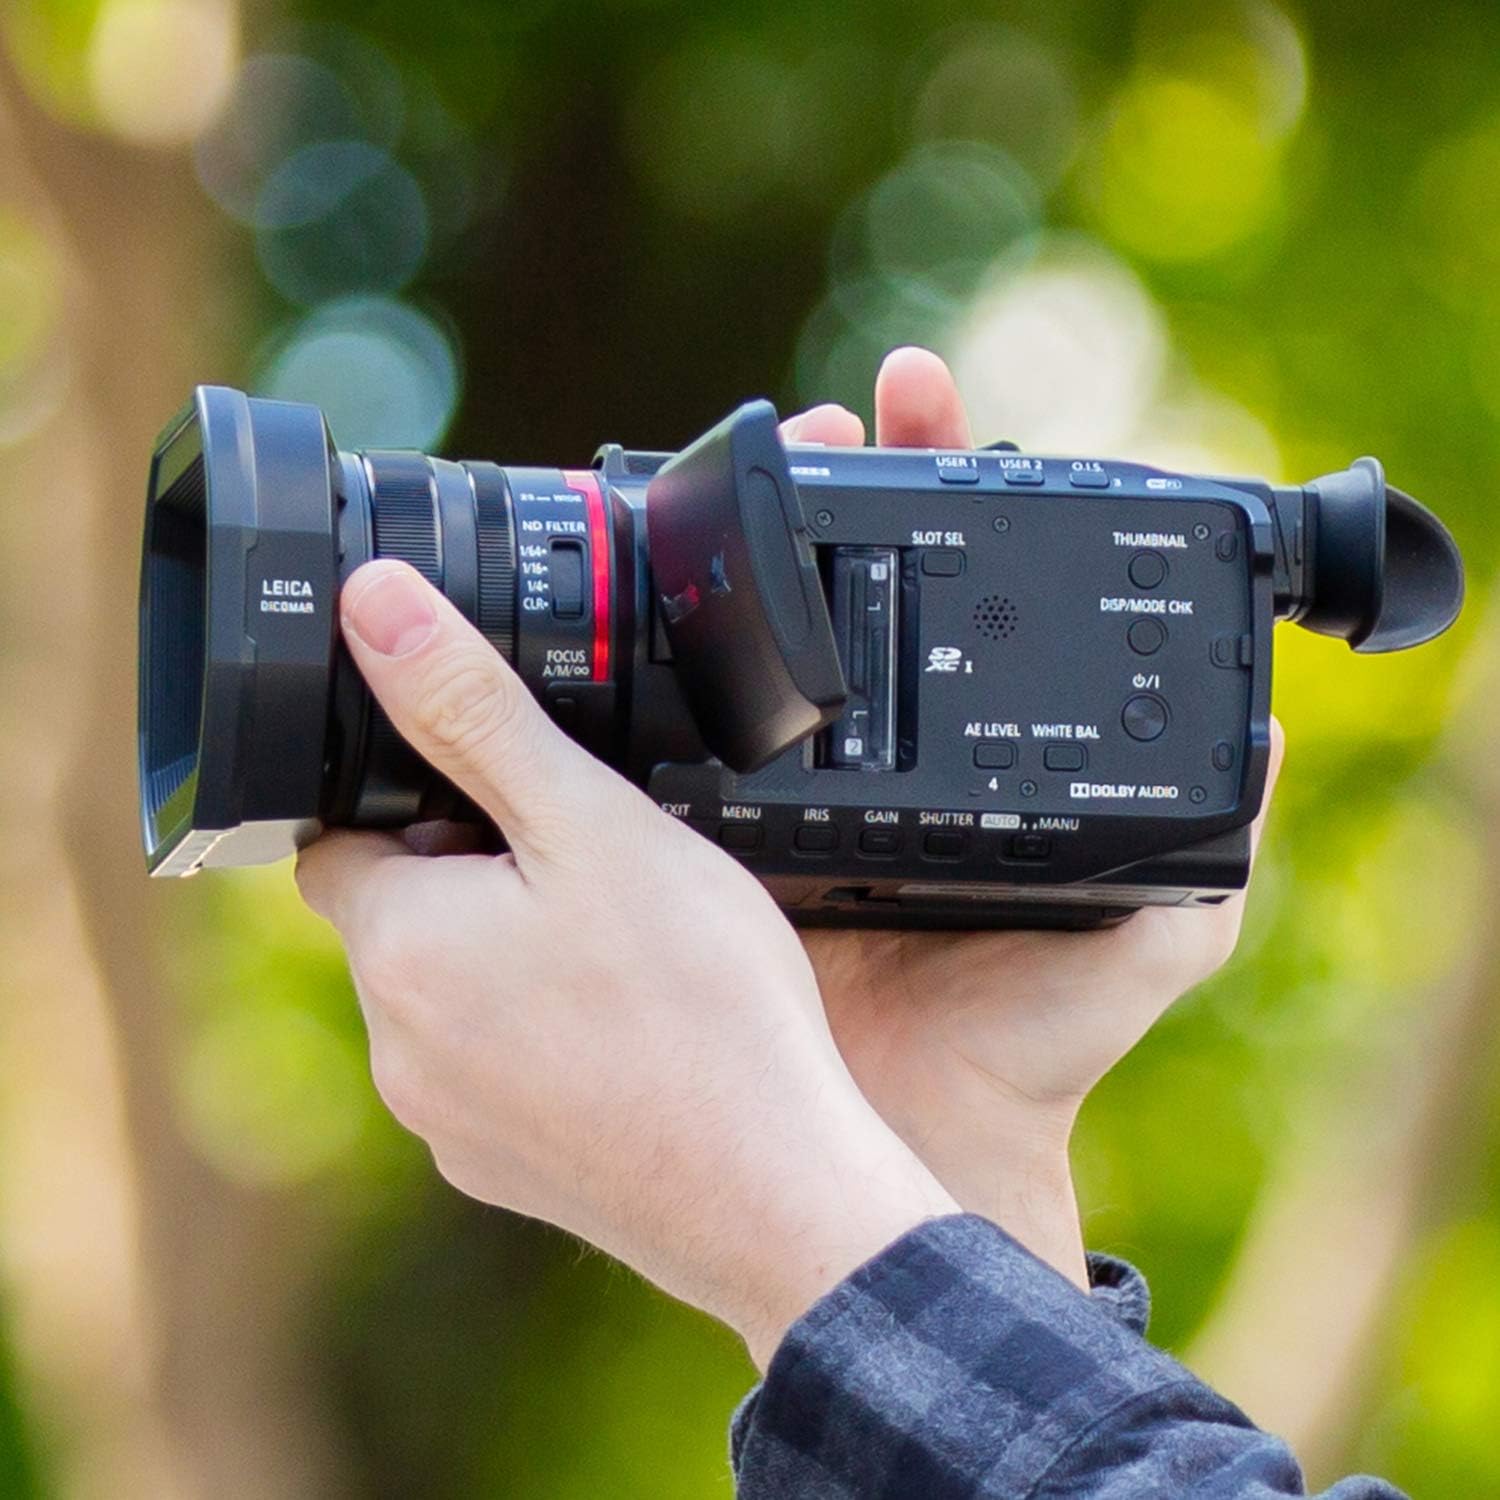
Figure 3.1: Demonstrates the compact size and ergonomic design of the camcorder when held.
Familiarize yourself with the main control layout:
- Manual Rings: Located on the lens barrel for precise control over focus, zoom, and iris.
- ND Filter Switch: Adjusts the built-in Neutral Density filters (1/4, 1/16, 1/64, Clear) to control exposure in bright conditions.
- მომხმარებლის ღილაკები: Customizable buttons (USER 1, USER 2) for quick access to frequently used functions.
- IRIS/GAIN/SHUTTER Dials: Dedicated controls for exposure settings.

სურათი 3.2: მხარე view highlighting the manual controls and dual SD card slots.
3.3. ვიდეოს ჩაწერა
To begin recording, press the REC START/STOP button. Press it again to stop recording.
3.3.1. 4K Recording and Codecs
The HC-X1500 supports 4K (UHD) recording at various frame rates, including 60p. It also supports 4:2:2 10-bit internal recording for enhanced color depth and grading flexibility.

Figure 3.3: Visual explanation of 4:2:2 color subsampling and 10-bit color depth, illustrating improved color information.
The camcorder utilizes an efficient heat-dispersing design to enable stable 4K 60p recording.
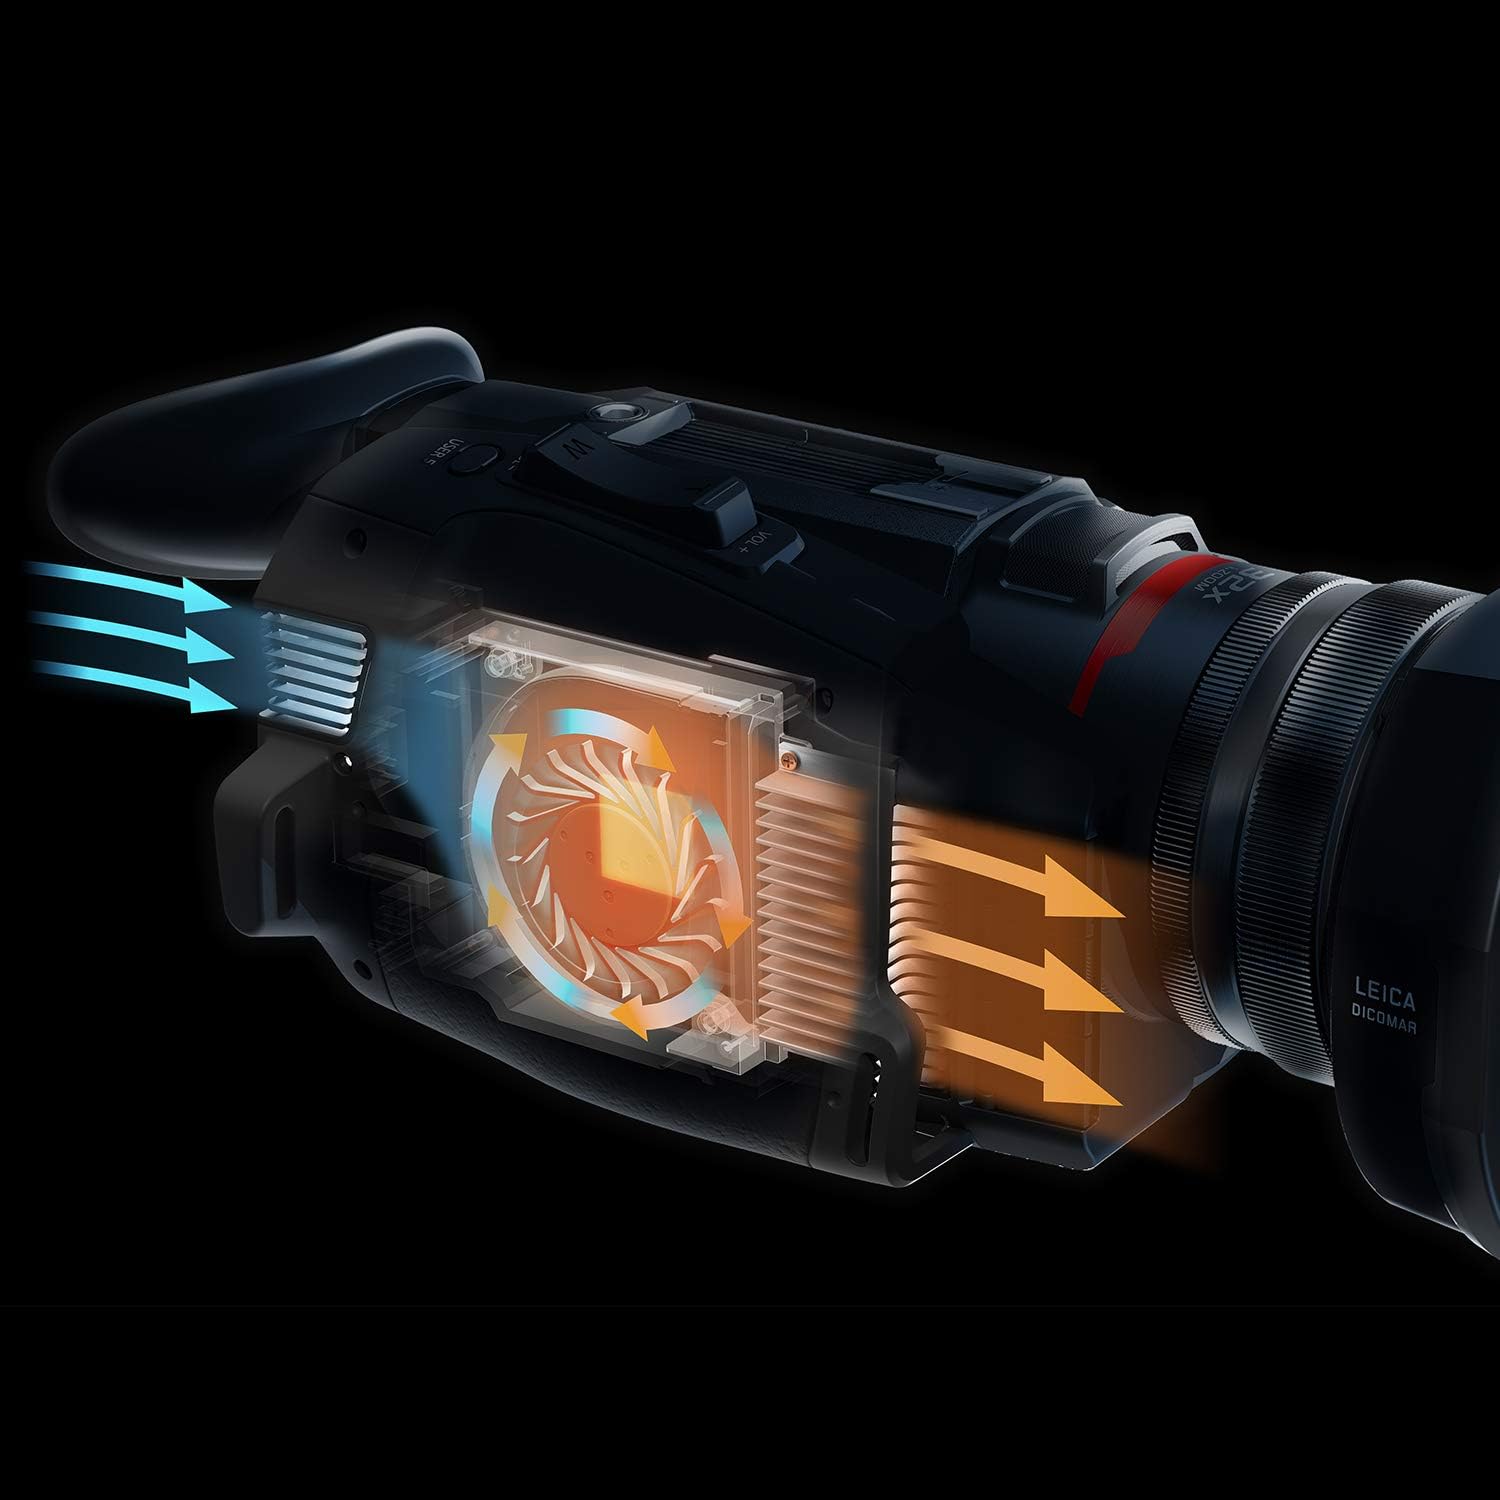
Figure 3.4: Internal diagram illustrating the heat-dispersing design for sustained performance.
3.3.2. Zoom and Focus
The camcorder features a 24x optical zoom Leica Dicomar lens, providing a wide-angle 25mm equivalent at its widest setting.

სურათი 3.5: წინა view of the Leica Dicomar lens, highlighting its 24x optical zoom and 25mm wide-angle capabilities.
Use the zoom rocker on the top handle or the manual zoom ring on the lens for adjusting focal length. The focus can be set to auto or manual using the A/M/OO switch on the lens barrel.
3.3.3. Image Stabilization (O.I.S.)
The 5-Axis Hybrid O.I.S. system helps to suppress blurring in various shooting conditions. Activate or deactivate O.I.S. using the dedicated button or menu setting.
3.3.4. ჩვენება და Viewმპოვნელი
The camcorder is equipped with a 3.5-inch electrostatic touch panel LCD monitor and an up/down tiltable viewfinder (LVF).

Figure 3.6: Close-up of the tiltable electronic viewfinder (EVF) for comfortable viewინგ.
3.4. Wi-Fi and Live Streaming
The built-in Wi-Fi functionality allows for HD live streaming. Refer to the detailed user manual (PDF) for instructions on connecting to a Wi-Fi network and setting up live streams.
4. მოვლა და მოვლა
სათანადო მოვლა უზრუნველყოფს თქვენი ვიდეოკამერის ხანგრძლივობას და ოპტიმალურ მუშაობას.
- ლინზების გაწმენდა: გამოიყენეთ რბილი, ბუსუსების გარეშე ქსოვილი, რომელიც სპეციალურად ოპტიკური ლინზებისთვისაა შექმნილი. მოერიდეთ ლინზის ზედაპირს თითებით შეხებას.
- სხეულის გაწმენდა: გაწმინდეთ ვიდეოკამერის კორპუსი რბილი, მშრალი ქსოვილით. ჯიუტი ჭუჭყის შემთხვევაში, გამოიყენეთ ქსოვილი მსუბუქად.ampened with water and then dry thoroughly. Do not use strong detergents or solvents.
- შენახვა: When not in use for extended periods, remove the battery and store the camcorder in a cool, dry place away from direct sunlight and extreme temperatures.
- ბატარეის მოვლა: Fully charge the battery before long-term storage and recharge it every six months to maintain its capacity.
5. Დიაგნოსტიკა
This section addresses common issues you might encounter. For more detailed troubleshooting, refer to the full user manual (PDF).
5.1. გამოსახულების ხარისხის პრობლემები
- Grainy or Noisy Footage in Low Light:
The camcorder's small sensor can produce noise in very low light conditions. Try to increase ambient light, use the built-in LED video light (if available on your model), or adjust gain settings carefully. Keep gain as low as possible (ideally below 6dB) to minimize noise.
- Overexposed or Underexposed Footage:
Adjust the ND filter, iris, shutter speed, or gain settings. Ensure the correct exposure mode (Auto/Manual) is selected for your shooting environment.
- ბუნდოვანი სურათები:
Check focus settings (auto/manual). Ensure the O.I.S. is active for handheld shooting. If using a tripod, ensure the tripod is stable and O.I.S. is set appropriately (some O.I.S. systems can cause issues on very stable tripods).
5.2. აუდიო საკითხები
- Noise in Recorded Audio (External Mic):
Ensure the external microphone is properly connected and its gain settings are appropriate. If using the 1/8" jack, some users have reported noise; consider using the XLR inputs on the detachable handle (if applicable) or an external audio recorder for critical audio.
- No Audio Recording:
Check audio input settings in the menu. Ensure microphone is connected and powered (if required). Verify audio levels are not muted.
5.3. დაკავშირების პრობლემები
- Wi-Fi კავშირის პრობლემები:
Ensure the camcorder is within range of the Wi-Fi access point. Check Wi-Fi settings on both the camcorder and the connecting device. Restart both devices if necessary.
- File Transfer Issues (USB):
Ensure the correct USB cable (micro USB) is used and the camcorder is set to "Card Reader Mode" in the menu (MENU > OTHER > USB DEVICE > CARD READER MODE).
6. სპეციფიკაციები
Below are the key specifications for the Panasonic HC-X1500 Camcorder:
| ფუნქცია | სპეციფიკაცია |
|---|---|
| ბრენდი | Panasonic |
| მოდელის ნომერი | HC-X1500 |
| პროდუქტის ზომები | 12.79 x 11.1 x 8.46 ინჩი |
| ნივთის წონა | 5.1 ფუნტი |
| ბატარეები | საჭიროა 1 ლითიუმ-იონის ბატარეა (შედის) |
| ფოტო სენსორის ტექნოლოგია | CMOS |
| ვიდეო გადაღების გარჩევადობა | 4K |
| მაქსიმალური ფოკუსური სიგრძე | 98.9 მილიმეტრი |
| მაქსიმალური დიაფრაგმა | 1.8 ვ |
| Flash მეხსიერების ტიპი | SD |
| ვიდეო გადაღების ფორმატი | MOV |
| მხარდაჭერილი აუდიო ფორმატი | ხაზოვანი PCM |
| ეკრანის ზომა | 3.5 ინჩი |
| დაკავშირების ტექნოლოგია | Wi-Fi |
| წარმოშობის ქვეყანა | მალაიზია |
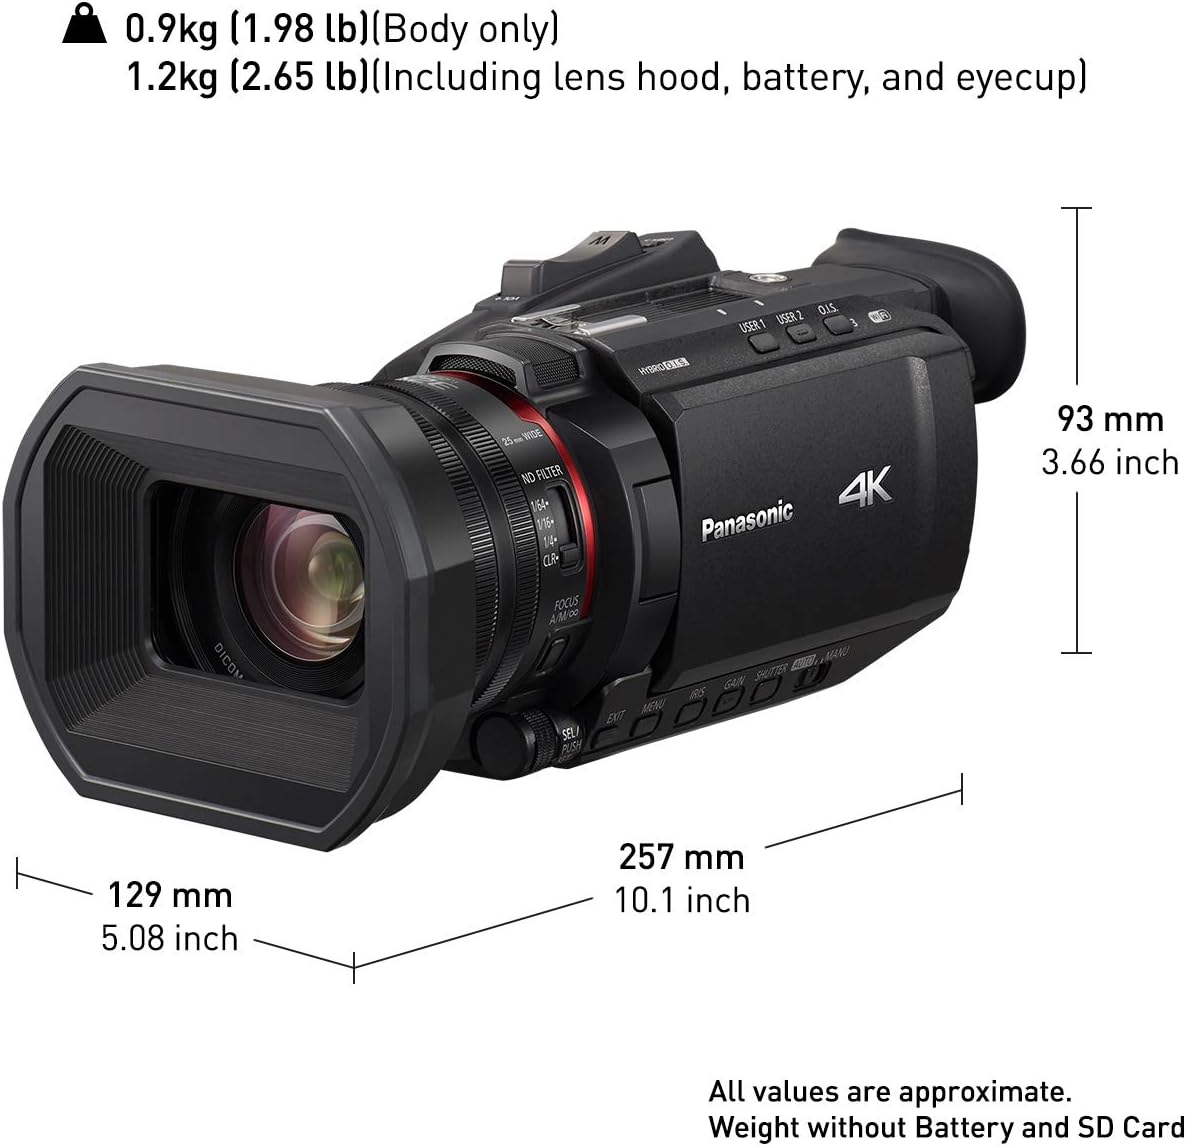
Figure 6.1: Physical dimensions of the Panasonic HC-X1500 camcorder.
7. გარანტია და მხარდაჭერა
დეტალური ინფორმაციისთვის გარანტიის შესახებ, გთხოვთ, იხილოთ თქვენს პროდუქტთან ერთად მოწოდებული გარანტიის ბარათი ან ეწვიეთ Panasonic-ის ოფიციალურ ვებსაიტს. webსაიტი.
A comprehensive User Manual in PDF format is available for download, providing more in-depth information on advanced features, settings, and troubleshooting. You can access it via the following link:
ჩამოტვირთეთ სრული მომხმარებლის სახელმძღვანელო (PDF)
For technical support or service inquiries, please contact Panasonic customer service.
Ask a question about this manual
Ask about setup, troubleshooting, compatibility, parts, safety, or missing instructions. Manuals+ will review the question and use this page’s manual context to help answer it.