შესავალი
This manual provides detailed instructions for the installation, operation, maintenance, and troubleshooting of the HP ProDesk 400 G3 MS-7957 motherboard. Please read this manual thoroughly before proceeding with any installation or operation to ensure proper functionality and safety.
უსაფრთხოების ინფორმაცია
დედაპლატის დაზიანების ან საკუთარი თავის დაზიანების თავიდან ასაცილებლად, ყოველთვის დაიცავით შემდეგი უსაფრთხოების ზომები:
- ნებისმიერი კომპონენტის დამონტაჟებამდე ან ამოღებამდე გამორთეთ დენის წყარო კედლის როზეტიდან.
- Wear an anti-static wrist strap or frequently touch a grounded metal object to discharge static electricity before handling the motherboard.
- დედა დაფა კიდეებით მოეჭიდეთ, რათა თავიდან აიცილოთ მგრძნობიარე კომპონენტებთან შეხება.
- კომპიუტერის კორპუსში გადახურების თავიდან ასაცილებლად, უზრუნველყავით სათანადო ვენტილაცია.
- დედა დაფა მოარიდეთ ტენიანობას და ექსტრემალურ ტემპერატურას.
პროდუქტი დასრულდაview
The HP ProDesk 400 G3 MS-7957 is a MicroATX motherboard designed for Intel processors with an LGA 1151 socket. It supports DDR4 RAM and features a B250 chipset, offering a reliable foundation for desktop computing.
ძირითადი მახასიათებლები
- Compatible CPU Brand: ინტელი
- სოკეტის ტიპი: LGA 1151/Socket H4
- ფორმის ფაქტორი: MicroATX
- I/O კონექტორები: Ethernet (RJ-45), USB 2.0, USB 3.0, VGA, DisplayPort, HD Audio Jack
კომპონენტის იდენტიფიკაცია
Familiarize yourself with the layout of the motherboard to facilitate proper installation and connection of components.

სურათი 1: დახრილი view of the HP ProDesk 400 G3 MS-7957 motherboard. This image highlights the CPU socket (LGA 1151), four DDR4 RAM slots, PCIe slots, and various headers for front panel connections and storage devices.
დაყენება და ინსტალაცია
სანამ დაიწყებ
- Ensure your computer case is compatible with the MicroATX form factor.
- Gather all necessary components: CPU, RAM, CPU cooler, power supply, storage devices, and graphics card (if not using integrated graphics).
- Prepare your workspace by ensuring it is clean, well-lit, and static-free.
დედაპლატის მონტაჟი
- Install the CPU into the LGA 1151 socket. Carefully align the CPU with the socket's notch and gently lower it into place. Close the retention arm.
- წაუსვით თერმოპასტა პროცესორს და დააინსტალირეთ გამაგრილებელი მწარმოებლის ინსტრუქციის შესაბამისად.
- Install the DDR4 RAM modules into the designated slots. Ensure they are fully seated until the clips lock into place.
- Mount the motherboard into the computer case using the appropriate standoffs and screws.
- დედაპლატას შეაერთეთ კვების ბლოკის მთავარი 24-პინიანი ATX კვების კონექტორი და 4-პინიანი ან 8-პინიანი CPU-ს კვების კონექტორი.
- Install any expansion cards (e.g., graphics card) into the PCIe slots.

სურათი 2: ზემოდან ქვემოთ დახრილი view of the HP ProDesk 400 G3 MS-7957 motherboard. This perspective provides a clear view of the processor socket, memory slots, and the layout of the various internal connectors and components.
პერიფერიული მოწყობილობების დაკავშირება
- Connect SATA storage devices (HDDs/SSDs) to the SATA ports on the motherboard.
- Connect front panel headers (power button, reset button, USB ports, audio jacks) to their respective pins on the motherboard. Refer to your case manual for specific pin assignments.
- Connect external peripherals such as monitor, keyboard, mouse, and Ethernet cable to the rear I/O panel.
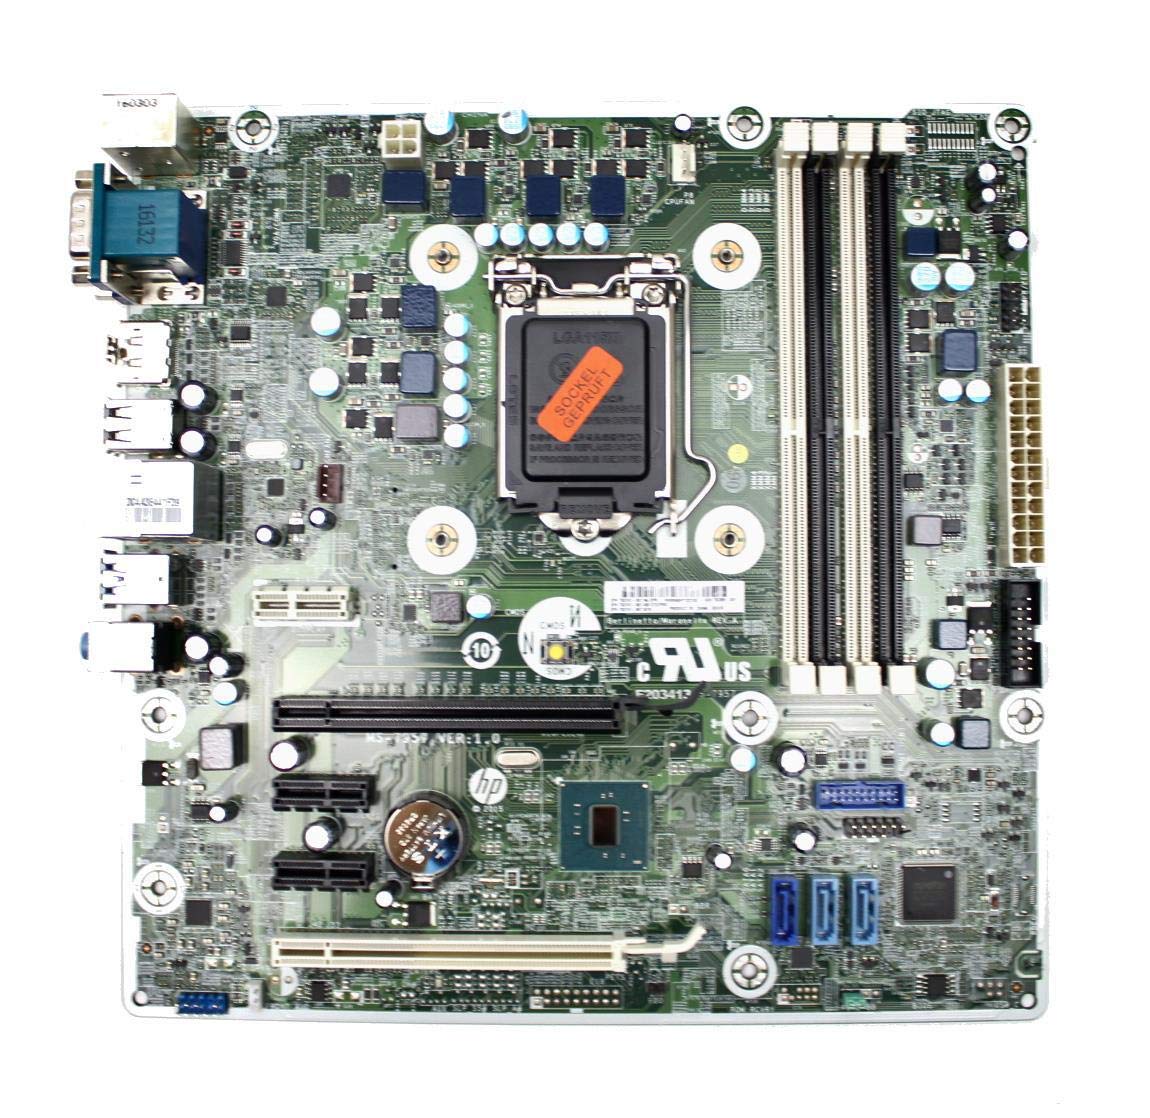
Figure 3: Rear I/O panel of the HP ProDesk 400 G3 MS-7957 motherboard. This image displays the available external connectivity options, including PS/2 ports, serial port, VGA, DisplayPort, USB 2.0, USB 3.0, Ethernet (RJ-45), and HD audio jacks.
ოპერაციული ინსტრუქციები
საწყისი ჩართვა
After all components are installed and connected, connect the power cable to the power supply and press the power button on your computer case. The system should initiate the boot process.
BIOS/UEFI კონფიგურაცია
BIOS/UEFI დაყენების პროგრამაზე წვდომისთვის დააჭირეთ შესაბამის ღილაკს (ხშირად დელ, F2, F10, ან F12) during the initial boot sequence. Here you can configure boot order, system time, and other hardware settings.
დრაივერის ინსტალაცია
After installing your operating system, it is crucial to install the latest drivers for your motherboard's chipset, integrated graphics, audio, and network adapter. These drivers can typically be found on the HP support webსაიტი ან ჩიპსეტის მწარმოებლის webსაიტი.
მოვლა
- დასუფთავება: რეგულარულად გაწმინდეთ დედაპლატა და კომპონენტები მტვერიდან შეკუმშული ჰაერის გამოყენებით. გაწმენდამდე დარწმუნდით, რომ სისტემა გამორთულია და დენის წყაროდან გამორთულია.
- BIOS/UEFI განახლებები: Periodically check for BIOS/UEFI updates from HP's official support website. Updates can improve stability, compatibility, and performance. Follow update instructions carefully to avoid system damage.
- დრაივერის განახლებები: Keep all system drivers updated to ensure optimal performance and compatibility with new software and hardware.
პრობლემების მოგვარება
ეს განყოფილება გთავაზობთ გადაწყვეტილებებს იმ გავრცელებული პრობლემებისთვის, რომლებიც შეიძლება შეგხვდეთ:
- ძალა არ არის: Check all power connections, including the 24-pin ATX and CPU power cables. Ensure the power supply is switched on and the wall outlet is functional.
- ჩვენების გარეშე: Verify that your monitor is connected to the correct video output (VGA or DisplayPort) and is powered on. Reseat the graphics card (if applicable) and RAM modules.
- სისტემის არასტაბილურობა/გაჭედვა: This could be due to overheating, faulty RAM, or outdated drivers. Check CPU and GPU temperatures, run memory diagnostic tools, and update drivers.
- პერიფერიული მოწყობილობა არ არის გამოვლენილი: Ensure the peripheral is properly connected. Try a different port or update the relevant drivers.
- BIOS/UEFI-ს პრობლემები: If you encounter issues after changing BIOS settings, try resetting the CMOS by removing the CMOS battery for a few minutes or using the clear CMOS jumper (refer to motherboard diagram for location).
სპეციფიკაციები
| ფუნქცია | სპეციფიკაცია |
|---|---|
| ბრენდი | HP |
| CPU სოკეტი | LGA 1151 |
| თავსებადი მოწყობილობები | დესკტოპ კომპიუტერი |
| ოპერატიული მეხსიერება ტექნოლოგია | DDR4 |
| თავსებადი პროცესორები | Intel Core i3-6xxx, Intel Core i5-6xxx, Intel Core i7-6xxx, Intel Core i3-7xxx, Intel Core i5-7xxx, Intel Core i7-7xxx, Intel Core i3-8xxx, Intel Core i5-8xxx, Intel Core i7-8xxx |
| ჩიპსეტის ტიპი | Intel B250 |
| პლატფორმა | ფანჯრები |
| მოდელის სახელი | MS-7957 |
| CPU მოდელი | Core i3 (Note: Supports i3, i5, i7 as listed above) |
| ძირითადი დენის კონექტორის ტიპი | 24 პინი |
| გრაფიკული ბარათის ინტერფეისი | PCI Express |
| ხელმისაწვდომი მეხსიერების სლოტები | 4 |
| SATA პორტების ჯამური რაოდენობა | 6 |
| სულ USB პორტები | 2 (Note: Refers to internal headers, rear I/O has more) |
| Ethernet პორტების საერთო რაოდენობა | 1 |
| Total PCIe Ports | 3 |
| მწარმოებელი | Computer Store Berlin (Reseller/Supplier) |
| ნაწილის ნომერი | 4061435962741 |
| ASIN | B08CS13PTQ |
გარანტია და მხარდაჭერა
ამ პროდუქტს მოყვება ა 1 წლიანი გარანტია შეძენის დღიდან. ეს გარანტია მოიცავს დეფექტებს მასალასა და სამუშაოზე ნორმალური გამოყენებისას.
For technical support, warranty claims, or further assistance, please contact your point of purchase or refer to the official HP support resources for the ProDesk 400 G3 series.