შესავალი
Thank you for choosing the Generic FWC556C Atomic Weather Clock. This device provides accurate time synchronized with the WWVB radio signal, displays indoor and outdoor temperatures, and offers a 12-hour weather forecast. Please read this manual thoroughly to ensure proper setup and operation of your new weather clock.
პროდუქტის მახასიათებლები
- ატომური დროის სინქრონიზაცია: Automatically receives WWVB radio signals for precise time and date, including automatic Daylight Saving Time (DST) adjustments.
- დიდი LCD ეკრანი: Features a 14.6-inch display with 4.05-inch tall time digits for easy readability.
- შიდა და გარე ტემპერატურა: Monitors temperatures in both Celsius and Fahrenheit using a built-in sensor and a wireless outdoor sensor.
- 12-Hour Weather Forecast: Provides an accurate forecast based on barometric pressure trends, including frost alerts.
- მაღვიძარას ფუნქცია: Includes an alarm with a selectable 1 to 30-minute snooze feature.
- მრავალი დროის ზონა: Selectable PST, MST, CST, EST time zones.
- კალენდრის ჩვენება: Shows day, month, and week.
- ბატარეით მუშაობს: Main unit and wireless sensor are battery-powered for flexible placement.
- Wireless Sensor Range: Outdoor sensor transmits data up to 200 feet (60 meters) with an IPX4 splash-proof rating.

სურათი: მეტიview of the multifunctional atomic weather clock display, highlighting atomic time, weather forecast, temperature, battery power, alarm, time zones, calendar, and DST.

Image: Visual representation of the clock's various functions including atomic time, alarm, calendar, weather forecast, indoor/outdoor temperature, Celsius/Fahrenheit, battery power, 12/24H format, and 4 time zones.
პაკეტის შიგთავსი
- 1 x Atomic Weather Clock (Main Unit)
- 1 x უსადენო გარე სენსორი
- 1 x მომხმარებლის სახელმძღვანელო (ეს დოკუმენტი)
Note: Batteries are not included. The main unit requires 4 AA batteries, and the wireless sensor requires 2 AAA batteries.
დაყენება
1. ბატარეის მონტაჟი
- ძირითადი განყოფილება: Open the battery compartment on the back of the atomic weather clock. Insert 4 new AA batteries, observing the correct polarity (+/-). Close the compartment.
- უკაბელო გარე სენსორი: Open the battery compartment on the back of the wireless sensor. Insert 2 new AAA batteries, observing the correct polarity (+/-). Close the compartment.
The clock will power on and begin searching for the WWVB atomic time signal and the outdoor sensor signal.

Image: Diagram showing the battery compartments for the main clock unit (4xAA batteries) and the wireless outdoor sensor (2xAAA batteries).
2. Initial Synchronization and Time Zone Setting
- After battery installation, the clock will automatically attempt to receive the WWVB atomic time signal. This process may take several minutes to several hours, depending on your location and atmospheric conditions.
- During the initial setup, place the main unit near a window or in an open area for better signal reception.
- Once the atomic time signal is received, the clock will display the correct time and date.
- To set your time zone (PST, MST, CST, EST), refer to the operating instructions section for specific button presses.

Image: Illustration showing the atomic clock receiving WWVB radio signals from Colorado, ensuring accurate time, and demonstrating automatic Daylight Saving Time adjustments (Spring Forward and Fall Back).
3. Wireless Outdoor Sensor Placement
- Place the outdoor sensor and the main clock unit together for approximately 15 minutes to establish a strong initial connection.
- After pairing, place the outdoor sensor in a shaded outdoor area, away from direct sunlight and rain. This ensures accurate temperature readings and protects the sensor from harsh weather.
- Ensure the sensor is within the 200-foot (60-meter) transmission range of the main unit. Obstacles like thick walls or metal structures can reduce the effective range.
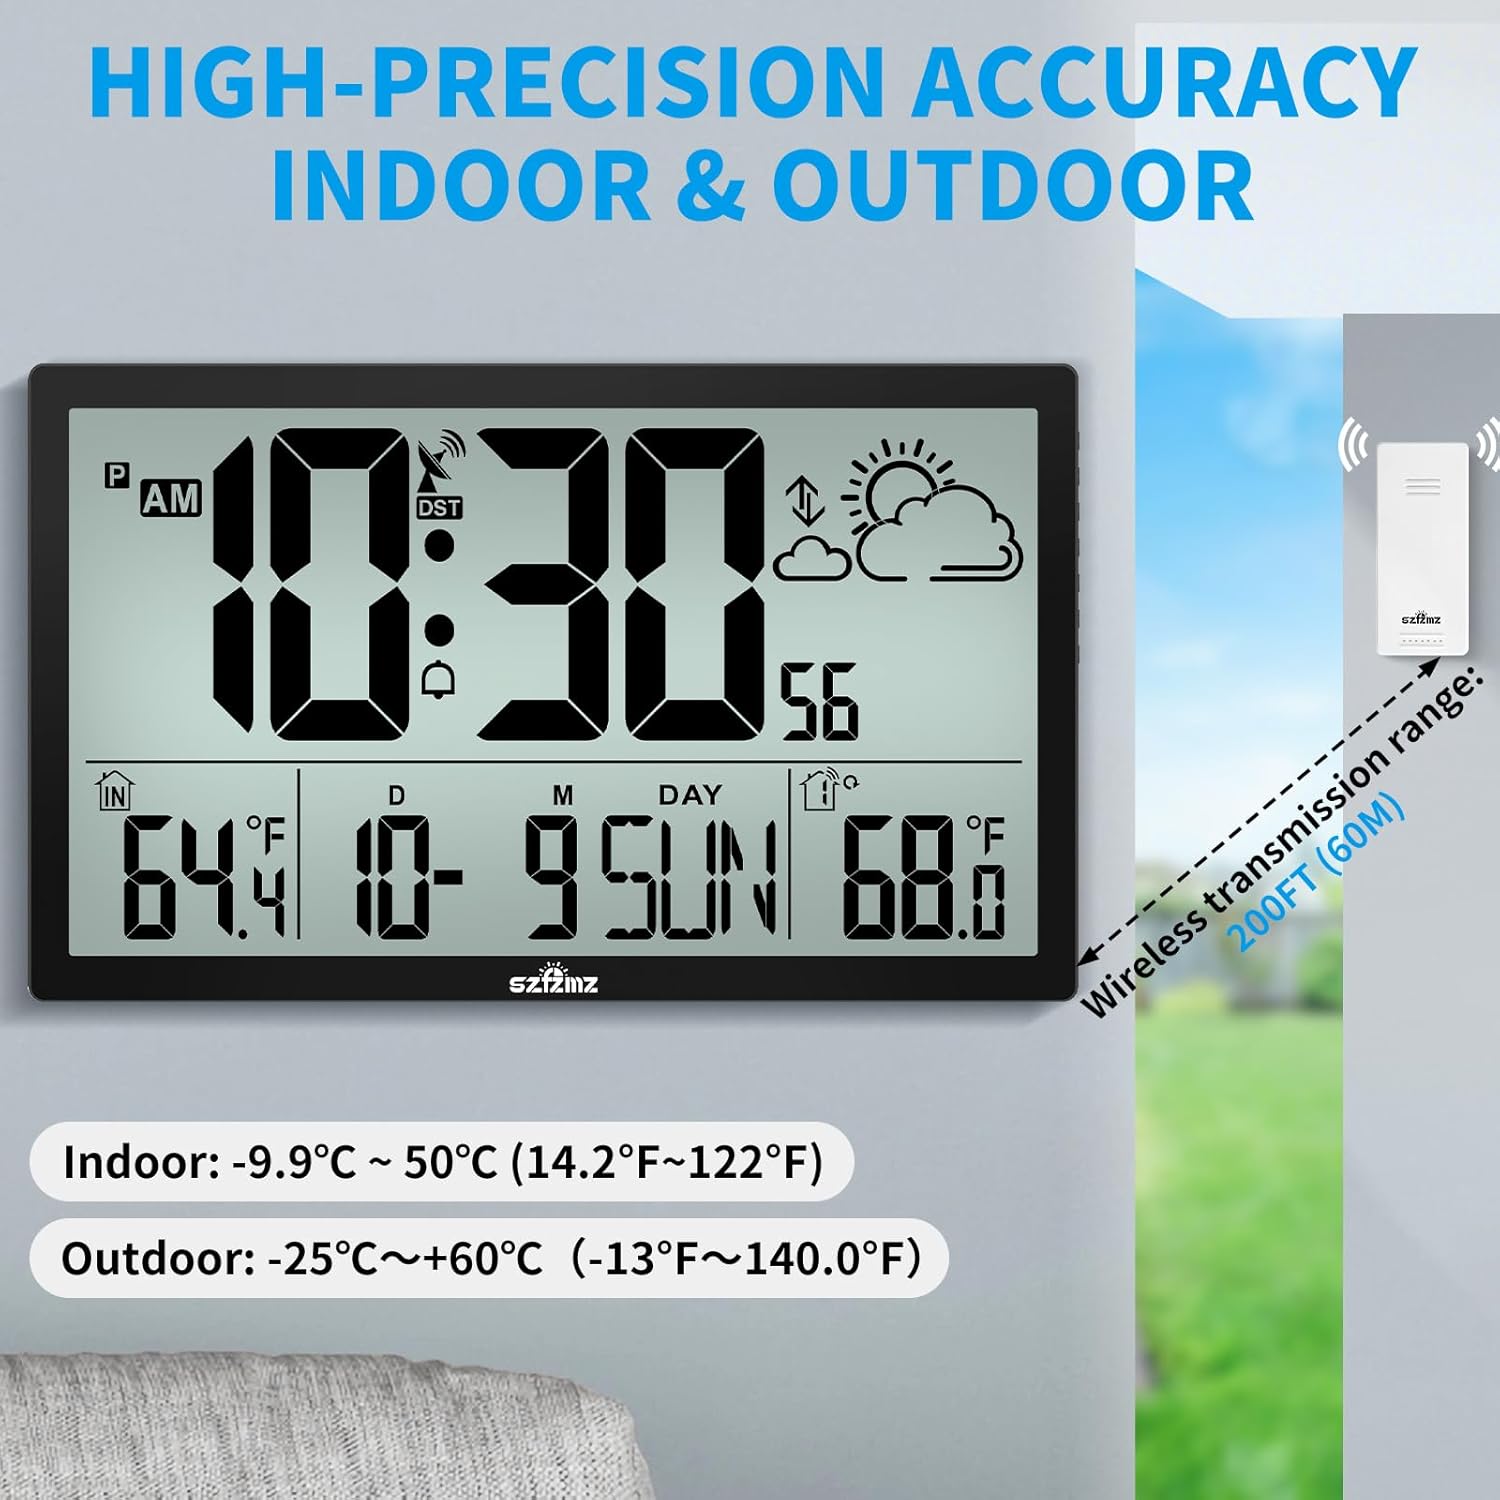
Image: The main clock display showing indoor and outdoor temperatures, with an arrow indicating the wireless transmission range of 200 feet (60 meters) from the outdoor sensor.

Image: Instructions for placing the outdoor sensor and wall clock together for 15 minutes to establish connection, then placing the sensor in a shaded outdoor area.
4. ინსტალაციის მეთოდები
- დესკტოპის განთავსება: Use the integrated bracket on the back of the clock to stand it upright on any flat surface.
- კედელზე მონტაჟი: Utilize the three hanging holes on the back of the clock to securely mount it on a wall using appropriate screws (not included).

Image: Depicts the two installation methods for the clock: standing on a desk using its built-in stand and mounted on a wall.
ოპერაციული ინსტრუქციები
1. დროისა და თარიღის ჩვენება
- The large digits display the current time.
- The date (month/day) and day of the week are shown below the time.
- 12/24 საათის ფორმატი: Press the '12/24H' button (location may vary, typically on the back or side) to switch between 12-hour (with AM/PM indicator) and 24-hour (military time) formats.

Image: Demonstrates the ability to switch between standard 12-hour (AM/PM) and 24-hour (military) time formats on the clock display.
2. ტემპერატურის ჩვენება
- The display shows both indoor ('IN') and outdoor ('OUT') temperatures.
- ცელსიუსი/ფარენჰაიტი: Press the '°C/°F' button (location may vary) to toggle between Celsius and Fahrenheit temperature units.
3. ამინდის პროგნოზი
- The weather forecast icon (e.g., sunny, cloudy, rainy, snowy) indicates the predicted weather for the next 8 hours.
- An ice alert symbol will appear and flash if the outdoor temperature is between 1.0°C to +2.9°C (30.2°F to 37.3°F).

Image: The clock display showing the weather forecast icon, indicating the predicted weather for the next 8 hours, along with various weather condition icons (sunny, slightly cloudy, cloudy, rainy, heavy rainy, snowy).
4. Alarm Clock and Snooze
- განგაშის დაყენება: Refer to the specific buttons on your device (usually 'ALARM' or 'SET') to enter alarm setting mode. Adjust the hour and minute using the '+' and '-' buttons.
- სიგნალიზაციის ჩართვა/გამორთვა: Press the 'ALARM' button to turn the alarm on or off. An alarm icon will appear on the display when active.
- ფუნქციის გადადება: When the alarm sounds, press the 'SNOOZE' button (often a large button on top) to temporarily silence it. The alarm will sound again after the set snooze duration (1-30 minutes, configurable).
- The alarm sound gradually increases in volume.

Image: A person sleeping while the atomic clock displays an alarm icon and sound waves indicating the alarm is getting louder, highlighting the alarm and snooze features.
5. ზაფხულის დრო (DST)
- The clock automatically adjusts for DST based on the WWVB signal.
- You can manually enable or disable the DST function if needed, typically by pressing a dedicated 'DST' button or through the settings menu. Ensure your time zone is correctly set for proper DST operation.

Image: Illustrates the automatic DST update feature with 'Spring Forward' (+1h) and 'Fall Back' (-1h) clock diagrams, emphasizing the ON/OFF option for DST.
მოვლა
- დასუფთავება: Wipe the clock and sensor with a soft, dry cloth. Do not use abrasive cleaners or solvents.
- ბატარეის გამოცვლა: Replace batteries in both the main unit and the outdoor sensor when the low battery indicator appears on the display. Always replace all batteries at the same time with new ones.
- სენსორის მოვლა: Ensure the outdoor sensor remains in a shaded, protected location to prolong its lifespan and maintain accuracy.

Image: Highlights the battery-powered nature of the clock and sensor, indicating extra-long battery use (12 months) and the presence of a low battery indicator on the display.
პრობლემების მოგვარება
| პრობლემა | შესაძლო მიზეზი | გამოსავალი |
|---|---|---|
| Clock not receiving atomic time signal (WWVB icon not solid) | Weak signal due to location, interference, or atmospheric conditions. | Move the clock closer to a window or to a different location. Ensure it is away from electronic devices that may cause interference. Allow up to 24 hours for synchronization. |
| გარე ტემპერატურა არ არის ნაჩვენები ან არასწორია | Sensor out of range, low sensor batteries, interference, or sensor exposed to direct sunlight/rain. | Ensure sensor is within 200ft of the main unit. Replace sensor batteries. Relocate sensor to a shaded, protected area. Re-pair the sensor by removing batteries from both units, then reinserting them into the sensor first, then the main unit. |
| არასწორი დრო ან თარიღი | Atomic signal not received, incorrect time zone set, or DST setting incorrect. | Verify atomic signal reception. Check and adjust the time zone setting. Ensure DST is set correctly (ON/OFF) for your region. |
| ეკრანი ბუნდოვანი ან ცარიელია | Low main unit batteries. | Replace all 4 AA batteries in the main unit with new ones. |
სპეციფიკაციები
- მოდელი: FWC556C
- ჩვენების ტიპი: ციფრული LCD
- პროდუქტის ზომები: 14.6" სიგანე x 8.9" სიმაღლე
- ძირითადი ერთეულის სიმძლავრე: 4 x AA ბატარეები (არ შედის)
- გარე სენსორის სიმძლავრე: 2 x AAA ბატარეები (არ შედის)
- შიდა ტემპერატურის დიაპაზონი: -9.9 ° C 50 ° C (14.2 ° F ~ 122 ° F)
- გარე ტემპერატურის დიაპაზონი: -25°C ~ +60°C (-13°F ~ 140.0°F)
- უსადენო გადაცემის დიაპაზონი: ღია ცის ქვეშ 60 მეტრამდე (200 ფუტამდე)
- Outdoor Sensor Water Resistance: IPX4 (დაფრქვევის საწინააღმდეგო)
- მასალა: პლასტიკური
- სამონტაჟო პარამეტრები: Wall mount or desktop stand

Image: The atomic clock display with key dimensions highlighted, showing its overall width of 14.6 inches and height of 8.9 inches, and the height of the time digits at 4.05 inches.
გარანტია და მხარდაჭერა
Specific warranty information for the Generic FWC556C Atomic Weather Clock is not provided in this manual. For warranty details, technical support, or any questions regarding your product, please contact the seller or manufacturer directly through your purchase platform.