შესავალი
Welcome to your Olvy 6-in-1 Electric Egg Cooker. This versatile appliance is designed to simplify your meal preparation, allowing you to cook a variety of egg dishes with ease. From perfectly boiled eggs to delicious omelettes and poached eggs, this cooker features an intuitive LCD timer and automatic shut-off for convenience and safety. Please read this manual thoroughly before first use to ensure proper operation and maintenance.
უსაფრთხოების მნიშვნელოვანი ინსტრუქციები
ელექტრო მოწყობილობების გამოყენებისას ყოველთვის უნდა დაიცვან უსაფრთხოების ძირითადი ზომები, რათა შემცირდეს ხანძრის, ელექტროშოკის და/ან ადამიანების დაზიანების რისკი, მათ შორის:
- წაიკითხეთ ყველა ინსტრუქცია მოწყობილობის მუშაობის დაწყებამდე.
- არ შეეხოთ ცხელ ზედაპირებს. გამოიყენეთ სახელურები ან სახელურები.
- To protect against electric shock, do not immerse the base unit, cord, or plug in water or other liquids.
- მჭიდრო მეთვალყურეობა აუცილებელია, როდესაც რომელიმე მოწყობილობას იყენებენ ბავშვები ან მის მახლობლად.
- გამორთეთ განყოფილებიდან, როდესაც არ იყენებთ და გაწმენდის წინ. ნაწილების ჩადებამდე ან ამოღებამდე დატოვეთ გაციება.
- არ გამოიყენოთ მოწყობილობა დაზიანებული სადენით ან შტეფსელით, ან მას შემდეგ, რაც მოწყობილობა გაუმართავია ან რაიმე ფორმით დაზიანებულია.
- მოწყობილობის მწარმოებლის მიერ არ არის რეკომენდებული აქსესუარების გამოყენებამ შეიძლება გამოიწვიოს დაზიანებები.
- არ გამოიყენოთ გარეთ.
- არ დაუშვათ კაბელი მაგიდის ან დახლის კიდეზე ჩამოკიდებას ან ცხელ ზედაპირებს შეეხოთ.
- არ მოათავსოთ ცხელ გაზზე ან ელექტრო სანთურზე ან გახურებულ ღუმელში ან ახლოს.
- განსაკუთრებული სიფრთხილე უნდა იქნას გამოყენებული ცხელი ზეთის ან სხვა ცხელი სითხის შემცველი მოწყობილობის გადაადგილებისას.
- ყოველთვის ჯერ შტეფსელი შეაერთეთ მოწყობილობაზე, შემდეგ კი კაბელი კედლის როზეტში. გათიშვისთვის, გადართეთ ნებისმიერი ღილაკი „გამორთულზე“ და შემდეგ ამოიღეთ შტეფსელი კედლის როზეტიდან.
- არ გამოიყენოთ მოწყობილობა სხვა დანიშნულებისამებრ.
პროდუქტი დასრულდაview
Familiarize yourself with the components of your Olvy Electric Egg Cooker:
- Base Unit with Heating Plate: The main body of the cooker where water is heated.
- კვერცხის თარო: მოხარშვისთვის 6 კვერცხამდე იტევს.
- ბრაკონიერობის უჯრა: Used for poaching eggs.
- Omelette Tray: Used for cooking omelettes.
- Measuring Cup with Egg Piercer: For adding the correct amount of water and piercing eggs.
- გამჭვირვალე სახურავი: Covers the cooking area during operation.
- LCD პანელი: Digital display and buttons for selecting cooking modes and settings.

Image: The Olvy 6-in-1 Electric Egg Cooker, showcasing its compact design and key features like the transparent lid, egg capacity, and control panel. Dimensions are approximately 20.5cm (height), 15cm (width), and 12.5cm (depth).
დაყენება
Before using your Olvy Electric Egg Cooker for the first time, follow these steps:
- გახსენით ყველა კომპონენტი და ამოიღეთ შესაფუთი მასალები.
- Wash the transparent lid, egg rack, poaching tray, omelette tray, and measuring cup in warm, soapy water. Rinse thoroughly and dry completely.
- გაწმინდეთ საბაზისო ერთეულის გარე ზედაპირი რეკლამინითamp ქსოვილი. არ ჩაყოთ ძირი წყალში ან სხვა სითხეში.
- Place the egg cooker on a stable, flat, heat-resistant surface, away from any heat sources or water.

Image: A visual guide demonstrating the initial steps of using the egg cooker: adding water with the measuring cup, piercing an egg, and then selecting the cooking preference on the control panel.
ოპერაციული ინსტრუქციები
მოხარშული კვერცხი (რბილი, საშუალო, მაგარი)
- Fill the measuring cup with the appropriate amount of water according to your desired egg consistency (soft, medium, or hard) and the number of eggs (1-3 or 4-6). The measuring cup has markings for guidance.
- Pour the measured water onto the heating plate of the base unit.
- Using the egg piercer located on the bottom of the measuring cup, gently pierce the large end of each egg. This helps prevent the eggs from cracking during cooking.
- Place the egg rack onto the heating plate.
- Carefully place the pierced eggs into the egg rack.
- კვერცხის მოსახარშ ჭურჭელს გამჭვირვალე სახურავი დაახურეთ.
- შეაერთეთ მოწყობილობა სტანდარტულ ელექტროგადამცემში. LCD ეკრანი აინთება.
- Select your desired cooking mode (Soft, Med, Hard) using the control panel buttons. Adjust the number of eggs (1-3 or 4-6) if applicable.
- Press the start button to begin cooking. The timer will count down on the LCD display.
- Once cooking is complete, an audible alarm will sound, and the appliance will automatically shut off.
- Carefully remove the lid and eggs using oven mitts or tongs. Immediately rinse the cooked eggs under cold water to stop the cooking process and make them easier to peel.
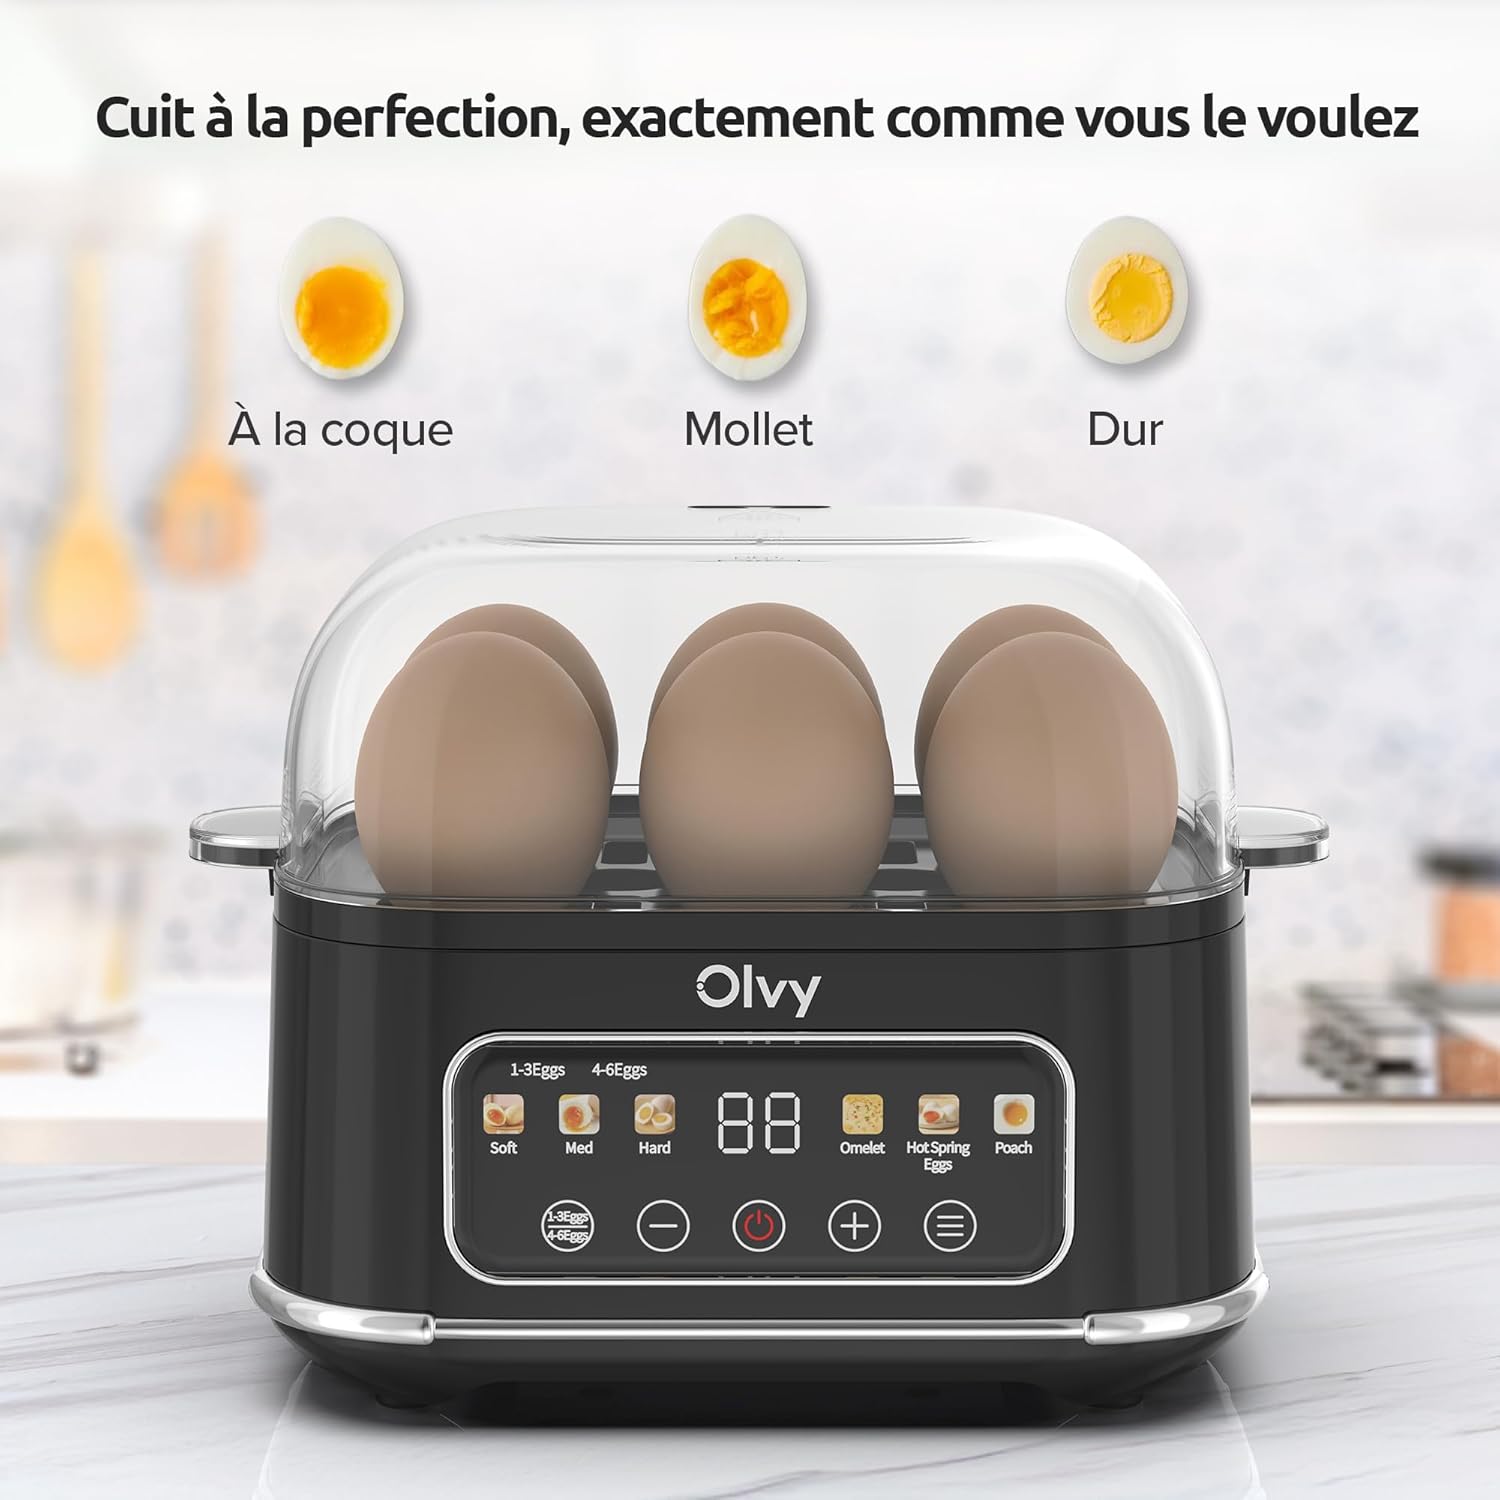
Image: The Olvy Egg Cooker illustrating the results for soft-boiled, medium-boiled, and hard-boiled eggs, along with the corresponding settings on the control panel.
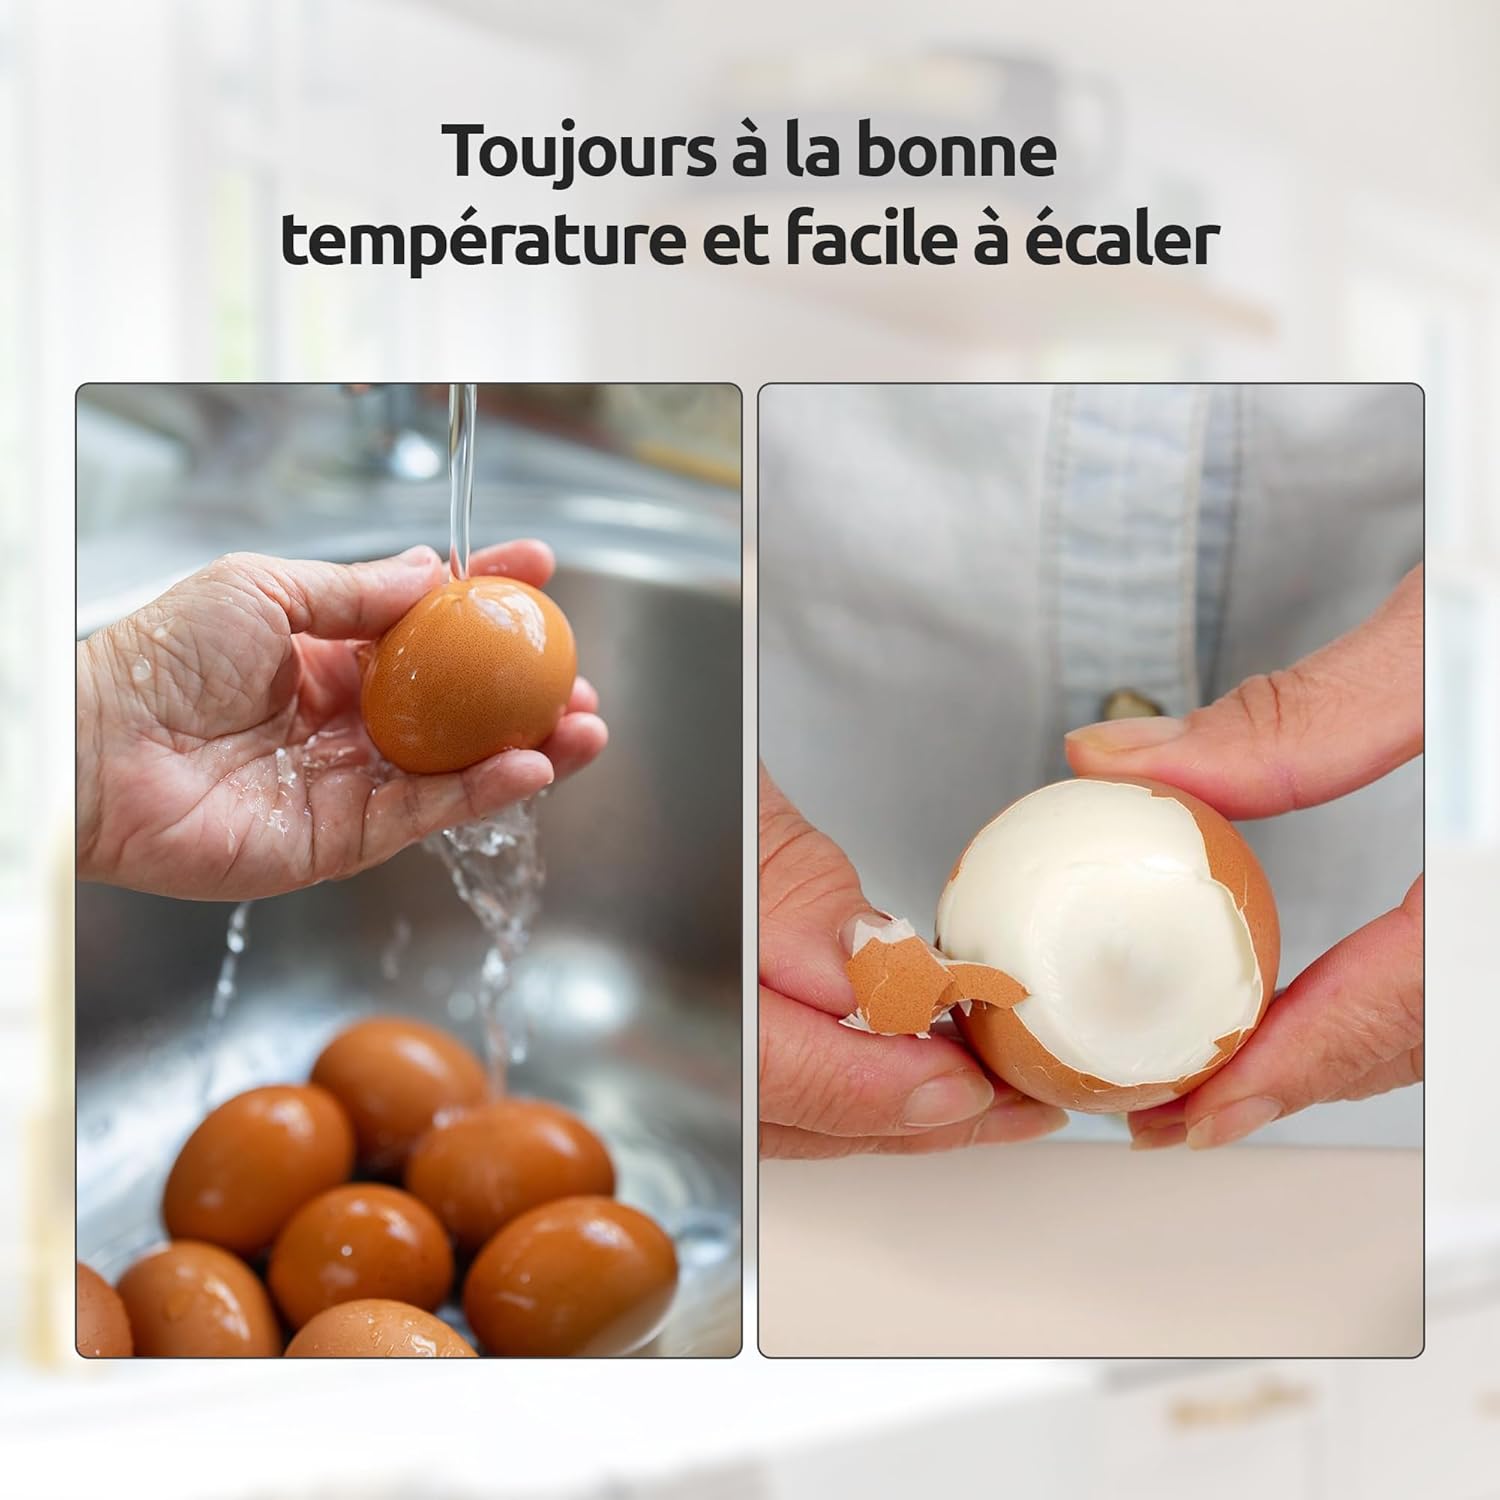
Image: Demonstrating the use of the egg piercer on the measuring cup and the ease of peeling a cooked egg.
ბრაკონიერული კვერცხები
- Fill the measuring cup with water to the designated 'Poach' line. Pour this water onto the heating plate.
- Lightly grease the poaching tray to prevent sticking.
- Crack one egg into each section of the poaching tray.
- Place the poaching tray onto the heating plate.
- დააფარეთ გამჭვირვალე თავსახური.
- Plug in the appliance and select the 'Poach' mode on the control panel.
- დააჭირეთ დაწყების ღილაკს.
- When the alarm sounds, carefully remove the lid and poaching tray.
ომლეტების დამზადება
- Fill the measuring cup with water to the designated 'Omelette' line. Pour this water onto the heating plate.
- Lightly grease the omelette tray.
- Whisk 1-2 eggs with a pinch of salt, pepper, and any desired fillings. Pour the mixture into the omelette tray.
- Place the omelette tray onto the heating plate.
- დააფარეთ გამჭვირვალე თავსახური.
- Plug in the appliance and select the 'Omelette' mode on the control panel.
- დააჭირეთ დაწყების ღილაკს.
- When the alarm sounds, carefully remove the lid and omelette tray.

Image: The Olvy Egg Cooker demonstrating its capability to prepare both poached eggs and omelettes.

სურათი: დეტალური view of the Olvy Egg Cooker's control panel, showing the LCD display and various cooking mode selection buttons.
დასუფთავება და მოვლა
Regular cleaning and maintenance will ensure the longevity and optimal performance of your egg cooker.
- გაწმენდის წინ ყოველთვის გამორთეთ მოწყობილობა დენის წყაროდან და მიეცით საშუალება, რომ სრულად გაგრილდეს.
- The transparent lid, egg rack, poaching tray, omelette tray, and measuring cup are dishwasher safe. Alternatively, they can be washed by hand in warm, soapy water, rinsed thoroughly, and dried.
- Wipe the heating plate and the exterior of the base unit with a damp cloth. For stubborn mineral deposits on the heating plate, which are normal with water usage, you can use a solution of 1 part white vinegar to 2 parts water. Pour the solution onto the heating plate and let it sit for 5-10 minutes, then wipe clean with a damp cloth. Do not use abrasive cleaners, scouring pads, or harsh chemicals, as these can damage the surface.
- არასოდეს ჩაძიროთ ბაზის ერთეული წყალში ან სხვა სითხეში.
- მოწყობილობის შენახვამდე დარწმუნდით, რომ ყველა ნაწილი სრულიად მშრალია. შეინახეთ გრილ, მშრალ ადგილას.
პრობლემების მოგვარება
If you encounter any issues with your Olvy Electric Egg Cooker, refer to the following common problems and solutions:
- Eggs not cooked to desired consistency:
Ensure you used the correct water level for the selected cooking mode and number of eggs. Verify that the transparent lid was properly closed during cooking. - ტექნიკა არ ირთვება:
შეამოწმეთ, არის თუ არა კვების კაბელი საიმედოდ შეერთებული მოქმედ ელექტროგადამცემში. - კვერცხის გატეხვა მომზადების დროს:
Always pierce the large end of each egg with the integrated egg piercer before placing them in the cooker. Avoid using eggs directly from the refrigerator; allowing them to come to room temperature for a few minutes can also help. - Mineral deposits on the heating plate:
This is a normal occurrence due to water evaporation. Refer to the 'Cleaning and Maintenance' section for instructions on how to remove these deposits using vinegar.
სპეციფიკაციები
| ბრენდი | ოლვი |
| მოდელის ნომერი | 58613813346653 |
| ფერი | შავი |
| მასალა | ფოლადი |
| ნივთის წონა | 850 გ |
| პროდუქტის ზომები (დაახლოებით) | 20.5 სმ (სიმაღლე) x 15 სმ (სიგანე) x 12.5 სმ (სიღრმე) |
| ტევადობა | 6 კვერცხამდე |
| მახასიათებლები | LCD Timer, Automatic Shut-off, Dishwasher Safe Accessories |
გარანტია და მხარდაჭერა
For warranty information and customer support, please refer to the retailer's policy where you purchased the Olvy 6-in-1 Electric Egg Cooker. It is recommended to retain your proof of purchase for any warranty claims. For further assistance, you may also visit the official Olvy website or contact their customer service department through the contact information provided at the point of purchase.