1. შესავალი
This manual provides comprehensive instructions for the safe and effective use of the PeakTech True RMS P 3131 Clamp Meter with Multimeter. This device is designed for measuring AC/DC currents without circuit interruption, as well as AC/DC voltage and resistance, with continuity testing capabilities. It features a 3 3/4 digit LCD display with True RMS measurement for accurate readings.
გთხოვთ, მოწყობილობის გამოყენებამდე ყურადღებით წაიკითხოთ ეს სახელმძღვანელო და შეინახეთ იგი მომავალი მითითებისთვის.
2. უსაფრთხოების ინფორმაცია
WARNING: Improper use of this meter can cause damage, shock, injury, or death. Always follow all safety precautions.
- ყოველთვის დაიცავით უსაფრთხოების ადგილობრივი და ეროვნული კოდები.
- Do not use the meter if it appears damaged or if the insulation on test leads is compromised.
- გაზომვების ჩატარებამდე დარწმუნდით, რომ მრიცხველი სწორ ფუნქციასა და დიაპაზონშია დაყენებული.
- Avoid contact with live circuits. Use appropriate personal protective equipment (PPE).
- The device is rated for CAT II 600V. Do not exceed these limits.
- დაუყოვნებლივ შეცვალეთ ბატარეები, როდესაც დაბალი ბატარეის ინდიკატორი გამოჩნდება.
- Do not operate the meter in explosive atmospheres.
3. პროდუქტი დასრულდაview და კომპონენტები
The PeakTech P 3131 is a robust and reliable clamp meter. Familiarize yourself with its main components:

სურათი 1: წინა view of the PeakTech P 3131 Clamp Meter, showing the clamp jaw, function selector, LCD display, and input terminals.
- Clamp ყბა: For non-contact AC/DC current measurement.
- ფუნქციის შერჩევის ციფერბლატი: To select measurement modes (A~, A=, V~, V=, Ω/Continuity, OFF).
- LCD ეკრანი: აჩვენებს გაზომვის მაჩვენებლებს, ერთეულებს და ინდიკატორებს.
- ღილაკები: AC/DC, ZERO, H/MAX (Data Hold/Max Hold).
- შეყვანის ტერმინალები: COM (common) and VΩ (voltage/resistance) for test leads.
- ხელის მცველი: Provides protection against accidental contact.
4. დაყენება
4.1 ბატარეის დაყენება
The PeakTech P 3131 requires two 1.5V AAA batteries (included). To install or replace batteries:
- დარწმუნდით, რომ მოწყობილობა გამორთულია.
- იპოვეთ ბატარეის განყოფილების საფარი მრიცხველის უკანა მხარეს.
- გამოიყენეთ ხრახნიანი განყოფილების გასახსნელად.
- Insert the two AAA batteries, observing correct polarity (+ and -).
- შეცვალეთ ბატარეის განყოფილების საფარი და დაამაგრეთ იგი ხრახნით.
When the low battery indicator appears on the display, replace the batteries immediately to ensure accurate measurements.
4.2 სატესტო გამტარების შეერთება
მოცულობისთვისtage, resistance, and continuity measurements, connect the supplied test leads:
- ჩადეთ შავი სატესტო ტყვია მასში COM (საერთო) შეყვანის ტერმინალი.
- ჩადეთ წითელი ტესტის ტყვია მასში VΩ შეყვანის ტერმინალი.

Figure 2: PeakTech P 3131 Clamp Meter shown with its carrying case, test leads, batteries, and user manual.
5. საოპერაციო ინსტრუქციები
5.1 ჩართვა/გამორთვა
Rotate the function selector dial from the "OFF" position to any desired measurement function to power on the meter. To power off, rotate the dial back to "OFF". The meter features an automatic power-off function (can be deactivated) to conserve battery life.
5.2 ცვლადი/მუდმივი დენის გაზომვა (Clamp)
To measure current without breaking the circuit:
- ფუნქციის შერჩევის ღილაკი გადაატრიალეთ A~ (ცვლადი დენი) ან A= (DC დენის) პოზიცია.
- დააჭირეთ AC/DC button if you need to switch between AC and DC current modes (if the dial position combines them).
- დააჭირეთ ნულოვანი button to zero the display before measuring DC current, especially for small currents, to compensate for residual magnetism.
- გახსენით clamp ყბა ჩახმახის დაჭერით.
- Enclose only ერთი conductor with the clamp ყბა. დარწმუნდით, რომ ყბა სრულად დახურულია.
- წაიკითხეთ მიმდინარე მნიშვნელობა LCD ეკრანზე.
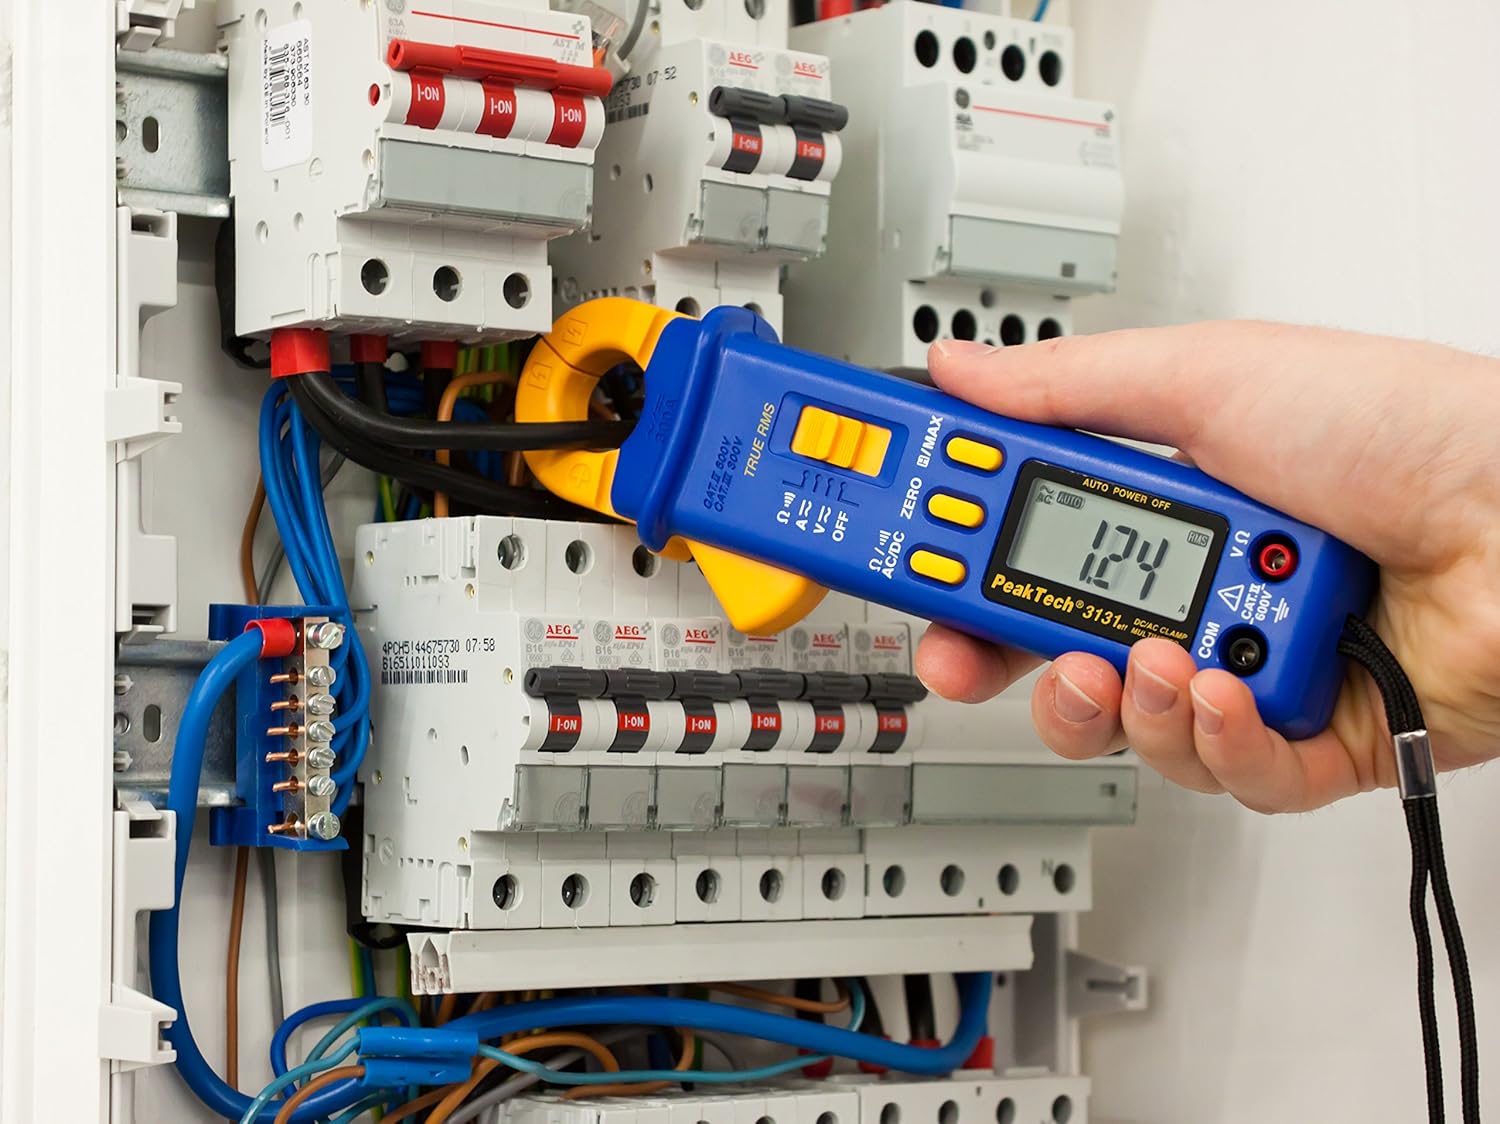
Figure 3: The PeakTech P 3131 Clamp Meter in use, measuring current on a single conductor within an electrical panel.
5.3 AC/DC ტtage გაზომვა
გავზომოთ ტომიtage:
- შეაერთეთ სატესტო გამტარები, როგორც ეს აღწერილია 4.2 ნაწილში.
- ფუნქციის შერჩევის ღილაკი გადაატრიალეთ V~ (AC მოცულობაtagე) ან V= (DC Voltagე) თანამდებობა.
- სატესტო ზონდები პარალელურად შეაერთეთ იმ წრედთან ან კომპონენტთან, რომლის გაზომვაც გსურთ.
- წაიკითხეთ ტtage მნიშვნელობა LCD ეკრანზე.
5.4 Resistance and Continuity Measurement
To measure resistance or check for continuity:
- შეაერთეთ სატესტო გამტარები, როგორც ეს აღწერილია 4.2 ნაწილში.
- ფუნქციის შერჩევის ღილაკი გადაატრიალეთ Ω/))) (Resistance/Continuity) position.
- For resistance: Connect the test probes across the component. Ensure the circuit is de-energized.
- For continuity: Touch the test probes to the two points you want to check. A continuous beep indicates a low-resistance path (continuity).
- წაიკითხეთ წინააღმდეგობის მნიშვნელობა LCD ეკრანზე.
5.5 სპეციალური ფუნქციები
- ნამდვილი RMS: The meter measures True Root Mean Square values for AC voltage and current, providing accurate readings for non-sinusoidal waveforms.
- მონაცემთა შენახვა (H): დააჭირეთ H/MAX button briefly to freeze the current reading on the display. Press again to release.
- Maximum Value Hold (MAX): დააჭირეთ და გააჩერეთ H/MAX button to capture and display the maximum measured value. Press again to exit.
- ZERO Function: Used to zero the display for DC current measurements to eliminate offset errors.
- ავტომატური დიაპაზონი: The meter automatically selects the appropriate measurement range.
- ავტომატური გამორთვა: The meter automatically turns off after a period of inactivity to save battery. This feature can typically be disabled by holding a specific button during power-on (refer to the device's on-screen indicators or a more detailed manual if available).
6. მოვლა
6.1 დასუფთავება
გაწმინდეთ მრიცხველის კორპუსი რეკლამითamp ნაჭერი და რბილი სარეცხი საშუალება. არ გამოიყენოთ აბრაზიული საშუალებები ან გამხსნელები. გამოყენებამდე დარწმუნდით, რომ მრიცხველი სრულიად მშრალია.
6.2 ბატარეის გამოცვლა
Refer to Section 4.1 for instructions on battery replacement. Always use two fresh 1.5V AAA batteries. Remove batteries if the meter is not used for an extended period to prevent leakage.
6.3 შენახვა
Store the meter in a cool, dry place, away from direct sunlight and extreme temperatures. Use the provided carrying case for protection.
7. Დიაგნოსტიკა
| პრობლემა | შესაძლო მიზეზი | გამოსავალი |
|---|---|---|
| მრიცხველი არ ირთვება. | მკვდარი ან არასწორად დამონტაჟებული ბატარეები. | შეამოწმეთ ბატარეის პოლარობა; შეცვალეთ ბატარეები. |
| ნაჩვენებია „OL“ ან „OVER“. | გაზომვა აღემატება არჩეულ დიაპაზონს ან მრიცხველის მაქსიმალურ სიმძლავრეს. | Select a higher range (if manual ranging) or ensure measurement is within meter's limits. |
| Inaccurate DC current reading. | Residual magnetism in clamp ყბა. | დააჭირეთ ნულოვანი button before measurement. |
| უწყვეტობის სიგნალი არ ისმის. | ღია წრედი ან მაღალი წინააღმდეგობა. | Check connections; ensure circuit is complete. |
If problems persist, contact PeakTech customer support or a qualified service technician.
8. ტექნიკური მახასიათებლები
| პარამეტრი | სპეციფიკაცია |
|---|---|
| ჩვენება | 3 3/4 digit LCD, max. 3999 counts |
| DC ტომიtage (DCV) | 0.1 mV to 600 V (Accuracy: 0.5% + 2 digits) |
| AC ტომიtage (ACV) | 1 mV to 600 V (Accuracy: 1.5% + 5 digits) |
| DC დენი (DCA) | 10 mA to 300 A (Accuracy: 1% + 2 digits) |
| AC დენი (ACA) | 10 mA to 300 A (Accuracy: 1% + 3 digits) |
| წინააღმდეგობა (Ω) | 0.1 Ω to 40 MΩ (Accuracy: 0.9% + 2 digits) |
| უწყვეტობის ტესტი | ზუმერის ფუნქცია |
| ნამდვილი RMS | Yes, for AC measurements |
| ყბის გახსნა | 22 mm max. conductor diameter |
| უსაფრთხოების რეიტინგი | EN 61010-1, CAT II 600 V |
| ელექტრომომარაგება | 2 x 1.5V AAA ბატარეები |
| ზომები (L x W x H) | 192 x 66 x 27 მმ (დაახლოებით 7.56 x 2.6 x 1.06 ინჩი) |
| წონა | 205 გ (დაახლოებით 0.45 ფუნტი) |
9. გარანტია და მხარდაჭერა
PeakTech products are manufactured under strict quality control. This product is covered by a standard manufacturer's warranty against defects in materials and workmanship. Please refer to the warranty card included with your product or visit the official PeakTech webსაიტზე დეტალური გარანტიის პირობებისთვის.
For technical support, service, or calibration inquiries, please contact your local PeakTech distributor or the PeakTech customer service department. Contact information can typically be found on the PeakTech webადგილზე ან პროდუქტის შეფუთვაში.


