1. შესავალი
This manual provides detailed instructions for the installation, operation, and maintenance of your Gewiss GW10701 Programmable Thermostat. This device is designed to control heating and air conditioning systems, allowing you to manage room temperature efficiently and comfortably. Please read this manual thoroughly before installation and use to ensure proper functionality and safety.
2. უსაფრთხოების ინფორმაცია
პირადი ტრავმების ან მოწყობილობის დაზიანების თავიდან ასაცილებლად, ყოველთვის დაიცავით შემდეგი უსაფრთხოების ზომები:
- მონტაჟი უნდა განხორციელდეს მხოლოდ კვალიფიციური პერსონალის მიერ ადგილობრივი ელექტრო კოდებისა და რეგულაციების შესაბამისად.
- Disconnect power to the heating/cooling system at the main circuit breaker before installing or servicing the thermostat.
- თერმოსტატი არ მოხვდეს წყალზე ან ჭარბ ტენიანობაზე.
- გამოიყენეთ მხოლოდ მითითებული ტიპის აკუმულატორი და ინსტალაციის დროს უზრუნველყავით სწორი პოლარობა.
- შეინახეთ ბატარეები ბავშვებისთვის მიუწვდომელ ადგილას. არ გადააგდოთ ბატარეები ცეცხლში.
- Do not attempt to open or repair the thermostat yourself. Contact qualified service personnel.
3. პროდუქტი დასრულდაview
The Gewiss GW10701 is a wall-mounted programmable thermostat featuring an LCD display and intuitive controls for temperature management.
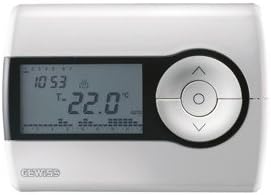
სურათი 1: წინა view of the Gewiss GW10701 Thermostat. It features a clear LCD screen displaying time and temperature, alongside a circular control panel with directional buttons and a central confirmation button for easy navigation and setting adjustments.
3.1. კომპონენტები
- LCD ეკრანი: Shows current time, temperature, operating mode, and programming settings.
- საკონტროლო ღილაკები: Typically include UP/DOWN arrows for temperature adjustment, MODE button for selecting operating modes (e.g., Heat, Cool, Auto, Off), and a SET/PROG button for accessing programming menus. (Note: Specific button functions may vary slightly; refer to on-screen prompts.)
- ბატარეის განყოფილება: Located on the rear or side, houses the power supply batteries.
- Სამონტაჟო დისკო: For secure wall installation.
4. მონტაჟი
4.1. ადგილმდებარეობის არჩევა
Select a central location on an interior wall, approximately 1.5 meters (5 feet) above the floor. Avoid locations near heat sources (lamps, direct sunlight, fireplaces), drafts (windows, doors), or areas with poor air circulation.
4.2. თერმოსტატის მონტაჟი
- გამორთეთ ელექტროენერგია: Turn off the power to your heating/cooling system at the main circuit breaker.
- Separate Base Plate: Carefully detach the front cover of the thermostat from its base plate.
- მარკირება და ბურღვა: Hold the base plate against the wall at your chosen location. Mark the drilling points. Drill holes and insert wall anchors if necessary.
- Secure Base Plate: Fasten the base plate to the wall using the provided screws.
- გაყვანილობა (ასეთის არსებობის შემთხვევაში): Connect the system wires to the appropriate terminals on the base plate. Refer to the wiring diagram provided with your heating/cooling system or consult a qualified electrician. Note: While the thermostat is battery-powered, it controls a 230V system. Ensure correct wiring.
- დააინსტალირეთ ბატარეები: Insert the required batteries into the battery compartment, observing correct polarity (+/-).
- თერმოსტატის დამაგრება: Carefully reattach the thermostat front cover to the base plate, ensuring it clicks securely into place.
- ენერგიის აღდგენა: Turn on the power to your heating/cooling system at the main circuit breaker.
5. ოპერაცია
5.1. საწყისი დაყენება
Upon first power-up or after battery replacement, you may need to set the current time and date. Follow the on-screen prompts or refer to the programming section.
5.2. ტემპერატურის დაყენება
გამოიყენეთ UP და ქვემოთ arrow buttons to adjust the desired temperature. The display will show the set temperature temporarily, then revert to the current room temperature.
5.3. ოპერაციული რეჟიმები
დააჭირეთ MODE button (or similar) to cycle through available operating modes:
- გათბობა: თერმოსტატი ჩართავს გათბობის სისტემას, როდესაც ოთახის ტემპერატურა დადგენილ ტემპერატურაზე დაბლა დაეცემა.
- გაგრილება: The thermostat will activate the air conditioning system when the room temperature rises above the set temperature.
- ავტო: თერმოსტატი ავტომატურად გადართავს გათბობასა და გაგრილებას შორის, რათა შეინარჩუნოს დადგენილი ტემპერატურის დიაპაზონი.
- გამორთულია: გათბობისა და გაგრილების სისტემები გამორთულია.
6. პროგრამირება
The Gewiss GW10701 allows you to create custom heating/cooling schedules for different times of the day and days of the week. This feature helps optimize energy consumption and comfort.
6.1. დროისა და თარიღის დაყენება
- დააჭირეთ SET or პროგ ღილაკი პარამეტრების მენიუში შესასვლელად.
- Navigate using the arrow buttons to find "Time" or "Date" settings.
- Use the arrow buttons to adjust the values (hour, minute, day, month, year).
- Confirm each setting with the SET or central button.
6.2. Creating a Program Schedule
The thermostat typically offers daily or weekly programming options. You can set different temperatures for various periods (e.g., Wake, Day, Evening, Sleep).
- დააჭირეთ პროგ ღილაკი პროგრამირების რეჟიმში შესასვლელად.
- Select the day or group of days you wish to program (e.g., Mon-Fri, Sat-Sun, or individual days).
- For each period (e.g., "Wake"), set the desired start time and temperature using the arrow buttons.
- Advance to the next period and repeat the process.
- Save your program and exit programming mode.
Consult the on-screen menu and specific button labels on your device for precise programming steps, as interfaces can vary.
7. მოვლა
7.1. ბატარეის გამოცვლა
The thermostat is powered by batteries. When the battery indicator appears on the display, replace the batteries promptly to ensure continuous operation. Typically, 2x AA or AAA alkaline batteries are required.
- ფრთხილად ამოიღეთ თერმოსტატის წინა საფარი.
- ამოიღეთ ძველი ბატარეები და გადააგდეთ ისინი პასუხისმგებლობით.
- ჩადეთ ახალი ბატარეები სწორი პოლარობის უზრუნველსაყოფად.
- მიამაგრეთ წინა საფარი.
7.2. დასუფთავება
Clean the thermostat's exterior with a soft, dry cloth. Do not use abrasive cleaners, solvents, or spray cleaners directly onto the device, as this can damage the display or internal components.
8. Დიაგნოსტიკა
| პრობლემა | შესაძლო მიზეზი | გამოსავალი |
|---|---|---|
| ეკრანი ცარიელია ან ბუნდოვანია. | დაბალი ან მკვდარი ბატარეები. | შეცვალეთ ბატარეები ახლით. |
| გათბობის/გაგრილების სისტემა არ რეაგირებს. |
|
|
| ტემპერატურის მაჩვენებლები არაზუსტი ჩანს. | თერმოსტატის მდებარეობაზე გავლენას ახდენს ნაკადები ან სითბოს წყაროები. | Ensure thermostat is not exposed to direct sunlight, drafts, or heat-emitting appliances. |
9. სპეციფიკაციები
- მწარმოებელი: გევისი
- მოდელის ნომერი: GW10701 (Chorus)
- ზომები (L x W x H): 13 x 2.3 x 9.2 სმ
- წონა: 9.07 გ
- ფერი: თეთრი
- მასალა: პლასტიკური
- ელექტრომომარაგება: ბატარეით იკვებება
- გადართვის ტtage: 230 Volt (for controlled system)
- ჩვენების ტიპი: LCD ან LED
- სამონტაჟო ტიპი: კედელზე დამაგრებული
- კონტროლის მახასიათებლები: Programmable, Button control
- გამოყენება: Heating systems, Air conditioning systems
10. გარანტია და მხარდაჭერა
For warranty information, technical support, or service inquiries regarding your Gewiss GW10701 Thermostat, please refer to the warranty card included with your product or visit the official Gewiss website. You may also contact your local Gewiss distributor or retailer for assistance.
Gewiss Official Webსაიტი: www.gewiss.com


