1. შესავალი
This manual provides essential instructions for the safe and effective use of your Olympus E-PM2 Mirrorless Digital Camera. The E-PM2 is equipped with a 16 MP Live MOS sensor and a TruePic VI Image Processor, designed to deliver high-quality images in a compact form factor. Please read this manual thoroughly before using your camera.
ძირითადი მახასიათებლები:
- 16MP CMOS Micro Four Thirds sensor for detailed images.
- 8 frames per second continuous shooting for capturing fast action.
- 35-area contrast detect AF with touch focus for precise and quick focusing.
- ISO sensitivity range of 100-25,600 for versatile low-light performance.
- 1080 HD video recording capability.
- 3.0 inch touchscreen LCD with 460,000 dots for intuitive control.
- In-body sensor-shift image stabilization to reduce blur.
- RAW and RAW + JPEG shooting options.
- Compatible with SD/SDHC/SDXC memory cards.
2. კამერის კომპონენტები
Familiarize yourself with the main parts of your Olympus E-PM2 camera.

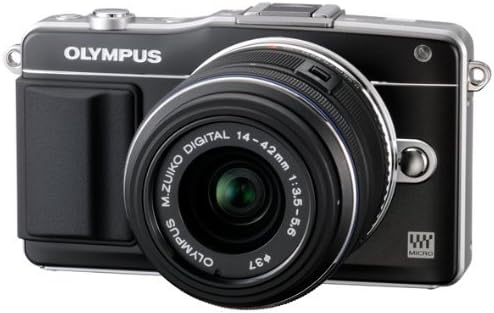
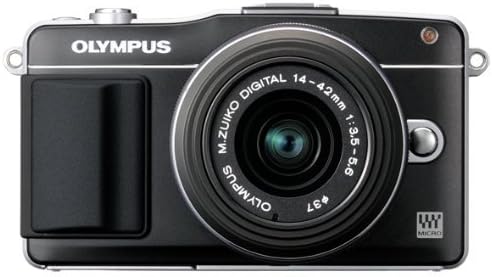
სურათი 2.1: წინა view of the Olympus E-PM2 camera with the 14-42mm lens attached. This image shows the lens, grip, and overall compact design of the camera body.
სურათი 2.2: Ზემოდან ქვემოთ view of the Olympus E-PM2 camera. This perspective highlights the shutter button, mode dial (if present, or equivalent controls), and accessory port.
სურათი 2.3: უკანა view of the Olympus E-PM2 camera, showing the 3.0-inch touchscreen LCD and control buttons. This is where you will interact with the camera's menu and review სურათები.
3. დაყენება
3.1. ლინზის მიმაგრება
- მოხსენით კამერის კორპუსის თავსახური და ლინზიდან უკანა ლინზის თავსახური.
- Align the mounting marks (usually a white dot) on the lens with the corresponding mark on the camera body.
- დაატრიალეთ ლინზა საათის ისრის მიმართულებით, სანამ ის თავის ადგილზე არ დაწკაპუნება.
3.2. ბატარეის ჩასმა
The Olympus E-PM2 uses a rechargeable battery. Although batteries are not included with all packages, ensure you have a compatible battery charged before use.
- გახსენით ბატარეის განყოფილების საფარი, რომელიც კამერის ქვედა ნაწილში მდებარეობს.
- Insert the charged battery with the correct orientation, ensuring the contacts align.
- უსაფრთხოდ დახურეთ ბატარეის განყოფილების საფარი.
3.3. მეხსიერების ბარათის ჩასმა
კამერას აქვს SD, SDHC და SDXC მეხსიერების ბარათების მხარდაჭერა.
- Open the memory card slot cover, typically located on the side or bottom of the camera.
- Insert the memory card with the label facing the correct direction until it clicks into place.
- მეხსიერების ბარათის სლოტის საფარი საიმედოდ დახურეთ.
3.4. საწყისი პარამეტრები
Upon first power-on, you may be prompted to set the date, time, and language. Follow the on-screen instructions using the touchscreen or control buttons.
4. კამერის მართვა
4.1. ჩართვა/გამორთვა
Press the power button to turn the camera on or off. The LCD screen will illuminate when the camera is on.
4.2. ფოტოგრაფიის ძირითადი რეჟიმები
The E-PM2 offers various shooting modes to suit different situations:
- iAuto (Intelligent Auto): კამერა ავტომატურად ამოიცნობს სცენას და იყენებს ოპტიმალურ პარამეტრებს.
- პროგრამა AE (P): The camera sets both aperture and shutter speed for optimal exposure, but you can shift the combination.
- დიაფრაგმის პრიორიტეტი (A): You set the aperture, and the camera automatically sets the shutter speed. Ideal for controlling depth of field.
- ჩამკეტის პრიორიტეტი (S): You set the shutter speed, and the camera automatically sets the aperture. Ideal for controlling motion blur.
- სახელმძღვანელო (M): თქვენ აკონტროლებთ როგორც დიაფრაგმას, ასევე ჩამკეტის სიჩქარეს.
- სცენის რეჟიმები: Select from various pre-set scene modes (e.g., Portrait, Landscape, Night Scene) for optimized results in specific situations.
4.3. ფოკუსირება
The E-PM2 features a FAST (Frequency Acceleration Sensor Technology) AF system with 35 focus points.
- ავტოფოკუსი: Press the shutter button halfway down to activate autofocus. The camera will focus on the subject within the selected AF area.
- Touch Focus: Tap on the desired area of the touchscreen LCD to focus on that point. You can also configure the camera to take a picture immediately after touching to focus.
- ხელით ფოკუსი: Rotate the focus ring on the lens while observing the LCD screen to achieve sharp focus.
4.4. ექსპოზიციის კონტროლი
Adjusting exposure ensures your photos are neither too bright nor too dark.
- ISO მგრძნობელობა: Adjust the ISO setting (100-25,600) to control the camera's sensitivity to light. Higher ISO values are useful in low light but may introduce noise.
- ექსპოზიციის კომპენსაცია: Use the exposure compensation function to manually adjust the brightness of your image.
- გამრიცხველიანების რეჟიმები: The camera offers Multi, Center-weighted, and Spot metering modes to measure light effectively.
4.5. გამოსახულების სტაბილიზაცია
The E-PM2 incorporates sensor-shift image stabilization to minimize blur caused by camera shake, especially in low light or with longer focal lengths.
4.6. უწყვეტი სროლა
For capturing fast-moving subjects, use the continuous shooting mode, which allows you to take up to 8 frames per second.
4.7. ფლეშის გამოყენება
An attachable flash is included with the camera. Connect it to the accessory port when additional illumination is required. The flash offers various modes, including Auto and Red-eye Reduction.
4.8. Art Filters
The E-PM2 features 12 in-camera Art Filters (e.g., Pop Art, Soft Focus, Diorama) to add creative effects to your photos and videos. These can be applied in all shooting modes.
4.9. Live Guide
The Live Guide system allows you to preview effects like brightness, color saturation, and background blur on the LCD before capturing the image. Access it via the dedicated button or menu.
4.10. ვიდეოჩანაწერი
To record video, switch to movie mode. The E-PM2 supports Full 1080i HD video recording with stereo sound in .MOV or .AVI formats. Art Filters can also be applied to videos.
ვიდეო 4.1: გენერალი დასრულდაview of camera features and operation. This video demonstrates various aspects of the camera's functionality.
ვიდეო 4.2: Short demonstration of camera usage. This video provides a brief look at the camera in action.
5. მოვლა
5.1. მტვრის შემცირების სისტემა
The E-PM2 features a Supersonic Wave Filter that vibrates silently each time the camera is turned on, dislodging dust from the sensor to ensure spot-free images.
5.2. კამერისა და ლინზის გაწმენდა
- კამერის სხეული: კამერის კორპუსის გასაწმენდად გამოიყენეთ რბილი, მშრალი ქსოვილი. ჯიუტი ჭუჭყის შემთხვევაში, ოდნავ გაწმინდეთ.ampქსოვილი წყლით დაასველეთ. მოერიდეთ ორგანული გამხსნელების გამოყენებას.
- ობიექტივი: Use a lens blower brush to remove dust. For smudges, use a specialized lens cleaning solution and a microfiber cloth. Never touch the lens surface with your fingers.
- LCD ეკრანი: ნაზად გაწმინდეთ რბილი, მშრალი ქსოვილით. მოერიდეთ ზედმეტად დაჭერას.
5.3. ბატარეის მოვლა
- Always use genuine Olympus batteries and chargers.
- შეინახეთ ბატარეები გრილ, მშრალ ადგილას, როდესაც არ იყენებთ.
- მოერიდეთ ბატარეების ექსტრემალურ ტემპერატურაზე ზემოქმედებას.
5.4. შენახვა
When storing the camera for extended periods, remove the battery and memory card. Store the camera in a dry, well-ventilated area, preferably in a camera bag to protect it from dust and impact.
6. Დიაგნოსტიკა
If you encounter issues with your Olympus E-PM2, refer to the following common problems and solutions:
6.1. კამერა არ ირთვება
- დარწმუნდით, რომ ბატარეა სრულად დატენილია და სწორად არის ჩასმული.
- შეამოწმეთ, სუფთაა თუ არა ბატარეის კონტაქტები.
- თუ შესაძლებელია, სცადეთ სხვა დატენილი ბატარეის გამოყენება.
6.2. ბუნდოვანი სურათები
- Check if the lens is properly attached and clean.
- Ensure the camera is properly focused on the subject.
- Increase shutter speed or use a tripod in low light conditions to prevent camera shake.
- Verify that image stabilization is enabled if shooting handheld.
6.3. Autofocus Not Working
- Ensure the lens is set to autofocus (AF) mode.
- Check for sufficient light on the subject; the AF illuminator may assist in dark conditions.
- Ensure there is enough contrast in the subject for the autofocus system to lock on.
6.4. მეხსიერების ბარათის შეცდომა
- Ensure the memory card is correctly inserted.
- Check if the memory card is locked (write-protected).
- Try formatting the card (this will erase all data, so back up first).
- გაუმართაობის გამოსარიცხად გამოიყენეთ სხვა მეხსიერების ბარათი.
7. სპეციფიკაციები
Detailed technical specifications for the Olympus E-PM2 Mirrorless Digital Camera.
| ფუნქცია | სპეციფიკაცია |
|---|---|
| მოდელის სახელი | Olympus E-PM2 |
| სენსორის ტიპი | 16 MP CMOS Micro Four Thirds |
| გამოსახულების სტაბილიზაცია | სენსორების შეცვლა |
| თავსებადი სამონტაჟოები | მიკრო ოთხი მესამედი |
| Lens Type (Included) | Standard Zoom (14-42mm) |
| მაქსიმალური ფოკუსური სიგრძე | 84 მილიმეტრი |
| მინიმალური ფოკუსური სიგრძე | 14 მილიმეტრი |
| მაქსიმალური დიაფრაგმა | 3.5 ვ |
| ISO მგრძნობელობა | 100-25,600 (Expanded ISO Minimum 200, Expanded ISO Maximum 1600 listed in some specs) |
| ჩამკეტის სიჩქარე | 1/4000-დან 60 წამამდე |
| უწყვეტი სროლა | 8 კადრი წამში |
| ავტოფოკუსის წერტილები | 35 |
| ჩვენება | 3.0 Inch LCD Touch Screen (460,000 dots) |
| ვიდეო რეზოლუცია | FHD 1080p |
| მხარდაჭერილი File ფორმატები | RAW, JPEG, RAW+JPEG, MPO(3D still) |
| მეხსიერების ბარათის სლოტი | SD/SDHC/SDXC |
| დაკავშირება | HDMI (Type C Mini), USB 2.0, EyeFi (Wireless Technology) |
| ნივთის წონა | 0.59 ფუნტი |
8. გარანტია და მხარდაჭერა
For detailed warranty information, product registration, and technical support, please refer to the official Olympus website or contact Olympus customer service. Keep your proof of purchase for warranty claims.
The Olympus E-PM2 is identified by Model Number V206021BU000 and UPC 050332184336.


