1. შესავალი
მადლობა შენაძენისთვისasing the Gotech GTV-7-TFT 7-inch Portable Color TFT LCD TV. This manual provides essential information for the safe and efficient operation of your device. Please read it thoroughly before use and retain it for future reference.
2. უსაფრთხოების მნიშვნელოვანი ინსტრუქციები
- ხანძრის ან ელექტროშოკის თავიდან ასაცილებლად, მოწყობილობა არ დატოვოთ წვიმის ან ტენიანობის ზემოქმედების ქვეშ.
- არ გახსნათ casinზ. ყველა სახის მომსახურება კვალიფიციურ პერსონალს მიანდეთ.
- მოერიდეთ მოწყობილობის განთავსებას სითბოს წყაროებთან ახლოს ან მზის პირდაპირ სხივებში.
- უზრუნველყოს სათანადო ვენტილაცია მოწყობილობის გარშემო.
- გამოიყენეთ მხოლოდ მითითებული კვების ადაპტერი.
- შეინახეთ მოწყობილობა ძლიერი მაგნიტური ველებისგან.
- გაწმინდეთ მოწყობილობა რბილი, მშრალი ქსოვილით. არ გამოიყენოთ თხევადი საწმენდი საშუალებები.
3. პაკეტის შიგთავსი
დარწმუნდით, რომ შეფუთვაში ყველა ნივთია:
- Gotech GTV-7-TFT Portable TV Unit
- დისტანციური მართვა
- AC/DC ადაპტერი
- Car Cord (Car Holder not explicitly listed as included, but mentioned as a feature)
- ანტენა ჯეკი
- AV კაბელი
- მოხსნადი სტენდი

Image 3.1: The retail box for the Gotech GTV-7-TFT Portable TV, showing the product, remote control, and included accessories.
სურათი 3.2: დახურვის მოწყობილობა view of the Gotech GTV-7-TFT TV screen and the remote control, as depicted on the product packaging.
4. პროდუქტი დასრულდაview
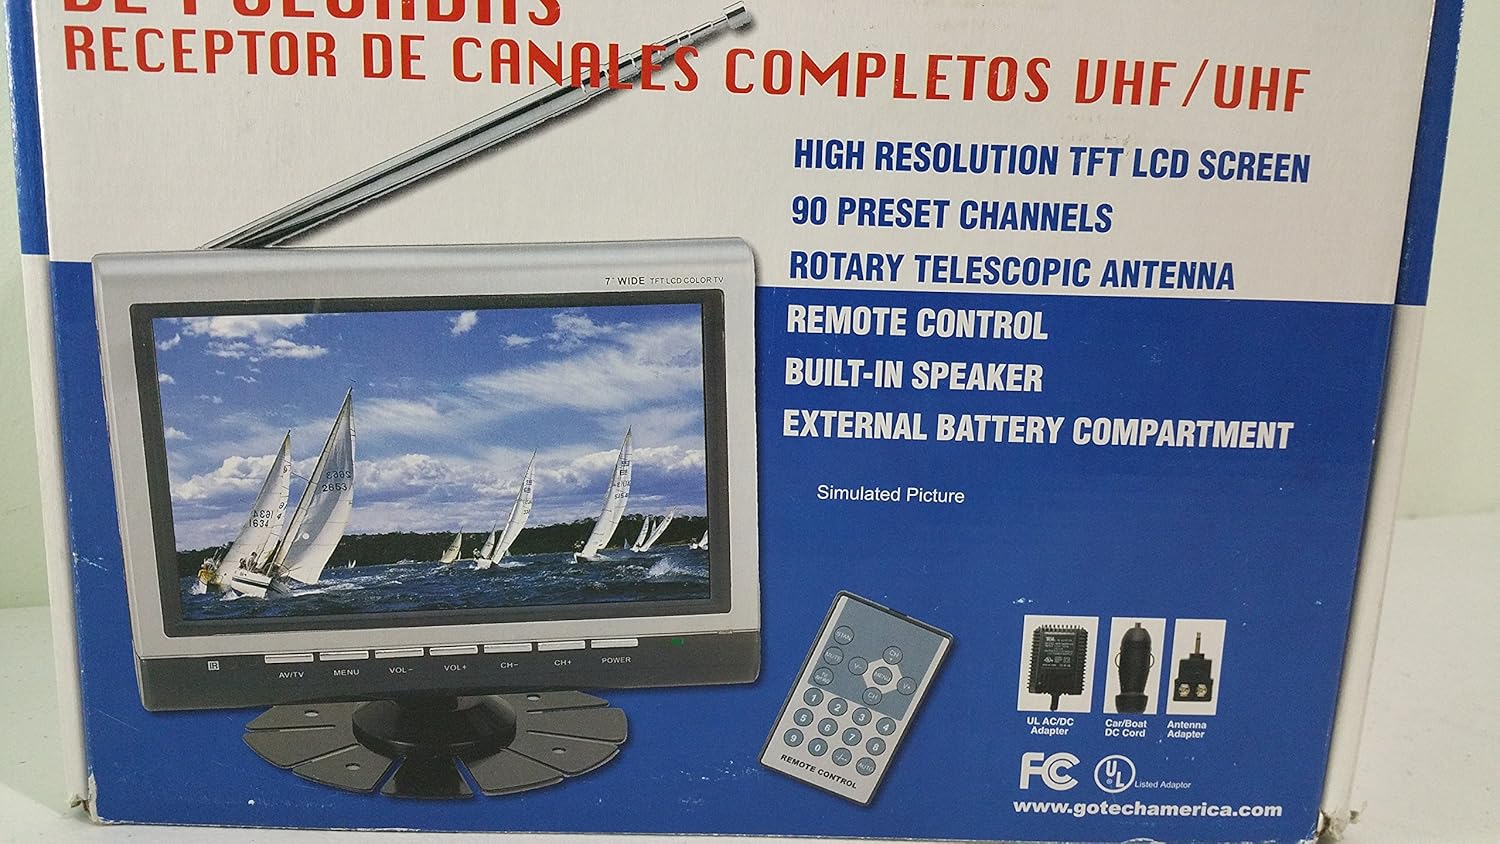
4.1 ძირითადი მახასიათებლები
- 7-inch High Resolution TFT LCD Screen
- Full Channel VHF/UHF Receiver
- 90 წინასწარ დაყენებული არხი
- Digital Up/Down Tuning
- Auto Channel Programming
- მბრუნავი ტელესკოპური ანტენა
- On-Screen Display (OSD) for Picture and Volume Adjustment
- ჩაშენებული დინამიკი
- External Battery Compartment (requires 10x AA batteries, not included)
- Remote Control with Button Cell
- New Detachable Stand with Battery

Image 4.1: Side panel of the Gotech GTV-7-TFT packaging, detailing the product's main features.
5. დაყენება
5.1 Powering the TV
The GTV-7-TFT can be powered in several ways:
- AC/DC ადაპტერი: Connect the provided AC/DC adapter to the TV's power input and then to a standard wall outlet.
- Car Cord: For in-vehicle use, connect the car cord to the TV's power input and then to your vehicle's 12V power outlet.
- გარე ბატარეები: Open the external battery compartment and insert 10x AA size batteries (UM3) according to the polarity indicators. Ensure the batteries are fresh and correctly oriented.
5.2 ანტენის დაკავშირება
Extend the rotary telescopic antenna for optimal signal reception. For improved reception, you may connect an external antenna to the antenna jack using the provided antenna jack adapter.
5.3 Connecting External Devices (AV Input)
To connect external devices such as a DVD player or gaming console, use the provided AV cable. Connect one end to the TV's AV input port and the other end to the AV output ports of your external device. Select the AV input source on the TV to view კონტენტი დაკავშირებული მოწყობილობიდან.
6. ოპერაცია
6.1 ჩართვა/გამორთვა
დააჭირეთ სიმძლავრე button on the TV unit or the remote control to turn the TV on or off.
6.2 არხის რეგულირება
- Auto Channel Programming: It is recommended to perform an auto channel scan upon first use or when moving to a new location. Access the menu, navigate to the channel setup, and select 'Auto Scan' or 'Auto Program'. The TV will search and store available channels.
- Digital Up/Down Tuning: გამოიყენეთ CH+ და CH- buttons on the TV or remote control to navigate through the preset channels.
6.3 Volume and Picture Adjustment
გამოიყენეთ VOL+ და VOL- buttons on the TV or remote control to adjust the volume. Picture settings (brightness, contrast, color) can be adjusted via the on-screen display (OSD) menu. Press the მენიუ button to access these options.
6.4 დისტანციური მართვა
The remote control allows convenient operation from a distance. Ensure the button cell battery is correctly inserted. Point the remote control directly at the TV's infrared sensor.
7. მოვლა
7.1 დასუფთავება
Wipe the TV screen and casing with a soft, dry, lint-free cloth. Do not use abrasive cleaners, waxes, or solvents as they may damage the finish or screen.
7.2 შენახვა
If the TV will not be used for an extended period, remove the external batteries to prevent leakage. Store the unit in a cool, dry place away from direct sunlight and extreme temperatures.
8. Დიაგნოსტიკა
| პრობლემა | შესაძლო მიზეზი | გამოსავალი |
|---|---|---|
| არავითარი ძალა | კვების ადაპტერი არ არის შეერთებული; ელემენტები დაცლილია ან არასწორად არის ჩასმული. | Check power connections; Replace or correctly insert batteries. |
| სურათი/ხმა არ არის | Incorrect input source; Antenna not connected or extended; No channels scanned. | Select correct input (TV/AV); Extend antenna or connect external one; Perform auto channel scan. |
| ცუდი მიღება | სუსტი სიგნალი; ანტენის პოზიცია. | Adjust antenna position; Try an external antenna; Check for local signal strength. |
| დისტანციური მართვა არ მუშაობს | Battery depleted; Obstruction between remote and TV. | Replace remote control battery; Remove any obstructions. |
9. სპეციფიკაციები
| ფუნქცია | დეტალი |
|---|---|
| მოდელის ნომერი | gtv-7-tft |
| ეკრანის ზომა | 7 ინჩი (17.8 სმ) |
| ჩვენების ტიპი | TFT LCD ფერადი ეკრანი |
| ტიუნერის ტიპი | Full Channel VHF/UHF Receiver |
| წინასწარ დაყენებული არხები | 90 |
| აუდიო გამომავალი ტიპი | ჩაშენებული დინამიკი |
| კონტროლის მეთოდი | დისტანციური მართვა |
| თავსებადი მოწყობილობები | ტელევიზია, სპიკერი |
| დენის წყარო | AC/DC Adapter, Car Cord, External Battery Compartment (10x AA batteries, not included) |
10. გარანტია და მხარდაჭერა
Specific warranty information and customer support details are not provided within this manual. Please refer to the product packaging or contact your retailer for warranty claims and technical assistance.


