1. შესავალი
This manual provides essential information for the safe and effective operation of your OWON SDS6062 Digital Storage Oscilloscope. Please read this manual thoroughly before using the device to ensure proper setup, operation, and maintenance. The SDS6062 is a 2-channel oscilloscope featuring a 60 MHz bandwidth, 500 MS/s sample rate, and a 10M record length, designed for precise electrical signal analysis.
2. უსაფრთხოების ინფორმაცია
Always observe the following safety precautions to prevent injury and avoid damage to the instrument or any connected products. Read these instructions carefully before operation.
- დენის წყარო: Use only the power adapter supplied with the instrument. Ensure the voltagე შეესაბამება თქვენს ადგილობრივ ელექტრომომარაგებას.
- დამიწება: The oscilloscope must be properly grounded to prevent electric shock.
- ზონდის უსაფრთხოება: Do not connect the probe ground lead to a point where a voltage greater than 30V RMS or 42.4V peak is present.
- გარემო: Operate the device in a well-ventilated area, away from moisture, dust, and direct sunlight. Avoid operating in explosive atmospheres.
- მოვლა: ყველა სახის მომსახურება კვალიფიციურ სერვის პერსონალს მიმართეთ. ნუ ეცდებით მოწყობილობის დამოუკიდებლად შეკეთებას.
3. პაკეტის შიგთავსი
Verify that all items listed below are present in your package. If any items are missing or damaged, contact your supplier.
- OWON SDS6062 Digital Storage Oscilloscope Unit
- 2 x Oscilloscope Probes
- XXX x დენის კაბელი
- 1 x Probe Adjust Pen
- 1 x USB მონაცემთა კაბელი
- 1 x პროგრამული CD
- 1 x მომხმარებლის სახელმძღვანელო (ეს დოკუმენტი)
4. პროდუქტი დასრულდაview
The OWON SDS6062 is a compact and powerful digital storage oscilloscope. It features an 8-inch (800x600) color TFT-LCD screen for clear waveform display and an intuitive control panel for easy operation. Key features include its 60 MHz bandwidth, 500 MS/s real-time sample rate, and 10M record length, making it suitable for a wide range of applications.
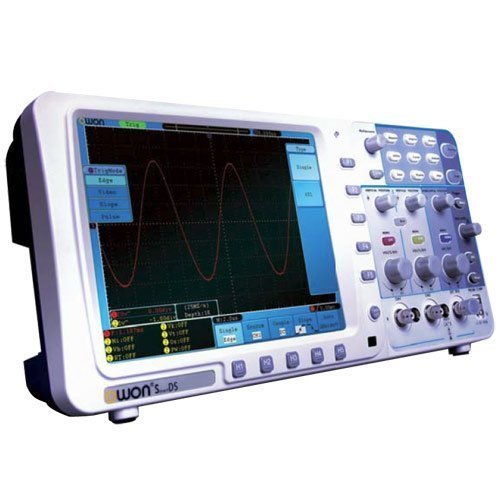
სურათი 4.1: წინა view of the OWON SDS6062 Digital Storage Oscilloscope, showing the display, control knobs, and function buttons.
4.1 წინა პანელის კონტროლი
The front panel includes the main display, vertical controls (VOLTS/DIV, position), horizontal controls (SEC/DIV, position), trigger controls, and various function buttons for menu navigation, measurement, and utility settings.
4.2 უკანა პანელის კავშირები
The rear panel provides connectivity options including the power input, USB host and device ports, LAN port for network connectivity, and a VGA port for external display output.
5. დაყენება
Follow these steps to set up your OWON SDS6062 oscilloscope for initial use.
5.1 დენის დაკავშირება
- დარწმუნდით, რომ ოსცილოსკოპი გამორთულია.
- Connect the supplied power cord to the power input on the rear panel of the oscilloscope.
- დენის კაბელის მეორე ბოლო შეაერთეთ დამიწებულ ცვლადი დენის სოკეტში.
5.2 ზონდების შეერთება
- Align the BNC connector of the probe with the CH1 or CH2 input on the front panel.
- Push and twist the connector clockwise until it locks into place.
- Attach the probe ground clip to the ground terminal of the circuit under test.
- Set the probe attenuation switch (e.g., 1X or 10X) to match the setting on the oscilloscope's input channel menu.
5.3 საწყისი ჩართვა
- დააჭირეთ ჩართვის ღილაკს, რომელიც მდებარეობს წინა პანელზე.
- The oscilloscope will perform a self-test and display the startup screen.
- After startup, it is recommended to perform a probe compensation adjustment (refer to Section 7.3).
6. ოსცილოსკოპის მართვა
This section covers basic operation and common functions of the SDS6062.
6.1 ძირითადი გაზომვები
To display a signal:
- Connect a signal source to CH1 or CH2 using a probe.
- დააჭირეთ AUTOSET button. The oscilloscope will automatically adjust vertical, horizontal, and trigger settings to display a stable waveform.
- დაარეგულირეთ ვოლტები/დივი knob to change the vertical scale (voltage თითო განყოფილება).
- დაარეგულირეთ SEC/DIV knob to change the horizontal scale (time per division).
- Use the vertical and horizontal POSITION knobs to move the waveform on the screen.
6.2 Trigger System
ტრიგერის სისტემა სტაბილიზაციას უკეთებს განმეორებად ტალღურ ფორმებს და აფიქსირებს ერთჯერადი დარტყმების მოვლენებს.
- ტრიგერის დონე: გამოიყენეთ TRIGGER LEVEL knob to set the voltage level at which the trigger occurs.
- გამომწვევი რეჟიმი: Access the trigger menu to select modes like Edge, Pulse, Video, or Slope.
- გამომწვევი წყარო: Select the input channel (CH1, CH2, EXT, AC Line) that will be used for triggering.
6.3 გაზომვის ფუნქციები
The SDS6062 offers various automatic measurement functions.
- დააჭირეთ გაზომეთ button to display the measurement menu.
- Select desired measurements such as Vpp, Vmax, Vmin, Freq, Period, Rise Time, etc.
6.4 Connectivity (LAN and VGA)
- LAN: Connect an Ethernet cable to the LAN port on the rear panel to connect the oscilloscope to a network. This allows for remote control and data transfer using compatible software.
- VGA: Use the VGA port to connect an external monitor or projector for larger display of waveforms, useful for presentations or collaborative work.
7. მოვლა
სათანადო მოვლა უზრუნველყოფს თქვენი ოსცილოსკოპის ხანგრძლივობას და სიზუსტეს.
7.1 დასუფთავება
Clean the instrument regularly with a soft, damp cloth. Do not use abrasive cleaners or solvents that could damage the casing ან ეკრანი. გაწმენდამდე დარწმუნდით, რომ მოწყობილობა გამორთულია და დენის წყაროდან ამოღებულია.
7.2 შენახვა
When not in use, store the oscilloscope in a dry, dust-free environment, away from extreme temperatures and direct sunlight. Use the original packaging or a suitable carrying case for protection during transport.
7.3 Probe Compensation Adjustment
Probe compensation should be adjusted to match the oscilloscope's input characteristics. This ensures accurate measurements.
- Connect the probe to CH1 and attach the probe tip to the probe compensation output (usually a square wave test point on the front panel).
- Attach the probe ground clip to the ground terminal.
- დააჭირეთ AUTOSET.
- Use the supplied probe adjust pen to turn the trimmer screw on the probe until the square wave displayed on the screen has flat top and bottom edges (no overshoot or undershoot).
8. Დიაგნოსტიკა
ეს განყოფილება გთავაზობთ გადაწყვეტილებებს იმ გავრცელებული პრობლემებისთვის, რომლებსაც შეიძლება წააწყდეთ.
- ჩვენების გარეშე: Check power connection, ensure the power button is pressed. Adjust screen brightness if necessary.
- No Waveform: Verify probe connection to the input channel and the circuit under test. Ensure the signal source is active. Press AUTOSET. Check vertical and horizontal scale settings.
- არასტაბილური ტალღის ფორმა: Adjust the trigger level. Check trigger mode and source settings. Ensure the signal is within the oscilloscope's bandwidth.
- არასწორი გაზომვები: Perform probe compensation adjustment (Section 7.3). Ensure probe attenuation settings match the oscilloscope.
- მოწყობილობა არ პასუხობს: Try restarting the oscilloscope. If the issue persists, contact technical support.
9. სპეციფიკაციები
Technical specifications for the OWON SDS6062 Digital Storage Oscilloscope.
| პარამეტრი | სპეციფიკაცია |
|---|---|
| მოდელის ნომერი | SDS6062 |
| გამტარუნარიანობა | 60 MHz |
| არხები | 2 + 1 (External Trigger) |
| Sample Rate (Real-time) | 500 MS/s |
| ჩანაწერის სიგრძე | 10 მილიონი ქულა |
| ჩვენება | 8-inch Color TFT-LCD (800x600) |
| ინტერფეისი | USB Host, USB Device, LAN, VGA |
| AutoScale Function | დიახ |
| მწარმოებელი | OWON |
10. გარანტია და მხარდაჭერა
OWON products are designed for reliability and performance. For warranty information, please refer to the warranty card included with your product or visit the official OWON website. For technical support, troubleshooting assistance, or service inquiries, please contact your local OWON distributor or the OWON customer service department. Keep your purchase receipt as proof of purchase for warranty claims.


