1. შესავალი
This manual provides comprehensive instructions for the safe and effective use of the PCE Instruments PCE-170 A Light Meter. This device is designed for measuring illuminance (lux or foot-candles) in various environments, such as offices, factories, and outdoor settings. It features a wide measurement range, fast response time, and a compact design for ease of use.
გთხოვთ, მოწყობილობის გამოყენებამდე ყურადღებით წაიკითხოთ ეს სახელმძღვანელო და შეინახეთ იგი მომავალი მითითებისთვის.
2. უსაფრთხოების ინფორმაცია
Observe the following safety precautions to prevent injury and avoid damage to the device:
- არ დაუშვათ მოწყობილობა ექსტრემალურ ტემპერატურაზე, ტენიანობაზე ან მზის პირდაპირ შუქზე.
- მოერიდეთ ძლიერ ვიბრაციას ან დარტყმებს.
- არ სცადოთ მოწყობილობის გახსნა ან მოდიფიცირება. ყველა სახის მომსახურება მიმართეთ კვალიფიციურ პერსონალს.
- Keep the light sensor clean and free from obstructions to ensure accurate readings.
- გაჟონვის თავიდან ასაცილებლად, ამოიღეთ ბატარეა, თუ მოწყობილობას დიდი ხნის განმავლობაში არ გამოიყენებთ.
- გადააგდეთ ბატარეები და მოწყობილობა ადგილობრივი რეგულაციების შესაბამისად.
3. პროდუქტი დასრულდაview
The PCE-170 A Light Meter consists of a main unit with a display and control buttons, and an integrated light sensor.

სურათი 1: წინა view of the PCE-170 A Light Meter, showing the display, control buttons, and light sensor at the top.
3.1 კომპონენტები
- სინათლის სენსორი: Located at the top of the device, protected by a white dome. This silicon photodiode measures incident light.
- LCD ეკრანი: A 5-digit display showing measurement values, units (lux/fc), and function indicators (e.g., AUTO RANGE, HOLD, MIN, MAX).
- ჩართვის ღილაკი (ჩართვა/გამორთვა): რთავს ან გამორთავს მოწყობილობას.
- CAL ღილაკი: Used for zero adjustment.
- HOLD ღილაკი: ეკრანზე მიმდინარე მაჩვენებლის გაყინვა.
- fc/lx Button: Toggles between foot-candle (fc) and lux (lx) measurement units.
- RANGE ღილაკი: Manually selects measurement ranges or activates auto-ranging.
- ბატარეის განყოფილება: Located at the rear, houses the 9V battery.

სურათი 2: ახლოდან view of the LCD display, showing a reading of "534 lx" and "AUTO RANGE 4 000".
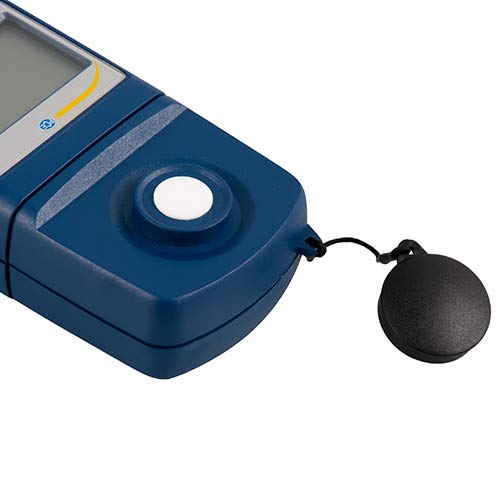
სურათი 3: დეტალურად view of the light sensor at the top of the device, with its protective cap removed.
4. დაყენება
4.1 ბატარეის დაყენება
- იპოვეთ ბატარეის განყოფილების საფარი მოწყობილობის უკანა მხარეს.
- Slide the cover open or unscrew it, depending on the model.
- ჩადეთ ერთი 9 ვოლტიანი აკუმულატორი, დაიცვათ სწორი პოლარობა (+/-).
- უსაფრთხოდ შეცვალეთ ბატარეის განყოფილების საფარი.
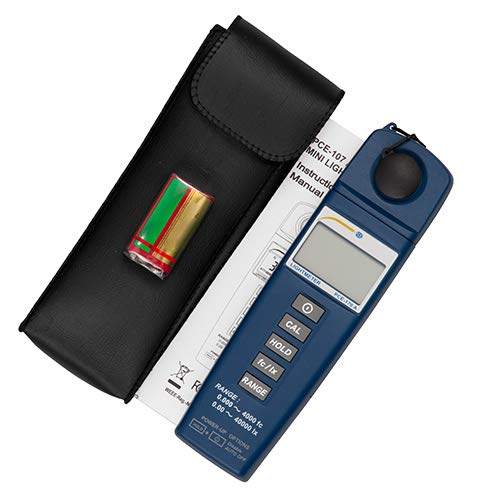
სურათი 4: The PCE-170 A Light Meter shown with its carrying case and the included 9V battery, ready for installation.
4.2 საწყისი ჩართვა
დააჭირეთ ძალაუფლება button to turn on the device. The display will illuminate and show a reading. If the battery symbol appears, replace the battery.
5. საოპერაციო ინსტრუქციები
5.1 გაზომვა
- Turn on the device using the ძალაუფლება ღილაკი.
- Ensure the light sensor is clean and unobstructed.
- Position the light sensor at the location where illuminance is to be measured. Ensure the sensor is facing the light source directly for accurate readings.
- The current illuminance value will be displayed on the LCD.

სურათი 5: A user measuring light levels in an office environment with the PCE-170 A Light Meter.
5.2 Changing Measurement Units (fc/lx)
დააჭირეთ fc/lx button to toggle between foot-candles (fc) and lux (lx) units. The selected unit will be indicated on the display.
5.3 HOLD ფუნქცია
დააჭირეთ გამართავს button to freeze the current reading on the display. Press it again to release the hold and resume live measurements.
5.4 Zero Adjustment (CAL)
ნულოვანი კორექტირების შესასრულებლად:
- Place the light sensor in a completely dark environment (e.g., cover it with the protective cap or place it in a dark box).
- დააჭირეთ CAL button. The display should show "0.00" or a value very close to zero.
- If the display does not show zero, repeat the process.
5.5 დიაპაზონის შერჩევა
The device typically operates in auto-ranging mode. To manually select a range or cycle through available ranges, press the RANGE button. The display will indicate the active range. Press and hold the RANGE button to return to auto-ranging mode.
5.6 Min/Max Function (Power-Up Option)
The PCE-170 A supports Min/Max recording. To activate this feature, refer to the power-up options indicated on the device label (e.g., press and hold a specific button during power-on). This function records the minimum and maximum illuminance values detected during a measurement session.
6. მოვლა
6.1 დასუფთავება
Wipe the device with a soft, dry cloth. Do not use abrasive cleaners or solvents. Keep the light sensor clean and free of dust or smudges, as this can affect measurement accuracy.
6.2 შენახვა
When not in use, store the PCE-170 A Light Meter in its carrying case in a cool, dry place, away from direct sunlight and extreme temperatures. Remove the battery if storing for extended periods.
7. Დიაგნოსტიკა
| პრობლემა | შესაძლო მიზეზი | გამოსავალი |
|---|---|---|
| მოწყობილობა არ ჩართულია. | მკვდარი ან არასწორად დამონტაჟებული ბატარეა. | შეამოწმეთ ბატარეის პოლარობა ან შეცვალეთ იგი ახალი 9 ვოლტიანი ბატარეით. |
| ეკრანზე გამოჩნდება "OL" (გადატვირთვა). | Light intensity exceeds the current measurement range. | Switch to a higher measurement range using the RANGE button, or move to a less intensely lit area. |
| არაზუსტი წაკითხვები. | Dirty sensor, incorrect zero adjustment, or sensor not facing light source correctly. | Clean the sensor, perform zero adjustment in darkness, and ensure the sensor is properly oriented. |
| ეკრანი ცარიელია ან ციმციმებს. | დაბალი ბატარეა. | შეცვალეთ 9 ვ ბატარეა. |
8. სპეციფიკაციები
| პარამეტრი | ღირებულება |
|---|---|
| საზომი დიაპაზონები | 0.00 ... 40,000 lux / 0.000 ... 4000 fc |
| რეზოლუცია | 0.01 ლუქსი / 0.001 fc |
| სიზუსტე | ±3% of measurement value + 5 digits |
| გადატვირთვის ინდიკატორი | "OL" |
| გაზომვის მაჩვენებელი | ყოველ 2 წამში |
| ოპერაციული ტემპერატურა | 0 ... 40°C / 32 ... 104°F |
| სინათლის სენსორი | Silicon photodiode, corrected cosine angle |
| ჩვენება | 5 ციფრიანი LCD |
| დენის წყარო | 9 ვ ბატარეა (შედის) |
| ზომები | 33 x 54 x 196 მმ / 1.3 x 2.1 x 7.7 დუიმი |
| წონა | 180 g / <1 lb (approx. 9.17 ounces) |
8.1 მიწოდების სფერო
The standard delivery package includes:
- 1 x PCE-170 A Lux Meter
- 1 x 9 ვ ბატარეა
- 1 x სატარებელი ჩანთა
- 1 x მომხმარებლის სახელმძღვანელო (ეს დოკუმენტი)
9. გარანტია და მხარდაჭერა
PCE Instruments provides a warranty for this product against defects in materials and workmanship. For specific warranty terms and conditions, please refer to the warranty card included with your purchase or visit the official PCE Instruments website. For technical support, service, or calibration inquiries, please contact PCE Instruments customer service.
PCE Instruments US: ეწვიეთ მაღაზიას