1. უსაფრთხოების მნიშვნელოვანი ინსტრუქციები
Please read all instructions carefully before using this appliance and retain them for future reference. Failure to follow these instructions may result in electric shock, fire, or serious personal injury.
- მოწყობილობა ყოველთვის დამიწებულ დენის წყაროსთან შეაერთეთ.
- არ გამოიყენოთ მოწყობილობა დაზიანებული სადენით ან შტეფსით.
- შეინახეთ მოწყობილობა აალებადი მასალებისა და ღია ცეცხლისგან მოშორებით.
- მუშაობის დროს, უზრუნველყავით მოწყობილობის გარშემო სათანადო ვენტილაცია.
- არ ჩადოთ საგნები ჰაერის შესასვლელში ან გამოსავალში.
- გაწმენდის ან რაიმე სახის ტექნიკური მომსახურების ჩატარებამდე გამორთეთ მოწყობილობა დენის წყაროდან.
- ეს მოწყობილობა არ არის განკუთვნილი შემცირებული ფიზიკური, სენსორული ან გონებრივი შესაძლებლობების ან გამოცდილების და ცოდნის ნაკლებობის მქონე პირების (მათ შორის ბავშვების) გამოსაყენებლად, გარდა იმ შემთხვევისა, როდესაც მათ არ მიეცათ ზედამხედველობა ან ინსტრუქცია მოწყობილობის გამოყენების შესახებ მათ უსაფრთხოებაზე პასუხისმგებელი პირის მიერ.
2. პროდუქტი დასრულდაview
The FlinQ Mobile Air Conditioner is a versatile unit designed to provide cooling, dehumidification, and fan functions for your living space. It is equipped with an energy-efficient design and comes with a window kit for easy installation.

სურათი 2.1: წინა view of the FlinQ Mobile Air Conditioner, showing the main air outlet and control panel area.

Figure 2.2: The mobile air conditioner unit, displaying its energy efficiency label (Class A) and the included remote control for convenient operation.
3. კომპონენტები და ნაწილები
Familiarize yourself with the main components of your mobile air conditioner:
- Main Unit (with control panel)
- გამოსაბოლქვი შლანგი
- Window Sealing Kit (adjustable window slider/plate)
- დისტანციური მართვა
- Drain Hose (for continuous drainage in dehumidification mode)
- Air Filters (located on the back/side)
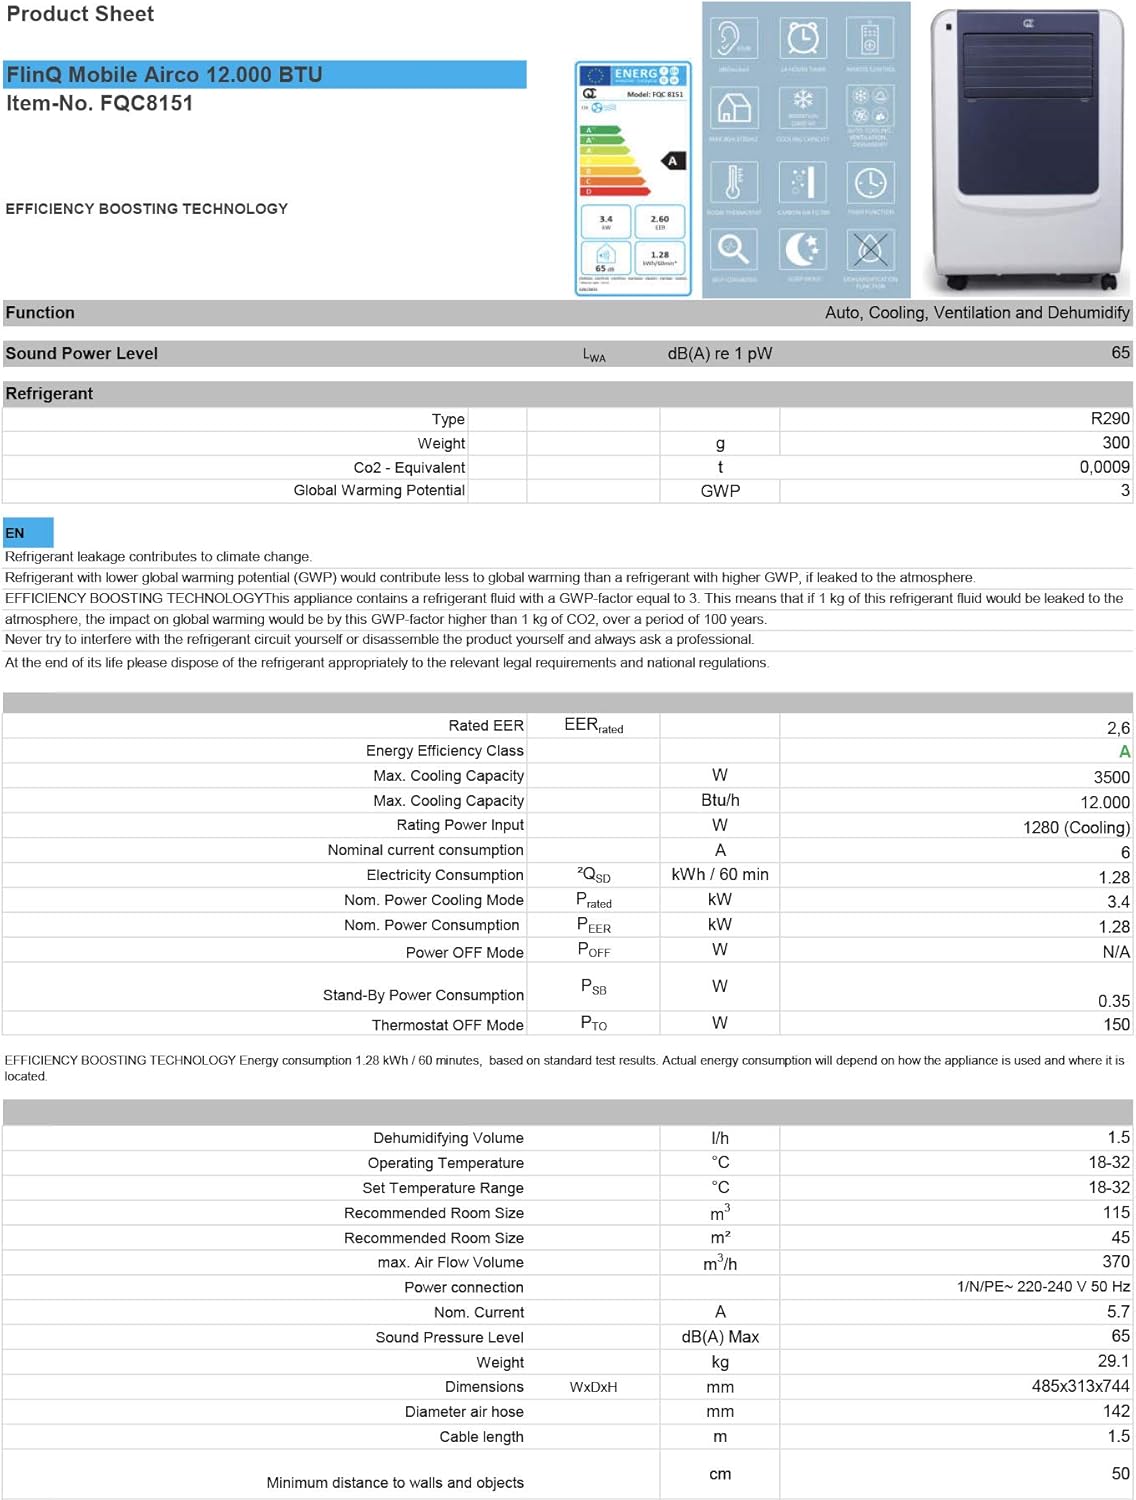
Figure 3.1: The remote control and a visual representation of the unit's key features, including noise level (65dB), 24-hour timer, cooling capacity (12000 BTU/h), room thermostat, carbon air filter, self-diagnosis, sleep mode, remote control function, timer function, auto cooling/fan/dehumidification, and dehumidification function.
4. დაყენება და ინსტალაცია
4.1 შეფუთვა
Carefully remove the air conditioner and all accessories from the packaging. Inspect for any damage during transit. Keep the original packaging for future storage or transport.
4.2 განთავსება
Place the unit on a flat, stable surface. Ensure there is at least 30 cm (12 inches) of clear space around the unit for proper airflow. Do not place it near heat sources or in direct sunlight.
4.3 ფანჯრის კომპლექტის მონტაჟი
To ensure efficient cooling, the hot air extracted by the unit must be vented outside. Use the provided window sealing kit for this purpose.
- გამონაბოლქვი შლანგის შემაერთებელი მიამაგრეთ მოწყობილობის უკანა მხარეს მდებარე ჰაერის გამოსასვლელზე.
- გაწელეთ გამონაბოლქვი შლანგი და მეორე ბოლოზე მიამაგრეთ ფანჯრის ადაპტერი.
- Adjust the window slider/plate to fit your window opening.
- Insert the window adapter into the opening of the window slider/plate.
- Close the window as much as possible to seal the opening around the kit, minimizing air leakage.

სურათი 4.1: მხარე view of the mobile air conditioner, illustrating the connection point for the exhaust hose, which expels hot air from the room.
5. საოპერაციო ინსტრუქციები
5.1 მართვის პანელი
The control panel is located on the top of the unit and features various buttons and an LED display for setting modes, temperature, and timer functions.
5.2 დისტანციური მართვა
The remote control allows you to operate all functions of the air conditioner from a distance. Ensure the remote control batteries are inserted correctly.
5.3 ოპერაციული რეჟიმები
Press the 'Mode' button to cycle through the available operating modes:
- გაგრილების რეჟიმი: ოთახის გასაგრილებლად. ტემპერატურის რეგულირების ღილაკების გამოყენებით დააყენეთ სასურველი ტემპერატურა.
- დატენიანების რეჟიმი: Removes excess moisture from the air. The fan speed is typically fixed in this mode. Consider connecting a drain hose for continuous drainage.
- გულშემატკივართა რეჟიმი: Circulates air without cooling. You can adjust the fan speed (Low, Medium, High).

სურათი 5.1: ახლოდან view of the adjustable louvers on the air conditioner's front panel, which direct the airflow.
6. მოვლა
რეგულარული მოვლა უზრუნველყოფს ოპტიმალურ მუშაობას და ახანგრძლივებს თქვენი კონდიციონერის სიცოცხლის ხანგრძლივობას.
6.1 ჰაერის ფილტრების გაწმენდა
The air filters should be cleaned every two weeks or more frequently depending on usage and air quality. Dirty filters reduce efficiency and can damage the unit.
- გამორთეთ კონდიციონერი დენის წყაროდან.
- Locate and remove the air filters (usually on the back or side of the unit).
- Wash the filters under running water (warm, not hot) or use a vacuum cleaner to remove dust.
- Allow the filters to air dry completely before reinserting them. Do not expose them to direct sunlight.

Figure 6.1: Illustration of how to remove the air filter from the mobile air conditioner for cleaning, highlighting the accessible filter panel.
6.2 წყლის დრენაჟი
The unit collects condensed water during cooling and dehumidification. The internal tank will fill up, and the unit may stop operating when full. Drain the water regularly.
- სადრენაჟე პორტის ქვეშ (როგორც წესი, მოწყობილობის ქვედა უკანა მხარეს) მოათავსეთ არაღრმა ტაფა ან უჯრა.
- მოხსენით სადრენაჟე საცობი, რათა წყალი გამოვიდეს.
- For continuous drainage in dehumidification mode, attach the provided drain hose to the drain port.
6.3 შენახვა
მოწყობილობის ხანგრძლივი შენახვისას:
- გადაწურეთ მთელი წყალი მოწყობილობიდან.
- გაასუფთავეთ ჰაერის ფილტრები.
- გამორთეთ კვების კაბელი და ფრთხილად დაახვიეთ.
- შეინახეთ მოწყობილობა მშრალ, გრილ ადგილას, სასურველია ორიგინალ შეფუთვაში.
7. Დიაგნოსტიკა
მომხმარებელთა მხარდაჭერის სამსახურთან დაკავშირებამდე, გთხოვთ, იხილოთ შემდეგი ცხრილი გავრცელებული პრობლემებისა და მათი გადაჭრის გზებისთვის:
| პრობლემა | შესაძლო მიზეზი | გამოსავალი |
|---|---|---|
| ერთეული არ ირთვება | დენი არ არის; კვების კაბელი არ არის შეერთებული; წყლის ავზი სავსეა | Check power outlet; Plug in power cord; Drain water tank |
| მოწყობილობა არასაკმარისად ცივდება | Dirty air filters; Exhaust hose blocked/leaking; Room too large; Doors/windows open | Clean filters; Check hose for blockages/proper sealing; Ensure room size is within capacity; Close doors/windows |
| ერთეული ხმაურიანია | Unit not on a flat surface; Air filters dirty | Place on flat surface; Clean air filters |
| ბლოკიდან წყალი გადის | სადრენაჟე საცობი სათანადოდ არ არის დალუქული; მოწყობილობა დახრილია | Ensure drain plug is secure; Place unit on a level surface |
8. სპეციფიკაციები
Technical details for the FlinQ Mobile Air Conditioner:
| ფუნქცია | ღირებულება |
|---|---|
| მოდელის ნომერი | 8720168680396 |
| პროდუქტის ზომები | 74 x 48 x 31 სმ |
| ნივთის წონა | 29 g (Note: This weight seems unusually low for an AC unit, please refer to product packaging for accurate weight) |
| ხმაურის დონე | 65 დბ |
| გაგრილების სიმძლავრე | 12000 BTU/სთ |
| ოთახის რეკომენდებული ზომა | 45 მ²-მდე |
| განსაკუთრებული თვისებები | დისტანციური მართვა |
| ენერგეტიკული კლასი | A |

Figure 8.1: Official product sheet detailing technical specifications, energy consumption, cooling capacity, and dimensions of the FlinQ Mobile Air Conditioner.
9. გარანტია და მხარდაჭერა
This FlinQ Mobile Air Conditioner comes with a limited warranty. Please refer to the warranty card included with your purchase for specific terms and conditions.
For technical support, service, or warranty claims, please contact your retailer or the manufacturer directly. Keep your proof of purchase for warranty validation.
საკონტაქტო ინფორმაცია:
- ბრენდი: FLINQ
- Webსაიტი: www.flinq.nl (მაგample, please refer to actual product documentation for correct webსაიტი)
- ელფოსტა: support@flinq.nl (მაგample, please refer to actual product documentation for correct email)


