1. შესავალი
The Autopilot APCET2 is a versatile temperature controller designed for both cooling and heating applications. It features automatic day and night set points, detected by a built-in photocell, allowing for precise temperature management. Easy-to-use knobs facilitate setting adjustments, and a Memory-lock feature ensures consistent performance by preventing accidental changes to set points.
ძირითადი მახასიათებლები:
- Controls heating or cooling equipment with both day/night set points.
- Includes a 20-foot remote precision temperature sensor.
- Temperature control differential of +/- 3°F.
- Built-in photocell for automatic day/night detection.
- Temperature control range: 50°F–100°F (10°C–38°C).
- Electric power source.
2. უსაფრთხოების ინფორმაცია
გთხოვთ, ამ მოწყობილობის გამოყენებამდე წაიკითხოთ და გაიგოთ ყველა უსაფრთხოების ინსტრუქცია. ამ ინსტრუქციების შეუსრულებლობამ შეიძლება გამოიწვიოს ელექტროშოკი, ხანძარი ან სერიოზული დაზიანება.
- მხოლოდ შიდა გამოყენება: This device is intended for indoor use in dry locations. Do not expose to water or high humidity.
- ელექტრო რეიტინგი: Ensure the connected device's electrical rating does not exceed the thermostat's maximum load (1800 watts, 15 amps at 120V AC).
- სათანადო დამიწება: Always plug the thermostat into a properly grounded 3-prong outlet.
- მოერიდეთ გადატვირთვას: Do not plug multiple high-power devices into the thermostat using a power strip or adapter.
- სენსორის განთავსება: Position the temperature sensor away from direct heat sources, cold drafts, or direct sunlight to ensure accurate readings.
- დასუფთავება: Disconnect power before cleaning. Use a dry cloth; do not use liquid cleaners.
- ბავშვები და შინაური ცხოველები: შეინახეთ მოწყობილობა ბავშვებისა და შინაური ცხოველებისთვის მიუწვდომელ ადგილას.
3. პროდუქტი დასრულდაview
The Autopilot APCET2 thermostat features a user-friendly design with clearly labeled controls and indicators.
წინა View:

სურათი 3.1: წინა view of the Autopilot APCET2 thermostat. This image displays the main control panel, including the two temperature setting knobs, the day/night mode switch, the heating/cooling mode switch, and the integrated power outlet for connecting your device. The "ON" and "POWER" indicator lights are also visible.
- Day/Night Temperature Knobs: Two separate knobs for setting desired temperatures for day and night cycles.
- Day/Night Mode Switch: Toggles between 24-hour operation or automatic day/night detection via photocell.
- Heating/Cooling Mode Switch: Selects whether the thermostat controls a heating or cooling device.
- ინტეგრირებული დენის წყარო: Where the controlled device is plugged in.
- დენის ინდიკატორი სინათლე: ანათებს, როდესაც მოწყობილობას დენი მიეწოდება.
- Output Indicator Light: Illuminates when power is being supplied to the connected device.
უკან View:

სურათი 3.2: უკან view of the Autopilot APCET2 thermostat. This image shows the standard 3-prong power plug for connecting the thermostat to a wall outlet, along with the screws for potential wall mounting.
- დენის შტეფსელი: Standard 3-prong plug for connecting to a 120V AC wall outlet.
- სამონტაჟო ხვრელები: For optional wall mounting.
ზომები:
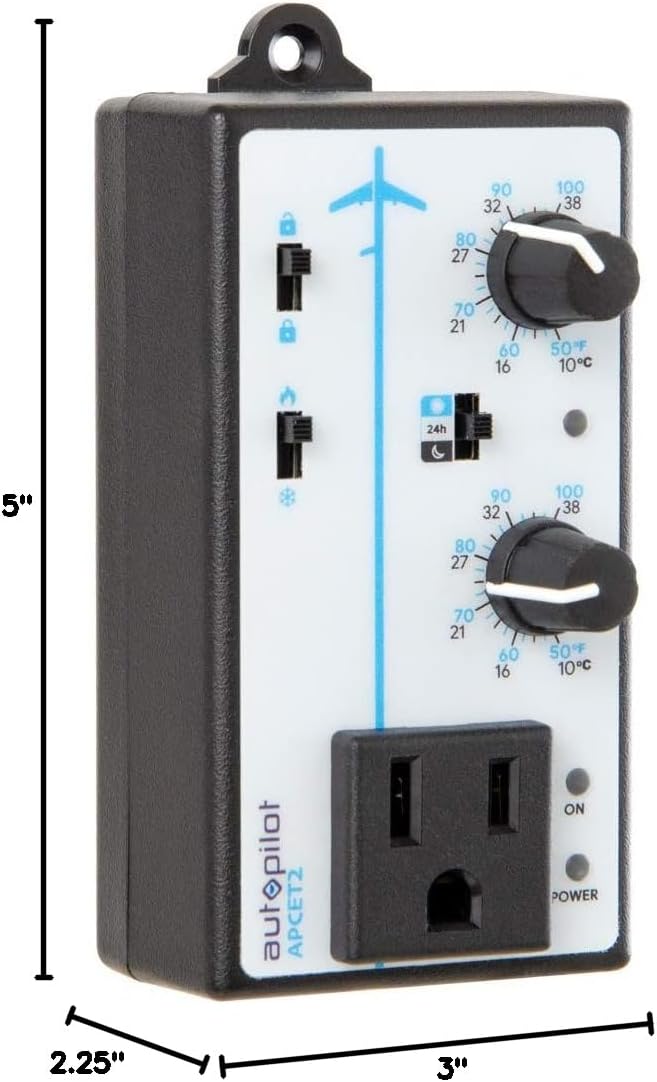
სურათი 3.3: Dimensions of the Autopilot APCET2 thermostat. The image indicates the device measures approximately 3 inches deep, 2.25 inches wide, and 5 inches high.
4. დაყენების ინსტრუქციები
- გახსენით მოწყობილობა: Carefully remove the Autopilot APCET2 thermostat and its components from the packaging.
- ტემპერატურის სენსორის დაკავშირება: Plug the 20-foot remote precision temperature sensor into the designated port on the side of the thermostat. Ensure a secure connection.
- მოათავსეთ სენსორი: Place the temperature sensor in the area where you want to monitor and control the temperature. Avoid placing it in direct sunlight, near heat sources, or in drafts, as this can affect accuracy.
- თერმოსტატის შეერთება: Insert the 3-prong plug of the Autopilot APCET2 thermostat into a standard 120V AC grounded wall outlet. The Power indicator light should illuminate.
- შეაერთეთ თქვენი მოწყობილობა: Plug the heating or cooling device you wish to control into the integrated power outlet on the front of the thermostat.
- საწყისი შემოწმება: Ensure all connections are secure before proceeding to operation.
5. საოპერაციო ინსტრუქციები
The Autopilot APCET2 offers flexible temperature control with day and night settings and heating/cooling modes.
5.1 Selecting Operating Mode (Heating or Cooling)
- იპოვნეთ Heating/Cooling Mode Switch on the front panel (typically marked with flame and snowflake icons).
- გაასრიალეთ გადამრთველი ცეცხლის ხატი ამისთვის გათბობის რეჟიმი. In this mode, the connected device will turn ON when the temperature drops below the set point and turn OFF when it rises above the set point (considering the +/- 3°F differential).
- გაასრიალეთ გადამრთველი ფიფქის ხატი ამისთვის გაგრილების რეჟიმი. In this mode, the connected device will turn ON when the temperature rises above the set point and turn OFF when it drops below the set point (considering the +/- 3°F differential).
5.2 დღის და ღამის ტემპერატურის დაყენება
The thermostat allows for distinct day and night temperature settings.
- Day Temperature Setting: გამოიყენეთ upper knob (associated with the sun icon) to set your desired daytime temperature. Rotate the knob clockwise to increase the temperature and counter-clockwise to decrease it. The range is 50°F–100°F (10°C–38°C).
- Night Temperature Setting: გამოიყენეთ lower knob (associated with the moon icon) to set your desired nighttime temperature. Rotate the knob clockwise to increase the temperature and counter-clockwise to decrease it. The range is 50°F–100°F (10°C–38°C).
5.3 Day/Night Detection Mode
The thermostat can automatically switch between day and night settings using its built-in photocell.
- იპოვნეთ დღის/ღამის რეჟიმის გადამრთველი (typically marked with a 24h icon and sun/moon icons).
- გაასრიალეთ გადამრთველი sun/moon icon ამისთვის დღის/ღამის ავტომატური გამოვლენა. The built-in photocell will detect ambient light levels and automatically switch between your set day and night temperatures.
- გაასრიალეთ გადამრთველი 24h icon ამისთვის 24-Hour Operation. In this mode, the thermostat will continuously use the Day Temperature Setting, regardless of light conditions.
5.4 Memory-Lock Feature
The Memory-lock feature prevents accidental changes to your set points.
- რომ ჩაკეტვა the settings, slide the small switch next to the padlock icon to the ჩაკეტილი პოზიცია. This will prevent the temperature knobs from being accidentally adjusted.
- რომ განბლოკვა the settings, slide the switch to the გახსნილი პოზიცია.
6. მოვლა
Regular maintenance ensures optimal performance and longevity of your Autopilot APCET2 thermostat.
- დასუფთავება: Disconnect the thermostat from the power outlet before cleaning. Use a soft, dry cloth to wipe the exterior. Do not use abrasive cleaners, solvents, or immerse the unit in water.
- სენსორის მოვლა: Keep the temperature sensor clean and free from dust or debris. Ensure the sensor cable is not pinched or damaged.
- შენახვა: If storing the device for an extended period, disconnect it from power, clean it, and store it in a cool, dry place.
7. Დიაგნოსტიკა
If you encounter issues with your Autopilot APCET2 thermostat, refer to the following common problems and solutions:
| პრობლემა | შესაძლო მიზეზი | გამოსავალი |
|---|---|---|
| Device not turning ON/OFF at set temperature. | Incorrect mode selected (Heating/Cooling). Temperature differential not met. Thermostat not receiving power. Connected device is faulty or not powered. | Verify the Heating/Cooling switch is in the correct position. Allow for the +/- 3°F temperature differential. Check if the thermostat is securely plugged into a live outlet and the Power indicator is ON. Test the connected device by plugging it directly into a wall outlet. |
| Temperature settings cannot be adjusted. | Memory-lock feature is engaged. | Slide the Memory-lock switch to the unlocked position. |
| Day/Night mode not switching automatically. | Photocell mode not selected. Photocell is obstructed or in constant light/darkness. | Ensure the Day/Night Mode switch is set to the sun/moon icon. Check that the photocell (small sensor on the front) is not covered and is exposed to natural light changes. |
| ტემპერატურის არაზუსტი ჩვენებები. | Temperature sensor improperly placed or damaged. | Relocate the sensor away from direct heat, cold drafts, or sunlight. Inspect the sensor and cable for damage. |
თუ პრობლემა ამ გადაწყვეტილებების მცდელობის შემდეგაც არ მოგვარდება, გთხოვთ, დაუკავშირდეთ მომხმარებელთა მხარდაჭერის სამსახურს.
8. სპეციფიკაციები
| ბრენდი | ავტოპილოტი |
| მოდელის სახელი | Advanced Day & Night Cooling or Heating |
| მოდელის ნომერი | APCET2 |
| პროდუქტის ზომები | 3"D x 2.25"W x 5"H |
| კონტროლერის ტიპი | Knob & Push Button |
| სპეციალური ფუნქცია | Lockable (Memory-lock) |
| ფერი | შავი |
| სპეციფიკური გამოყენება | Temperature Control in Grow Rooms, Controlling Heating and Cooling Equipment |
| ტემპერატურის კონტროლის ტიპი | პროგრამირებადი |
| მოყვება კომპონენტები | 20' remote precision temperature sensor |
| დენის წყარო | ელექტრო |
| ტtage | 120 ვოლტი |
| ვატtage | 1800 ვატი |
| ნივთის წონა | 8.1 უნცია |
| ტემპერატურის კონტროლის დიაპაზონი | 50°F–100°F (10°C–38°C) |
| ტემპერატურის დიფერენციალური | +/- 3 ° F |
| ჩვენების ტიპი | LCD |
| უკანა განათება | დიახ |
| სამონტაჟო ტიპი | კედლის სამაგრი |
9. გარანტია და მომხმარებელთა მხარდაჭერა
For warranty information or technical assistance, please contact Autopilot customer support. Refer to the product packaging or the official Autopilot webსაიტი უახლესი საკონტაქტო ინფორმაციისთვის.
When contacting support, please have your product model number (APCET2) and purchase information readily available.


