1. შესავალი
This manual provides essential information for the proper installation, configuration, and operation of your GIGABYTE B550 AORUS ELITE AX motherboard. This motherboard is designed to support 3rd Gen AMD Ryzen Processors and offers advanced features for high-performance computing.

სურათი 1.1: დასრულდაview of the GIGABYTE B550 AORUS ELITE AX Motherboard. This image displays the full motherboard with its various components, including the CPU socket, RAM slots, PCIe slots, and heatsinks.
Key features include a True 12+2 Phases Digital VRM Solution, advanced thermal design with enlarged surface heatsinks, an Ultra Durable PCIe 4.0 x16 Slot, dual ultra-fast NVMe PCIe 4.0/3.0 x4 M.2 slots with dual thermal guards, and integrated Intel WiFi 6 802.11ax with Bluetooth 5.
2. დაყენება და ინსტალაცია
ინსტალაციის დაწყებამდე დარწმუნდით, რომ თქვენი სისტემა გამორთულია და დენის წყაროდან გამორთულია. სტატიკური განმუხტვის თავიდან ასაცილებლად, დედა დაფა ყოველთვის კიდეებით მოეჭიდეთ.
2.1. კომპონენტის იდენტიფიკაცია
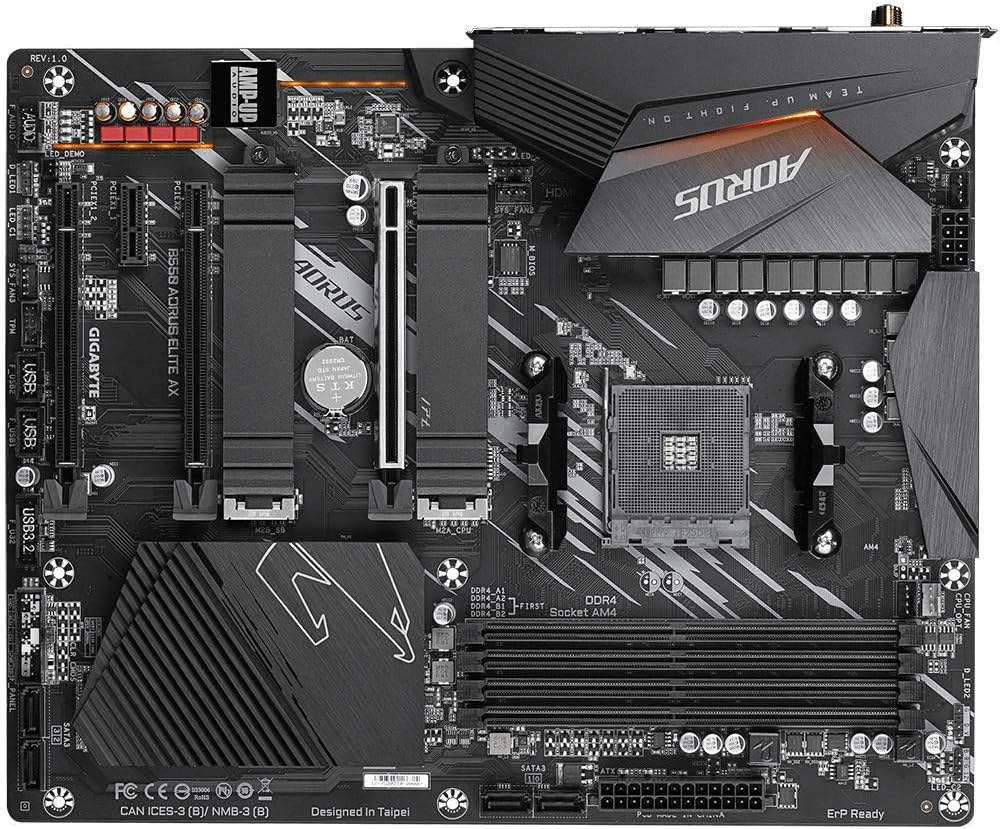
სურათი 2.1: ზემოდან ქვემოთ view of the GIGABYTE B550 AORUS ELITE AX Motherboard. This image highlights the layout of the CPU socket, four DDR4 DIMM slots, multiple PCIe slots, and two M.2 slots with their thermal guards.
2.2. პროცესორის ინსტალაცია
- Locate the AM4 CPU socket. Lift the load lever to open the socket.
- Carefully align the triangular mark on the CPU with the mark on the socket. Gently place the CPU into the socket without forcing it.
- Lower the load lever back into place to secure the CPU.
2.3. ოპერატიული მეხსიერების ინსტალაცია
This motherboard supports Dual Channel ECC/Non-ECC Unbuffered DDR4 memory across 4 DIMM slots.
- გახსენით კლიპები DIMM სლოტის ორივე ბოლოში.
- Align the notch on the DDR4 memory module with the key on the DIMM slot.
- მტკიცედ დააჭირეთ მეხსიერების მოდულის ორივე ბოლო, სანამ სამაგრები არ ჩამაგრდება.
2.4. M.2 SSD-ის ინსტალაცია
The motherboard features dual ultra-fast NVMe PCIe 4.0/3.0 x4 M.2 slots with dual thermal guards.
- Unscrew and remove the M.2 thermal guard from the desired slot.
- კუთხით მოათავსეთ M.2 SSD სლოტში.
- ფრთხილად დააჭირეთ SSD-ს და დაამაგრეთ იგი მოწოდებული ხრახნით.
- Reattach the M.2 thermal guard to ensure optimal cooling.
2.5. PCIe ბარათის ინსტალაცია
Install graphics cards or other expansion cards into the PCIe slots. The top slot is an Ultra Durable PCIe 4.0 x16 slot.
- Align the PCIe card with the chosen slot.
- მტკიცედ დააჭირეთ მანამ, სანამ ბარათი სრულად არ ჩაჯდება და დამჭერი კლიპი არ ჩაიჭრება.
2.6. დენის კავშირები
დედაპლატას შეაერთეთ კვების ბლოკიდან 24-პინიანი ATX მთავარი კვების კონექტორი და 8-პინიანი CPU-ს კვების კონექტორი.
2.7. წინა პანელის კონექტორები
Connect the power button, reset button, HDD LED, and USB/audio headers from your PC case to the corresponding pins on the motherboard. Refer to the motherboard diagram for exact pin locations.
2.8. უკანა შემავალი/გამომავალი პანელი

Image 2.2: Rear I/O Panel of the GIGABYTE B550 AORUS ELITE AX Motherboard. This image shows the various ports available, including USB 3.2 Gen 1, USB 3.2 Gen 2, DisplayPort, HDMI, 2.5GbE LAN, Wi-Fi antenna connectors, and audio jacks. The pre-installed I/O shield is visible.
The motherboard features a pre-installed I/O shield for easy and quick installation. Connect your peripherals such as monitor, keyboard, mouse, and network cable to the appropriate ports on the rear I/O panel.
3. საოპერაციო ინსტრუქციები
3.1. პირველი ჩატვირთვა
After assembling all components and connecting power, press the power button on your PC case. The system should power on and display the GIGABYTE splash screen.
3.2. BIOS/UEFI-ზე წვდომა
BIOS/UEFI დაყენების პროგრამაში შესასვლელად, დააჭირეთ ღილაკს DEL key repeatedly during the initial boot process when the GIGABYTE logo appears. The BIOS allows you to configure system settings, boot order, and enable features like XMP for memory profiles.
3.3. დრაივერის ინსტალაცია
After installing your operating system, install the necessary drivers for the motherboard's components. These include chipset drivers, LAN drivers, Wi-Fi/Bluetooth drivers, and audio drivers. Drivers can typically be found on the GIGABYTE official webსაიტი თქვენი კონკრეტული დედაპლატის მოდელისთვის.
4. მოვლა
4.1. სისტემის გაწმენდა
Regularly clean your computer's interior to prevent dust buildup, which can lead to overheating and reduced performance. Use compressed air to remove dust from fans, heatsinks, and other components. Ensure the system is powered off and unplugged before cleaning.
4.2. BIOS-ის განახლებები
GIGABYTE provides BIOS updates to improve system stability, add support for new hardware, and fix bugs. The B550 AORUS ELITE AX supports Q-Flash Plus, allowing you to update the BIOS without installing the CPU, memory, or graphics card. Refer to the GIGABYTE website for detailed instructions on using Q-Flash Plus and for the latest BIOS versions.
5. Დიაგნოსტიკა
ეს განყოფილება განიხილავს გავრცელებულ პრობლემებს, რომლებსაც შეიძლება წააწყდეთ.
5.1. კვების წყარო არ არის / ჩატვირთვა არ არის
- დარწმუნდით, რომ ყველა კვების კაბელი (24-პინიანი ATX, 8-პინიანი CPU) საიმედოდ არის დაკავშირებული დედაპლატთან და კვების წყაროსთან.
- დარწმუნდით, რომ კვების წყაროს გადამრთველი „ჩართვის“ პოზიციაშია.
- შეამოწმეთ, რომ წინა პანელის ჩართვის ღილაკის კონექტორი სწორად არის მიერთებული დედაპლატზე.
- თუ შესაძლებელია, სხვა კვების წყაროთი შეამოწმეთ.
5.2. ეკრანის გამომავალი არ არის
- Ensure your monitor is connected to the graphics card (if installed) or the motherboard's HDMI/DisplayPort (if using an APU with integrated graphics).
- ხელახლა დააინსტალირეთ გრაფიკული ბარათი და მეხსიერების მოდულები.
- სცადეთ ჩატვირთვა მხოლოდ ერთი დაინსტალირებული ოპერატიული მეხსიერების გამოყენებით.
5.3. Bluetooth / Wi-Fi Connectivity Issues
- Ensure the external Wi-Fi antenna is securely connected to the rear I/O panel.
- Update your Wi-Fi and Bluetooth drivers to the latest version from the GIGABYTE webსაიტი.
- If Bluetooth devices disconnect after sleep mode, try disabling USB selective suspend settings in Windows Power Options or updating the BIOS to the latest version, as this has resolved similar issues in some cases.
5.4. BIOS Reset
If you encounter issues after changing BIOS settings, you may need to reset the BIOS to default settings. This motherboard does not feature a dedicated BIOS reset button. To clear CMOS (BIOS settings), power off your system, unplug it, and remove the small circular battery (CMOS battery) from the motherboard for a few minutes. Reinsert the battery and power on the system.
6. სპეციფიკაციები
Below are the key technical specifications for the GIGABYTE B550 AORUS ELITE AX Motherboard:
| ფუნქცია | სპეციფიკაცია |
|---|---|
| ბრენდი | GIGABYTE |
| მოდელის სახელი | B550 AORUS ELITE AX |
| CPU სოკეტი | სოკეტი AM4 |
| თავსებადი პროცესორები | AMD მე-3 თაობის Ryzen |
| ჩიპსეტის ტიპი | AMD B550 |
| RAM მეხსიერების ტექნოლოგია | DDR4 |
| მეხსიერების სიჩქარე | 2133 MHz (Base), up to 4733MHz (OC) |
| მეხსიერების შენახვის მოცულობა | 128 GB (მაქს.) |
| უკაბელო ტიპი | 802.11ax (Intel WiFi 6) |
| LAN | 2.5 გიგაბიტიანი Ethernet |
| PCIe სლოტები | 1x PCIe 4.0 x16, 2x PCIe 3.0 x16 (x4 რეჟიმი), 1x PCIe 3.0 x1 |
| M.2 სლოტები | 2x NVMe PCIe 4.0/3.0 x4 with Thermal Guards |
| USB 2.0 პორტები | 2 (უკანა) |
| USB 3.2 Gen 1 პორტები | 4 (უკანა) |
| USB 3.2 Gen 2 პორტები | 2 (Rear, Type-A) |
| ვიდეო გამომავალი | HDMI, DisplayPort |
| აუდიო | Realtek ALC1200 Codec, AMP-UP Audio |
| ფორმის ფაქტორი | ATX |
| ნივთის წონა | 4.07 ფუნტი |
| პროდუქტის ზომები | 13.18 x 10.62 x 3.14 ინჩი |
7. ინფორმაცია გარანტიის შესახებ
GIGABYTE products are covered by a limited warranty. The specific terms and duration of the warranty may vary by region and product type. Please retain your proof of purchase for warranty claims. For detailed warranty information, including coverage, limitations, and the claims process, please visit the official GIGABYTE webსაიტზე ან დაუკავშირდით თქვენს ადგილობრივ საცალო მოვაჭრეს.
8. ტექნიკური მხარდაჭერა
If you encounter issues that cannot be resolved using this manual or require further assistance, please contact GIGABYTE technical support. You can find support resources, FAQs, driver downloads, and contact information on the official GIGABYTE webსაიტი:
When contacting support, please have your motherboard model (B550 AORUS ELITE AX) and a detailed description of your issue ready.


