1. შესავალი
Welcome to the user manual for your Ulefone Armor X9 Rugged Phone. This guide provides essential information on setting up, operating, maintaining, and troubleshooting your device. The Ulefone Armor X9 is designed for durability and performance, featuring robust protection and advanced functionalities.
Key features of your Ulefone Armor X9 include:
- IP68/IP69K Grade 360 All Round Protection: შექმნილია მკაცრი გარემოს გაძლებისთვის.
- Android 11 ოპერაციული სისტემა: Enjoy the latest Android experience.
- 4 GB ოპერატიული მეხსიერება + 128 GB ROM: Ampთავისუფალი მეხსიერება და საცავი თქვენი აპლიკაციებისა და მონაცემებისთვის.
- 16MP Triple Rear Camera: Capture high-quality photos and videos.
- Massive 5580mAh Battery Capacity: Extended usage time.
- Triple Navigation System: Enhanced positioning accuracy.
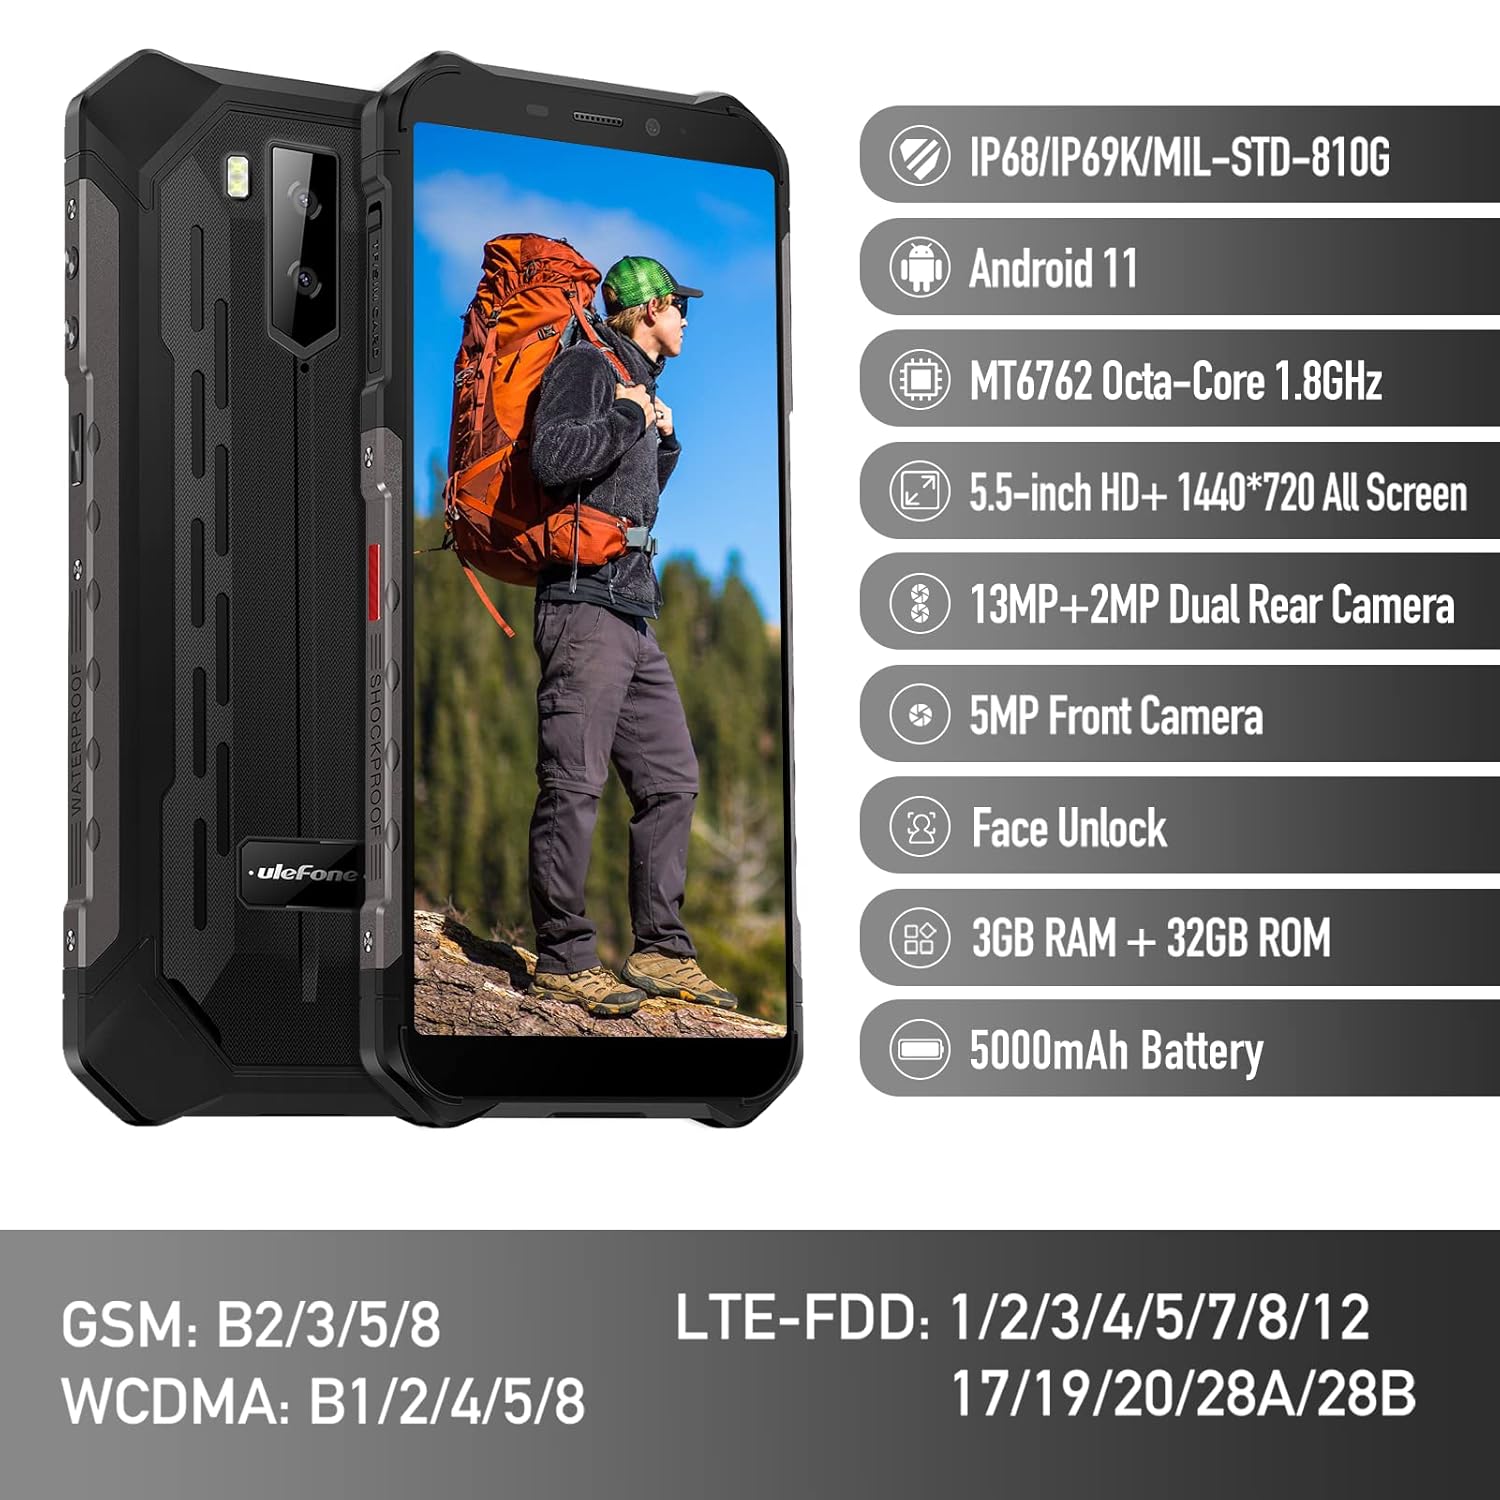
Figure 1: Ulefone Armor X9 Rugged Phone overview, highlighting its robust design and core specifications like IP68/IP69K rating, Android 11, Octa-Core processor, 5.5-inch HD+ screen, 13MP+2MP dual rear camera, 5MP front camera, Face Unlock, 3GB RAM + 32GB ROM, and 5000mAh battery.
2. დაყენება
2.1. SIM ბარათის და TF ბარათის ინსტალაცია
The Ulefone Armor X9 supports dual SIM cards and a TF (microSD) card for expandable storage. Follow these steps to install them:
- იპოვეთ SIM ბარათის უჯრა ტელეფონის გვერდზე.
- უჯრის გასახსნელად გამოიყენეთ მოწოდებული SIM ბარათის ამოსაღები ხელსაწყო.
- Carefully place your Nano-SIM cards into the designated slots (SIM1 and SIM2).
- If using a TF card, place it into the dedicated TF card slot. Note that some configurations may share a slot between SIM2 and the TF card.
- Gently push the tray back into the phone until it is flush with the device body. Ensure the tray is properly sealed to maintain water and dust resistance.

Figure 2: Illustration of the dual SIM and TF card tray, showing how to insert SIM1, SIM2, and a TF card into the Ulefone Armor X9.
2.2. საწყისი დატენვა
Before first use, it is recommended to fully charge your Ulefone Armor X9. Use the provided USB cable and power adapter.
- შეაერთეთ USB კაბელი თქვენი ტელეფონის დამტენ პორტთან.
- შეაერთეთ USB კაბელის მეორე ბოლო დენის ადაპტერთან.
- შეაერთეთ დენის ადაპტერი კედლის განყოფილებაში.
- ეკრანზე გამოჩნდება დატენვის ინდიკატორი. დაელოდეთ ტელეფონს დატენვას მანამ, სანამ ბატარეის ხატულა სრულად არ გამოჩნდება.
2.3. ჩართვა/გამორთვა
- ჩართვა: დააჭირეთ და გააჩერეთ ჩართვის ღილაკი (ჩვეულებრივ მარჯვენა მხარეს) სანამ Ulefone-ის ლოგო არ გამოჩნდება.
- გამორთვა: Press and hold the Power button until the power options menu appears on the screen. Select "Power off" and confirm.
- გადატვირთვა: კვების პარამეტრების მენიუდან აირჩიეთ "გადატვირთვა" და დაადასტურეთ.
3. საოპერაციო ინსტრუქციები
3.1. ძირითადი ნავიგაცია (Android 11)
Your Ulefone Armor X9 runs on Android 11, offering an intuitive user interface. Common gestures and navigation include:
- Აწიე: აპლიკაციის უჯრაზე წვდომა.
- გადაფურცლეთ ქვემოთ: გახსენით შეტყობინებების პანელი და სწრაფი პარამეტრები.
- შეეხეთ: აირჩიეთ ნივთი ან გახსენით აპლიკაცია.
- გრძელი პრესა: კონტექსტურ მენიუებზე წვდომა ან ხატულების გადატანა.
- მასშტაბირება თითებით: სურათების მასშტაბირება გადიდება ან დაპატარავება და web გვერდები.

Figure 3: Screenshots of the Android 11 interface on the Ulefone Armor X9, showing settings menus, quick toggles, and the sound recorder application.

Figure 4: The 5.5-inch 18:9 All Screen display of the Ulefone Armor X9, showcasing its immersive viewing experience with an image of a skier.
3.2. კამერის გამოყენება
Your phone is equipped with a 16MP Triple Rear Camera and a Front Camera. To use the camera:
- გახსენით „კამერის“ აპლიკაცია თქვენი მთავარი ეკრანიდან ან აპლიკაციების უჯრიდან.
- ფოტოს გადასაღებად შეეხეთ ჩამკეტის ღილაკს.
- საჭიროებისამებრ გადართეთ ფოტო და ვიდეო რეჟიმებს შორის.
- Tap the icon to switch between the front and rear cameras.
- Explore various camera modes and settings for optimal results.
3.3. დაკავშირება
The Ulefone Armor X9 supports various connectivity options:
- Wi-Fi: ხელმისაწვდომ ქსელებთან დასაკავშირებლად გადადით პარამეტრებში > ქსელი და ინტერნეტი > Wi-Fi.
- Bluetooth: Go to Settings > Connected devices > Bluetooth to pair with Bluetooth devices.
- GPS: The phone features AGPS for accurate location services. Ensure location services are enabled in Settings > Location.
- USB: მონაცემთა გადასაცემად ან დატენვისთვის, თქვენი ტელეფონი კომპიუტერს USB კაბელის გამოყენებით დაუკავშირეთ.
3.4. სახის განბლოკვა
For convenient and secure unlocking, your Ulefone Armor X9 supports Face Unlock:
- გადადით პარამეტრებში > უსაფრთხოება > სახით განბლოკვა.
- მიჰყევით ეკრანზე მითითებებს თქვენი სახის დასარეგისტრირებლად.
- Ensure good lighting and hold the phone at eye level during registration.
- რეგისტრაციის შემდეგ, ტელეფონის განბლოკვა შეგიძლიათ უბრალოდ წინა კამერის დათვალიერებით.
4. მოვლა
4.1. დასუფთავება და მოვლა
To maintain the performance and appearance of your rugged phone:
- გაწმინდეთ ეკრანი და კორპუსი რბილი, ბუსუსების გარეშე ქსოვილით.
- ჯიუტი ჭუჭყისთვის გამოიყენეთ ოდნავ დamp ქსოვილი. მოერიდეთ უხეში ქიმიკატების ან აბრაზიული მასალების გამოყენებას.
- Ensure all port covers are securely closed to maintain water and dust resistance, especially after charging or using headphones.

Figure 5: The Ulefone Armor X9's 360° All Protection Design, showcasing its superior materials and superb durability against impacts and harsh conditions.
4.2. წყლისა და მტვრისადმი მდგრადობა (IP68/IP69K)
The Ulefone Armor X9 is rated IP68/IP69K, meaning it is resistant to dust and water immersion. However, this resistance is not permanent and may decrease over time with normal wear. To ensure optimal protection:
- Do not intentionally submerge the phone in water for extended periods or beyond specified depths.
- Avoid exposing the phone to high-pressure water or extreme temperatures.
- Ensure all port covers are tightly sealed before exposure to water or dust.
- If the phone gets wet, dry it thoroughly before charging or opening any ports.
4.3. ბატარეის მოვლა
To prolong the life of your 5580mAh Lithium Polymer battery:
- მოერიდეთ ექსტრემალურ ტემპერატურას (ცხელი ან ცივი), რადგან მათ შეუძლიათ ბატარეის მუშაობის შემცირება.
- გამოიყენეთ მხოლოდ ორიგინალი დამტენი და კაბელი ან სერტიფიცირებული თავსებადი აქსესუარები.
- ხშირად ნუ დაუშვებთ ბატარეის სრულად დაცლას. დატენეთ ის მანამ, სანამ მისი დატენვის დონე ძალიან დაბალ დონეს მიაღწევს.
5. Დიაგნოსტიკა
If you encounter issues with your Ulefone Armor X9, try the following troubleshooting steps:
5.1. ტელეფონი არ ირთვება
- დარწმუნდით, რომ ბატარეა დატენილია. შეაერთეთ ტელეფონი დამტენთან მინიმუმ 30 წუთის განმავლობაში.
- გადატვირთვის იძულებით დასაწყებად დააჭირეთ და გააჩერეთ ჩართვის ღილაკი 10-15 წამის განმავლობაში.
5.2. დატენვის პრობლემები
- Verify that the charging cable and adapter are working correctly. Try a different charger if available.
- დარწმუნდით, რომ დატენვის პორტი სუფთაა და ნარჩენებისგან თავისუფალი.
- Make sure the charging cable is fully inserted into the port. Some rugged phone ports may require a firm connection due to protective covers.
5.3. SIM/TF Card Not Detected
- Ensure the SIM/TF card is correctly inserted into the tray and the tray is fully seated.
- გადატვირთეთ ტელეფონი.
- Check if the SIM card is active with your network provider.
5.4. აპლიკაციის გათიშვა ან გაყინვა
- დახურეთ და ხელახლა გახსენით პრობლემური აპლიკაცია.
- აპლიკაციის ქეშისა და მონაცემების გასუფთავება (პარამეტრები > აპლიკაციები > [აპლიკაციის სახელი] > მეხსიერება და ქეში).
- დარწმუნდით, რომ აპლიკაცია განახლებულია უახლეს ვერსიაზე.
- გადატვირთეთ ტელეფონი.
5.5. ქარხნული გადატვირთვა
თუ პრობლემები კვლავ გაგრძელდა, ქარხნულ პარამეტრებზე გადატვირთვამ შესაძლოა ისინი მოაგვაროს. გაფრთხილება: ეს თქვენს ტელეფონზე არსებული ყველა მონაცემის წაშლას გამოიწვევს. გაგრძელებამდე შექმენით მნიშვნელოვანი მონაცემების სარეზერვო ასლი.
- გადადით პარამეტრებში > სისტემაში > პარამეტრების გადატვირთვაზე.
- აირჩიეთ "ყველა მონაცემის წაშლა (ქარხნული პარამეტრების გადატვირთვა)".
- დაადასტურეთ თქვენი გადაწყვეტილება და საჭიროების შემთხვევაში შეიყვანეთ თქვენი PIN/პაროლი.
6. სპეციფიკაციები
Below are the detailed specifications for the Ulefone Armor X9:

Figure 6: Details of the Ulefone Armor X9's Octa-Core Processor, highlighting its power-efficient yet powerful performance, along with 3GB RAM and 32GB ROM, and support for up to 256GB TF card extendable storage.
| ფუნქცია | სპეციფიკაცია |
|---|---|
| ოპერაციული სისტემა | Android 11.0 |
| ოპერატიული მეხსიერება | 3 GB (Note: Feature bullets mention 4GB RAM, please verify actual model) |
| მეხსიერების შენახვის მოცულობა | 32 GB (Expandable with TF card up to 256GB. Feature bullets mention 128GB ROM, please verify actual model) |
| CPU მოდელი | MT6762 რვა ბირთვი 1.8 გჰც (Note: Specifications list 'Snapdragon', but image indicates MT6762. Please verify actual model) |
| პროდუქტის ზომები | 15.8 x 7.75 x 1.38 სმ |
| ნივთის წონა | 472 გ |
| ბატარეები | 1 Lithium Polymer battery (5580mAh, included) |
| უსადენო კომუნიკაცია | მობილური, Bluetooth, USB, Wi-Fi |
| GPS | AGPS |
| განსაკუთრებული თვისებები | Rear Camera, Face Unlock, IP68/IP69K, MIL-STD-810G |
| ჩვენება | 5.5-inch HD+ 1440*720 All Screen |
| უკანა კამერა | 13MP+2MP Dual Rear Camera (Note: Feature bullets mention 16MP Triple Rear Camera, please verify actual model) |
| წინა კამერა | 5 MP წინა კამერა |
| ფერი | შავი |
| მწარმოებელი | ულეფონე |
Note: Specifications are based on available product data and may vary slightly. Please refer to your product packaging for the most accurate information. There are discrepancies between feature bullets, specifications, and image text regarding RAM, ROM, CPU, and camera megapixels. This manual uses the most frequently cited or detailed information, with notes for clarification.
7. გარანტია და მხარდაჭერა
7.1. ინფორმაცია გარანტიის შესახებ
Your Ulefone Armor X9 is covered by a manufacturer's warranty. The specific terms and duration of the warranty may vary by region and retailer. Please refer to the warranty card included in your product packaging or contact your point of purchase for detailed information regarding warranty coverage and claims.
7.2. მომხმარებელთა მხარდაჭერა
For technical assistance, troubleshooting beyond this manual, or warranty inquiries, please contact Ulefone customer support or your authorized dealer. You can typically find contact information on the official Ulefone webსაიტზე ან თქვენი პროდუქტის დოკუმენტაციაში.
- ეწვიეთ Ulefone-ის ოფიციალურ პორტალს website for FAQs, software updates, and support contact details.
- მხარდაჭერის სამსახურთან დაკავშირებისას ხელთ გქონდეთ შესყიდვის ქვითარი და პროდუქტის სერიული ნომერი.


