1. შესავალი
This manual provides detailed instructions for the installation, operation, and maintenance of your WOLFBOX T10 Plus 2.5K Mirror Dash Cam. Please read this manual thoroughly before using the device to ensure proper functionality and safety. This device is designed to record video footage from your vehicle's front and rear perspectives, offering features such as GPS tracking, Wi-Fi connectivity, and parking monitoring.
2. პაკეტის შიგთავსი
დარწმუნდით, რომ ქვემოთ ჩამოთვლილი ყველა ნივთი შედის თქვენს პაკეტში:
- 1x WOLFBOX T10 Plus Mirror Dash Cam (Front Camera integrated)
- 1x WDR/HDR Rear Camera
- 1x GPS ანტენა
- 1x 32GB TF ბარათი
- 1x 21FT Backup Camera Cable
- 1x 11.5FT Car Charger
- 4x Rubber Mounting Straps
- 1x Car Wire Trim Tool
- 1x მომხმარებლის სახელმძღვანელო (ეს დოკუმენტი)

Figure 2.1: Contents of the WOLFBOX T10 Plus package, including the mirror dash cam, rear camera, GPS module, and 32GB TF card.
3. პროდუქტი დასრულდაview
The WOLFBOX T10 Plus integrates a high-resolution front camera into a 10-inch touch screen rearview mirror. It is accompanied by a separate rear camera and a GPS module for comprehensive vehicle monitoring.
3.1 ძირითადი კომპონენტი
- Mirror Dash Cam Unit: The main unit featuring a 10-inch LCD touch screen, integrated front camera, and control buttons/ports.
- უკანა კამერა: A separate camera for recording the rear view, typically mounted on the license plate area or rear window.
- GPS მოდული: Connects to the main unit to record location and speed data.
- TF ბარათი: Used for storing recorded video footage.

Figure 3.1: The front camera lens on the mirror dash cam is adjustable, allowing for optimal positioning to avoid obstructions from the vehicle's original rearview სარკე.
4. დაყენება და ინსტალაცია
Proper installation is crucial for optimal performance. It is recommended to consult a professional for installation if you are unsure.
4.1 სარკისებური ვიდეოდაფის კამერის დამონტაჟება
- მიამაგრეთ სარკისებრი დაფის კამერა თქვენი მანქანის არსებულ უკანა მხარესview mirror using the provided rubber mounting straps. Ensure it is securely fastened and does not obstruct your view.
- Adjust the integrated front camera lens to ensure it captures a clear view წინ გზის.
4.2 დენის კაბელის დაკავშირება
- შეაერთეთ მანქანის დამტენი ვიდეოკონტროლის დენის შემავალ პორტთან.
- მანქანის დამტენის მეორე ბოლო შეაერთეთ თქვენი მანქანის 12 ვოლტიან დენის წყაროში (სიგარეტის სანთებელას ბუდე).
- Route the power cable neatly along the vehicle's interior trim using the provided trim tool to avoid interference with driving.
4.3 უკანა კამერის დაყენება
- Mount the rear camera at the rear of your vehicle, typically above the license plate or on the rear window. Ensure it has a clear, unobstructed view.
- უკანა კამერის კაბელი შეაერთეთ მთავარი დაფის კამერის ბლოკზე არსებულ უკანა კამერის შემავალ პორტთან.
- For parking assist functionality, connect the red wire of the rear camera cable to the positive terminal of your vehicle's reversing light. This enables the parking guidelines to appear when shifting into reverse.
- Route the rear camera cable discreetly through the vehicle's interior to the main unit.
4.4 GPS მოდულის შეერთება
- Connect the GPS antenna to the designated GPS port on the mirror dash cam.
- Mount the GPS antenna on your dashboard or windshield in a location with a clear view ცის ოპტიმალური სიგნალის მიღების უზრუნველსაყოფად.
5. საოპერაციო ინსტრუქციები
5.1 ჩართვა/გამორთვა
- The device will automatically power on and begin recording when your vehicle's ignition is turned on (if connected to a switched power source).
- მოწყობილობის ხელით გამოსართავად, დააჭირეთ და გეჭიროთ ჩართვის ღილაკი. მოწყობილობა ავტომატურად გამოირთვება, როდესაც ავტომობილის ანთება გამორთულია.
5.2 Touch Screen Operations
The 10-inch touch screen allows for intuitive control:
- გადაფურცლეთ მარცხნივ/მარჯვნივ: წინა კამერას შორის გადართვა view, უკანა კამერა view, or a split-screen display showing both.
- Swipe Up/Down (Left side of screen): დაარეგულირეთ ვერტიკალური viewკამერის კუთხე.
- Swipe Up/Down (Right side of screen): დაარეგულირეთ ეკრანის სიკაშკაშე.
- შეეხეთ: მენიუს პარამეტრებზე წვდომა ან არჩევანის დადასტურება.

Figure 5.1: Demonstrates various touch screen gestures for switching camera views and adjusting display settings.
5.3 მენიუს ნავიგაცია
Tap the screen to reveal menu icons. Navigate through settings to configure recording resolution, loop recording duration, G-sensor sensitivity, parking monitor mode, Wi-Fi settings, and more.
6. მახასიათებლების ახსნა
6.1 მაღალი გარჩევადობის ჩაწერა
The T10 Plus records in 2.5K (2560x1440P) for the front camera and 1080P (1920x1080P) for the rear camera, capturing clear details. Wide Dynamic Range (WDR) technology enhances image quality in varying light conditions, including low light and strong headlights, providing improved night vision.

Figure 6.1: Visual comparison highlighting the enhanced detail and clarity provided by 2.5K resolution compared to 1080P.

სურათი 6.2: ყოფილიample of video quality in low-light conditions, showcasing the effectiveness of WDR technology for clear night vision.
6.2 Built-in Wi-Fi
The integrated Wi-Fi allows you to connect your smartphone (iOS or Android) to the dash cam via the WOLFBOX app. This enables you to view იცოცხლეtage, download recorded videos, and share them directly from your phone.

Figure 6.3: The WOLFBOX app interface on a smartphone, demonstrating video playback and options for sharing recorded content.
6.3 ჩაშენებული GPS
The GPS module accurately records your driving route, speed, and location. This data can be reviewed using a dedicated GPS player on your computer, providing valuable evidence in case of incidents.

Figure 6.4: A computer screen showing a map with a recorded driving route and speed data, illustrating the GPS tracking feature.
6.4 Supercapacitor
The T10 Plus utilizes a supercapacitor instead of traditional lithium batteries. This enhances safety, especially in extreme temperatures (-4°F to 158°F), and significantly increases the device's lifespan and charging efficiency.

Figure 6.5: An illustration of a supercapacitor, highlighting its internal components and integration into electronic circuitry.
6.5 Parking Assist
When the rear camera's red wire is connected to the reversing light, the dash cam displays parking guidelines on the screen when the vehicle is in reverse. The 310° wide-angle view helps reduce blind spots, and the guidelines can be adjusted by swiping up or down on the screen.
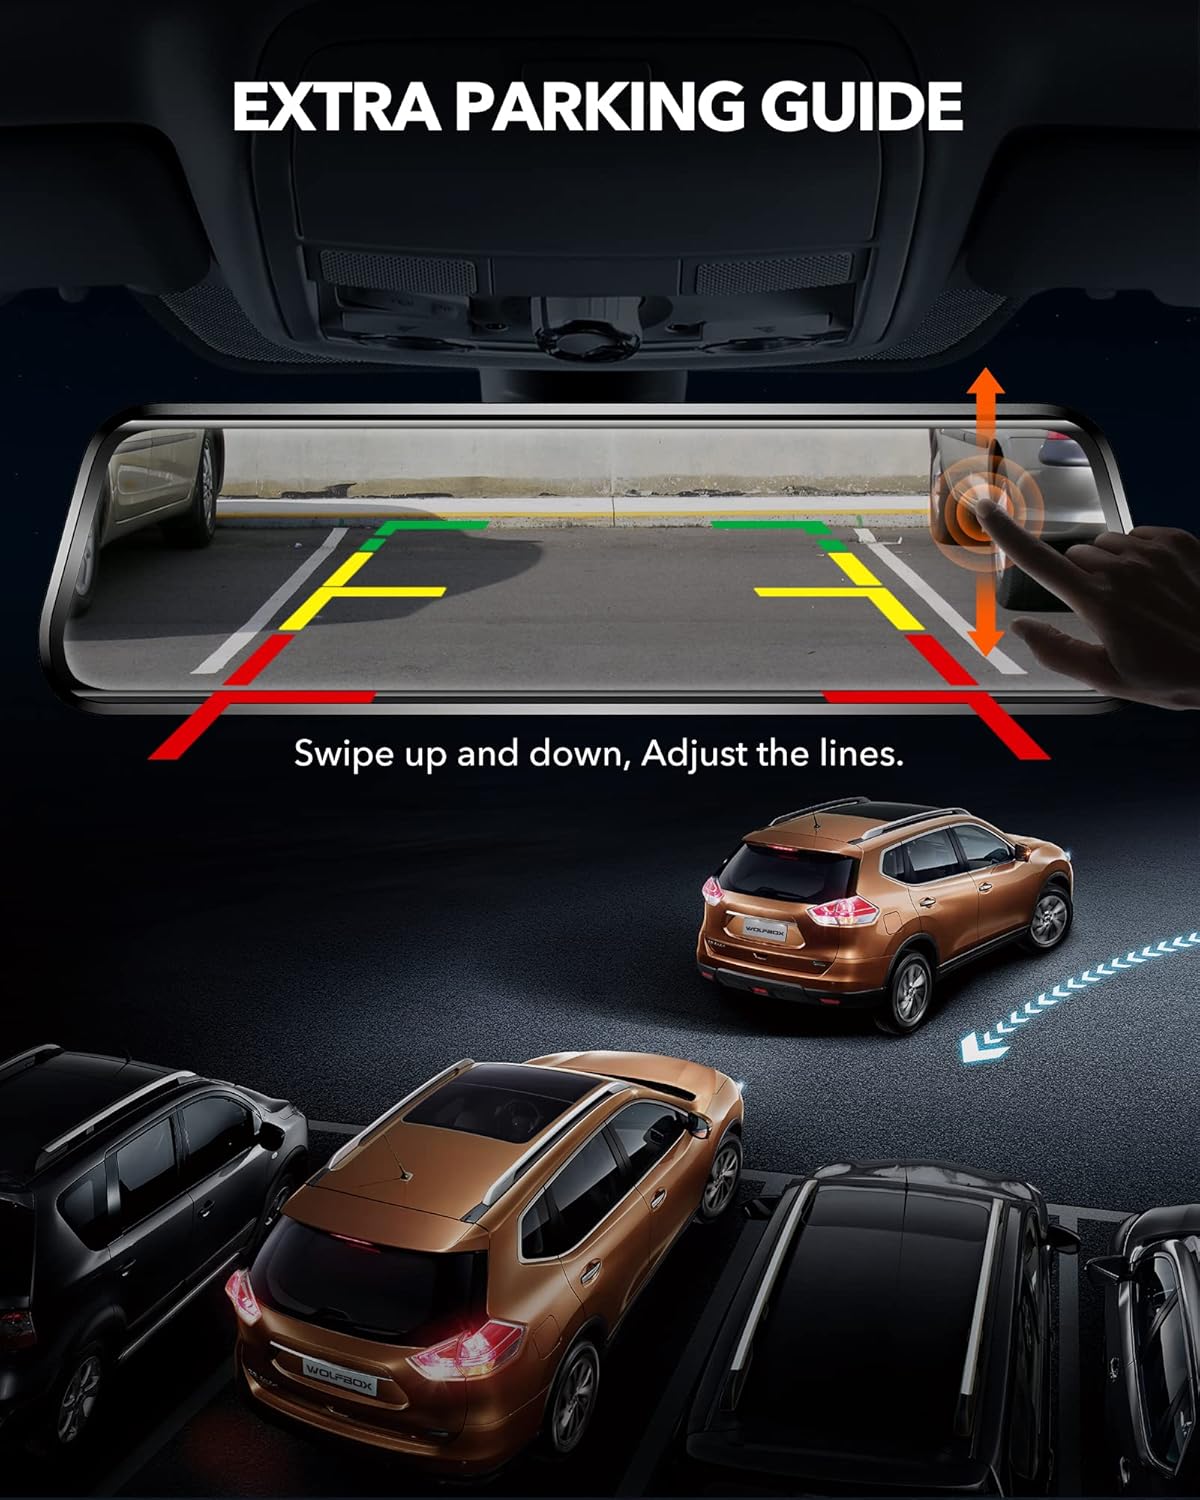
Figure 6.6: The dash cam display showing dynamic parking guidelines, which can be adjusted vertically to assist with precise parking maneuvers.
6.6 24-Hour Protection
- მარყუჟის ჩაწერა: უწყვეტად იწერს, უძველეს განბლოკილ საკვებს გადაწერსtagროდესაც TF ბარათი სავსეა.
- G-სენსორი: Automatically detects sudden impacts or collisions and locks the current video segment to prevent it from being overwritten.
- გადაუდებელი შემთხვევების ხელით ჩაწერა: Allows you to manually lock a video segment by pressing a button.
- პარკინგის მონიტორინგი: Provides continuous time-lapse recording or event-triggered recording when the vehicle is parked, offering surveillance against potential incidents.

Figure 6.7: A visual representation of the 24-hour parking monitoring feature, showing a vehicle under continuous surveillance in a parking environment.

Figure 6.8: An image depicting a police officer, representing the use of recorded footage as evidence in accident investigations.

Figure 6.9: An image illustrating a person peering into a car, symbolizing the dash cam's role in deterring theft and providing surveillance.
7. მოვლა
7.1 მოწყობილობის გაწმენდა
Use a soft, dry cloth to clean the dash cam screen and lens. Avoid using abrasive cleaners or solvents that could damage the device.
7.2 Formatting the TF Card
It is recommended to format the TF card regularly (e.g., once a month) to maintain optimal recording performance and prevent data corruption. This can typically be done through the device's settings menu.
7.3 პროგრამული უზრუნველყოფის განახლებები
WOLFBOX may release firmware updates to improve performance or add new features. Check the official WOLFBOX website or contact customer support for information on available updates and installation instructions.
8. Დიაგნოსტიკა
If you encounter issues with your WOLFBOX T10 Plus, refer to the following common problems and solutions:
- მოწყობილობა არ ჩართულია: Ensure the car charger is securely connected to both the dash cam and the vehicle's 12V power outlet. Check if the vehicle's power outlet is functioning.
- ჩაწერის პრობლემები: Verify that a TF card is inserted and properly formatted. Check the TF card's capacity and ensure it is not full. If the issue persists, try a different TF card.
- GPS signal problems: Ensure the GPS antenna is mounted in a location with a clear view of the sky. Avoid placing it under metal objects or tinted windows that may block the signal.
- Wi-Fi კავშირის პრობლემები: Make sure Wi-Fi is enabled on the dash cam and your smartphone. Ensure you are within range of the dash cam's Wi-Fi signal. Restart both devices if necessary.
- Rear camera display problems: Check the connection of the rear camera cable to both the rear camera and the main unit. Ensure the cable is not damaged.
- Screen glare: Adjust the screen brightness using the touch screen gestures. Consider using an anti-glare film if glare remains an issue.
For further assistance, please contact WOLFBOX customer support.
9. სპეციფიკაციები
| ფუნქცია | სპეციფიკაცია |
|---|---|
| ბრენდი | WOLFBOX |
| მოდელის სახელი | T10 |
| საქონლის მოდელის ნომერი | T10Plus |
| წინა კამერის გარჩევადობა | 2.5K (2560x1440P) |
| უკანა კამერის გარჩევადობა | 1080P (1920x1080P) |
| ჩვენების ზომა | 10 ინჩი |
| ჩვენების ტიპი | LCD, Full Touch Screen |
| წინა Viewing კუთხე | 170 გრადუსი |
| უკანა Viewing კუთხე | 140 Degrees (approx.) |
| შენახვა | TF Card (32GB included) |
| დენის წყარო | Car Charger (11.5FT) |
| განსაკუთრებული თვისებები | GPS Tracking, Wi-Fi, WDR Technology, Super Night Vision, G-sensor, Emergency Recording, Loop Recording, Parking Monitor, Supercapacitor |
| ოპერაციული ტემპერატურა | -4°F-დან 158°F-მდე (-20°C-დან 70°C-მდე) |
| ზომები | 24.61 x 1.7 x 6.48 სმ |
| წონა | 1.09 კგ |
10. გარანტია და მხარდაჭერა
WOLFBOX stands behind its products with a 12-თვიანი გაყიდვის შემდგომი გარანტია. Additionally, 24/7 after-sales service is available to assist with any product-related questions or issues.
For technical support, warranty claims, or general inquiries, please refer to the contact information provided in your product packaging or visit the official WOLFBOX webსაიტი.


