1. შესავალი
The Lorex Fusion 4K 16 Camera Capable NVR System (Model N864A64B_Series) is a state-of-the-art network video recorder designed for comprehensive security surveillance. This system supports 4K Ultra HD recording across all channels, offering superior video quality for detailed monitoring. With advanced features like Smart Motion Plus, Safeguard technology, and Area Search, it provides intelligent detection and efficient event management. This manual provides essential information for setting up, operating, maintaining, and troubleshooting your NVR system.

Image: The Lorex Fusion 4K NVR System packaging and the recorder unit, highlighting its 4K capability and 24/7 recording with no monthly fees.
2. რა არის ყუთში
Upon unboxing your Lorex Fusion NVR System, ensure all components are present:
- კამერის სხეული
- ბატარეის პაკეტი
- Lorex Fusion 4K 16 Channel 3TB NVR Recorder
- დენის ადაპტერი NVR-სთვის
- USB მაუსი
- Ethernet კაბელი
- HDMI კაბელი
- სწრაფი დაწყების სახელმძღვანელო
3. დაყენების გზამკვლევი
3.1 აპარატურის საწყისი კავშირი
- მყარი დისკის დაკავშირება: The NVR comes with a 3TB hard drive pre-installed. For additional storage, this NVR supports two drive bays, each upgradable up to 8TB. Refer to the internal diagram for proper installation of additional drives.
- დისპლეისთან დაკავშირება: Use the provided HDMI cable to connect the NVR's HDMI output port to a monitor or TV.
- დააკავშირეთ მაუსი: შეაერთეთ USB მაუსი NVR-ის ერთ-ერთ USB პორტში.
- ქსელთან კავშირი: Connect an Ethernet cable from the NVR's LAN port to your router or network switch. This is essential for remote viewing and software updates.
- კამერების დაკავშირება: Connect your Lorex 4K cameras to the available PoE (Power over Ethernet) ports on the back of the NVR. The NVR supports up to 16 cameras.
- ჩართვა: Connect the power adapter to the NVR and then plug it into a power outlet. The system will boot up automatically.
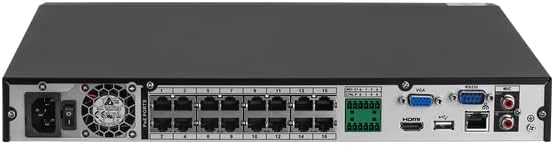
სურათი: უკანა view of the Lorex NVR, illustrating the various ports for power, Ethernet, HDMI, USB, and camera connections.
3.2 პროგრამული უზრუნველყოფის საწყისი კონფიგურაცია
Follow the on-screen prompts to complete the initial setup wizard. This typically includes setting a password, configuring network settings (DHCP recommended), and setting the date and time. Ensure your NVR is connected to the internet for optimal performance and access to remote features.
4. საოპერაციო ინსტრუქციები
4.1 ცოცხალი View და ჩაწერა
Once configured, the NVR will display live video feeds from connected cameras. The system is set to record 24/7 by default. You can customize recording schedules and motion detection settings through the NVR's interface.

Image: A hand interacting with the Lorex NVR's front panel, indicating ease of control and access to features like the alarm.
4.2 დაკვრა და სარეზერვო ასლი
ხელახლაview ჩაწერილი ფუtage, navigate to the playback menu. You can search by date, time, and event type (e.g., motion detection). Footage can be backed up to a USB drive connected to the NVR's USB port.
4.3 Remote Access via Lorex App
Download the official Lorex App from the App Store or Google Play. Follow the in-app instructions to add your NVR system. This allows you to view live feeds, playback recordings, and receive notifications from anywhere with an internet connection.

Image: Multiple smartphone screens displaying the Lorex Home App interface, demonstrating remote viewing and device management capabilities.
5. ძირითადი მახასიათებლები
5.1 4K Ultra HD Recording
The NVR records video in stunning 4K resolution on every channel. This ultra-high definition provides exceptional clarity, allowing for superior digital zooms and the ability to discern fine details, which is crucial for identification and evidence collection.

Image: A side-by-side comparison demonstrating the significant clarity difference between 1080p HD and 4K Ultra HD video footage.
5.2 Smart Motion Plus
This NVR supports cameras equipped with advanced smart person, vehicle, and face detection capabilities. This intelligent feature ensures that motion events and notifications are generated only when a person or vehicle is detected, significantly reducing false alerts caused by environmental factors.
5.3 Safeguard Technology
Lorex's Safeguard technology is ideal for monitoring specific objects or areas. It allows you to set up to three "Missing" areas to be notified if valuable objects are removed, and one "Left Behind" area to be alerted if something is left behind, such as a package.
5.4 ტერიტორიის ძებნა
Quickly find relevant footage using Lorex's Area Search. Select a specific area of interest within your recorded video, and the system will automatically playback any footage showing scene changes in that designated area. This is particularly useful for monitoring entryways or driveways.

Image: A scene depicting a man interacting with a car, demonstrating how Area Search can quickly identify activity within a defined zone.
5.5 Two Drive Bays
This NVR is equipped with two separate hard drive bays. Each bay can accommodate a hard drive up to 8TB, providing a potential total storage capacity of 16TB. You can configure the second hard drive to record videos in parallel with the primary drive, offering automatic backup in case of primary drive failure.

Image: The Lorex NVR unit alongside an icon representing a 3TB hard drive, emphasizing its storage capabilities.
6. მოვლა
- რეგულარული გაწმენდა: Keep the NVR unit free from dust and debris. Use a soft, dry cloth for cleaning. Ensure ventilation openings are not blocked.
- პროგრამული განახლებები: Periodically check for firmware updates through the NVR's system settings or the Lorex webსაიტი. განახლებები ხშირად მოიცავს მუშაობის გაუმჯობესებას და უსაფრთხოების გაუმჯობესებას.
- მყარი დისკის მდგომარეობა: Monitor the health of your hard drives through the NVR's system information. Consider replacing drives if errors are detected or after several years of continuous operation.
- პაროლის უსაფრთხოება: Regularly change your NVR and app passwords to strong, unique combinations to prevent unauthorized access.
7. Დიაგნოსტიკა
| პრობლემა | შესაძლო მიზეზი | გამოსავალი |
|---|---|---|
| მონიტორზე ვიდეო გამომავალი არ არის | Loose HDMI/VGA cable, incorrect display input, NVR not powered on. | Check cable connections. Ensure monitor is on correct input. Verify NVR power indicator. |
| Cannot access NVR remotely (app/web) | No internet connection, incorrect network settings, firewall blocking. | Verify NVR has internet access. Check network settings (DHCP). Ensure router firewall allows NVR traffic. Re-add device to app if necessary. |
| კამერები ვიდეოს არ აჩვენებენ | Loose cable, camera power issue, camera not added/configured. | Check PoE cable connections. Ensure cameras are powered. Verify cameras are properly added to the NVR. |
| Poor 4K streaming quality on PC/mobile | Network bandwidth limitations, device processing power. | დისტანციისთვის viewing, Lorex recommends using the sub-stream for smoother playback. Full 4K quality is best viewed directly via HDMI on the NVR. Ensure stable internet connection. |
| Hard drive not recording or recognized | Hard drive failure, improper installation, not formatted. | Check hard drive connections. Format the hard drive via NVR settings if it's new or recently installed. If issues persist, the drive may need replacement. |
8. სპეციფიკაციები
| ფუნქცია | დეტალი |
|---|---|
| ბრენდი | ლორექსი |
| მოდელის ნომერი | N864A64B_Series |
| დაკავშირების ტექნოლოგია | Wi-Fi, სადენიანი (Ethernet) |
| ვიდეო გადაღების გარჩევადობა | 4K Ultra HD |
| არხების რაოდენობა | 16 |
| მეხსიერების შენახვის მოცულობა | 3000 GB (3TB) pre-installed, expandable up to 16TB (2x 8TB drives) |
| განსაკუთრებული თვისებები | Motion Sensor, Smart Motion Plus, Safeguard, Area Search |
| ფერი | White (NVR unit is black, but product color listed as white) |
| დენის წყარო | კაბელიანი ელექტრო |
| ელემენტის ზომები (L x W x H) | 16 x 14 x 12 ინჩი |
| ნივთის წონა | 10.88 ფუნტი |
| რეკომენდებული გამოყენება | შიდა |
| თავსებადი მოწყობილობები | სმარტფონები, პლანშეტები |
| ვიდეო შეყვანა | IP, HDTVI, AHD |
| UPC | 695529038018 |
9. გარანტია და მხარდაჭერა
For detailed warranty information, please refer to the warranty card included with your product or visit the official Lorex website. Lorex provides customer support for technical assistance and troubleshooting.
- ონლაინ დახმარება: ეწვიეთ www.lorex.com/support ხშირად დასმული კითხვების, ჩამოტვირთვებისა და დახმარების რესურსებისთვის.
- დაუკავშირდით მხარდაჭერას: Refer to the Lorex website for current contact methods, including phone numbers and live chat options.
Important Note on Video Content
This manual aims to provide comprehensive text-based instructions and visual aids through images. While the product may have associated videos, specific video URLs with verified 'Seller' creator types were not available in the provided data for embedding. For official product videos and tutorials, please visit the Lorex official webსაიტი ან მათი ავტორიზებული არხები.