1. შესავალი
This manual provides essential information for the proper setup, operation, and maintenance of your Lake MX177 Wide Cycling Shoes. Designed for comfort and performance during long rides, the MX177 incorporates advanced materials and a secure closure system to enhance your cycling experience. Please read this manual thoroughly before using your new cycling shoes.
2. პროდუქტის მახასიათებლები
The Lake MX177 Wide Cycling Shoe is engineered with the following key features:
- ზედა მასალა: Constructed from durable Clarino Microfiber and breathable mesh, complemented by Carbidex tongue panels for enhanced comfort and ventilation.
- უგულებელყოფა: Soft microfiber lining ensures a comfortable fit.
- Closure System: Features an L6 BOA system for precise, secure, and easily adjustable fit.
- შუა ძირი: A fiberglass-injected nylon midsole provides a balance of stiffness for power transfer and comfort.
- ძირი: Equipped with a Supergrip Enduro Sole made of rubber, including Ice Lock anti-slip inserts for reliable traction off the bike.

სურათი 2.1: გვერდი view of the Lake MX177 Wide Cycling Shoe, showcasing the BOA closure system and sole design.
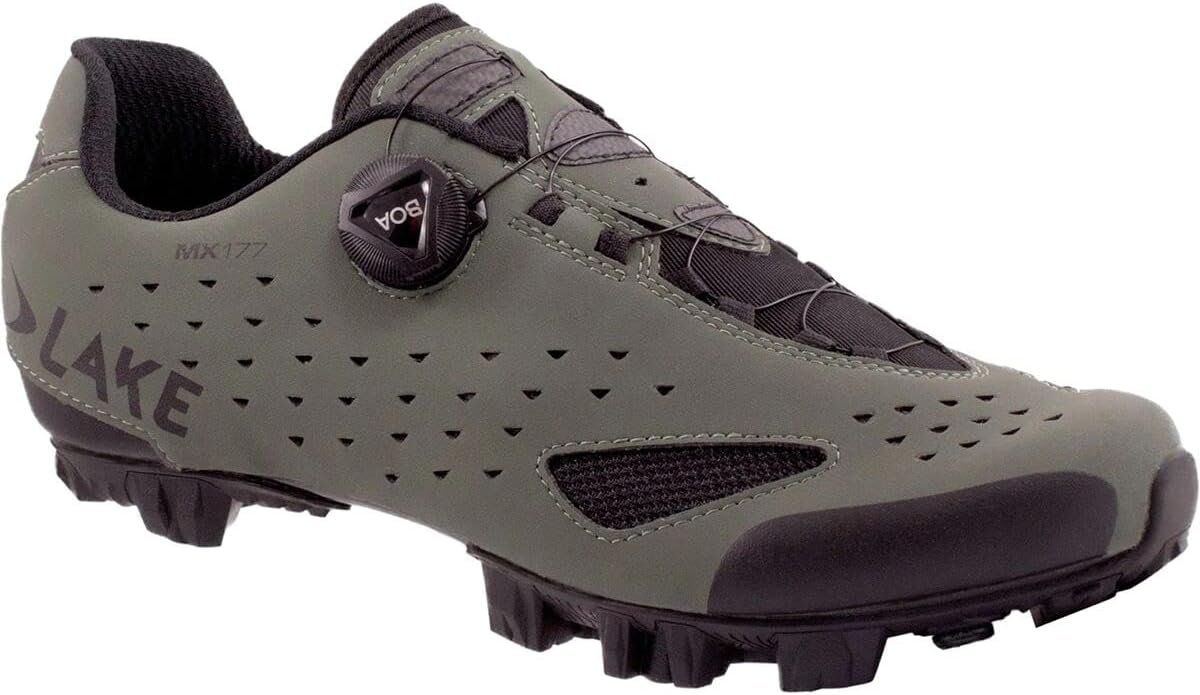
სურათი 2.2: დახრილი view of the Lake MX177 Wide Cycling Shoe, highlighting the upper material and ventilation perforations.
3. დაყენება
3.1 შეფუთვა
Carefully remove the shoes from their packaging. Inspect them for any signs of damage. Retain the packaging for future storage or transport.
3.2 Cleat Installation
The MX177 shoes are compatible with 2-bolt SPD-style cleats (cleats not included). Follow the instructions provided with your specific cleat set for proper installation. Ensure cleats are securely fastened to the sole using the provided hardware. Adjust cleat position for optimal comfort and pedaling efficiency, typically aligning with the ball of your foot.
3.3 Initial Fit Adjustment
Place your foot into the shoe. To tighten the L6 BOA system, push the dial in and rotate it clockwise until the desired snugness is achieved. Ensure the fit is secure but not overly tight, allowing for comfortable foot movement without excessive pressure points.
4. მოქმედებს
4.1 Wearing and Securing
Before each ride, ensure your shoes are properly secured. Push the BOA dial in and rotate clockwise to tighten. To release the tension, pull the BOA dial outwards. Adjust the tension as needed during your ride for optimal comfort and performance.
4.2 On-Ride Adjustments
The L6 BOA system allows for micro-adjustments while riding. If you experience discomfort or desire a tighter/looser fit, simply rotate the dial clockwise to tighten or pull it out to release tension and then re-tighten as needed. Avoid over-tightening, which can restrict blood flow.
5. მოვლა
5.1 დასუფთავება
- ზედა: Wipe the Clarino Microfiber and mesh upper with a damp cloth. For stubborn dirt, use a mild soap solution and a soft brush. Avoid harsh chemicals or abrasive cleaners.
- ძირი: Brush off dirt and debris from the rubber sole and Ice Lock inserts. A stiff brush can be used for mud.
- BOA System: Periodically inspect the BOA dial and laces for debris. Clean with a soft brush if necessary. Do not lubricate the BOA mechanism.
5.2 გაშრობა და შენახვა
After cleaning or if shoes become wet, allow them to air dry naturally at room temperature. Avoid direct heat sources like radiators or direct sunlight, as this can damage materials. Store shoes in a cool, dry place away from direct sunlight when not in use.
5.3 ინსპექტირება
Regularly inspect the shoes for wear and tear, especially the sole, cleats, and BOA system. Replace worn cleats as needed to maintain optimal performance and safety.
6. Დიაგნოსტიკა
- Discomfort/Hot Spots: Ensure cleats are correctly positioned. Adjust BOA tension. Consider trying different socks or insoles.
- BOA Dial Not Engaging/Releasing: Check for debris obstructing the mechanism. Ensure the dial is fully pushed in to tighten or pulled out to release. If issues persist, contact Lake customer support.
- Cleat Slippage: Ensure cleat bolts are tightened to the manufacturer's specifications. Check for wear on cleats and replace if necessary.
7. სპეციფიკაციები
| ფუნქცია | სპეციფიკაცია |
|---|---|
| მოდელის ნომერი | MX177 |
| ზედა მასალა | Clarino Microfiber, Mesh, Carbidex Tongue Panels |
| უგულებელყოფა | მიკროფიბერი |
| დახურვის ტიპი | L6 BOA System (Dial) |
| შუა ძირი | Fiberglass Injected Nylon |
| ძირის მასალა | Rubber (Supergrip Enduro Sole with Ice Lock Anti-Slip Inserts) |
| პროდუქტის ზომები | 13 x 8 x 5 ინჩი (დაახლოებით) |
| ნივთის წონა | 2.15 ფუნტი (დაახლოებით) |
| დეპარტამენტი | მამაკაცის |
| ASIN | B0B7RCP64P |
| მწარმოებელი | ტბა |
8. გარანტია და მხარდაჭერა
For warranty information or technical support, please refer to the official Lake Cycling website or contact your authorized Lake dealer. Keep your proof of purchase for any warranty claims.


