1. შესავალი
This manual provides detailed instructions for the installation, operation, and maintenance of your CP PLUS 4MP Wi-Fi Floodlight Camera, model CP-F42A. Please read this manual thoroughly before using the product to ensure proper functionality and safety. This camera combines high-resolution video surveillance with integrated floodlighting for enhanced security.
2. უსაფრთხოების ინფორმაცია
- Ensure the power supply matches the camera's requirements.
- არ სცადოთ კამერის დაშლა ან მოდიფიცირება.
- Install the camera in a location where it is protected from extreme weather conditions, although it has an IP54 rating, direct exposure to heavy rain or prolonged submersion is not recommended.
- Keep the camera away from heat sources and direct sunlight.
- ფრთხილად მოეპყარით კამერას, რათა თავიდან აიცილოთ ფიზიკური დაზიანება.
- Consult a qualified electrician for installation if you are unsure about electrical wiring.
3. პაკეტის შიგთავსი
დარწმუნდით, რომ შეფუთვაში ყველა ნივთია:
- CP PLUS 4MP Wi-Fi Floodlight Camera (CP-F42A)
- დენის ადაპტერი
- სამონტაჟო ხრახნები და კედლის შტეფსელები
- სწრაფი დაწყების სახელმძღვანელო (არ შედის ამ სახელმძღვანელოში)
4. პროდუქტი დასრულდაview
The CP-F42A is an outdoor Wi-Fi floodlight camera designed for surveillance and illumination. It features a 4MP sensor for clear video, H.265 video compression for efficient storage, and a 110° viewing angle. The integrated floodlight provides illumination, and the PIR sensor detects motion up to 12 meters.
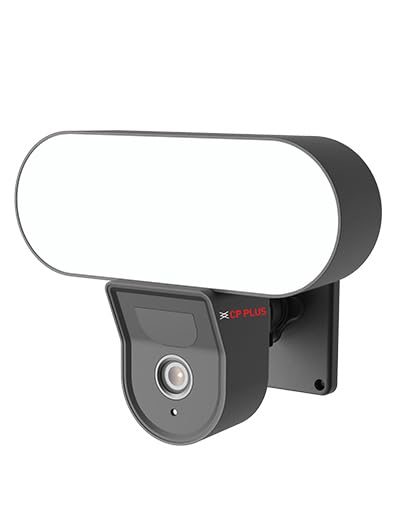
სურათი: წინა მხარე view of the CP PLUS 4MP Wi-Fi Floodlight Camera CP-F42A, showing the camera lens and the integrated floodlight panel.
ძირითადი კომპონენტები:
- კამერის ობიექტივი: იღებს 4 მეგაპიქსელიან ვიდეოს.
- Floodlight Panel: უზრუნველყოფს განათებას.
- PIR სენსორი: ამოიცნობს მოძრაობას.
- მიკროფონი: აუდიო შეყვანისთვის.
- სპიკერი: ორმხრივი აუდიო გამომავალისთვის.
- სამონტაჟო სამაგრი: უსაფრთხო ინსტალაციისთვის.
5. დაყენება
5.1 ფიზიკური მონტაჟი
- აირჩიეთ ადგილმდებარეობა: აირჩიეთ ღია ცის ქვეშ მდებარე ადგილი view of the area you wish to monitor and within Wi-Fi range. Ensure the mounting surface is sturdy.
- ბურღვის წერტილების მონიშვნა: კედელზე ხრახნების ხვრელების მონიშვნისთვის გამოიყენეთ სამონტაჟო სამაგრი შაბლონის სახით.
- საბურღი ხვრელები: მონიშნულ ადგილებში გაბურღეთ საორიენტაციო ხვრელები. ქვაზე დამონტაჟების შემთხვევაში, ჩადეთ კედლის შტეფსელები.
- კამერის დამონტაჟება: Secure the mounting bracket to the wall using the provided screws. Attach the camera to the bracket.
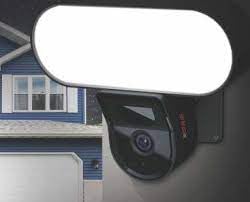
Image: The CP PLUS Floodlight Camera mounted on the exterior of a house, illustrating a typical installation scenario during the day.
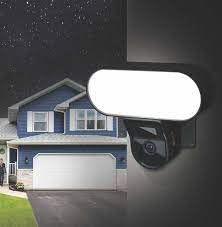
Image: The CP PLUS Floodlight Camera mounted on the exterior of a house at night, with the floodlight illuminated, demonstrating its night-time functionality.
5.2 დენის კავშირი
Connect the provided power adapter to the camera's power input port and then plug it into a suitable electrical outlet. Ensure the connection is secure and protected from moisture.
5.3 Wi-Fi Connection and App Pairing
- ჩამოტვირთეთ აპლიკაცია: ძიება the "ezyKam+" app (or the recommended CP PLUS app) on your smartphone's app store (iOS or Android) and install it.
- შექმენით ანგარიში: გახსენით აპლიკაცია და დარეგისტრირდით ახალ ანგარიშზე ან შედით სისტემაში, თუ უკვე გაქვთ ერთი.
- მოწყობილობის დამატება: Follow the in-app instructions to add a new device. Select "Floodlight Camera" or a similar option.
- დაუკავშირდით Wi-Fi-ს: The app will guide you through connecting the camera to your home Wi-Fi network. This usually involves scanning a QR code on the camera or entering your Wi-Fi credentials.
- სრული დაყენება: Once connected, you can name your camera and adjust initial settings.
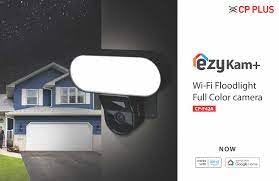
Image: Branding for CP PLUS ezyKam+ Wi-Fi Floodlight Full Color Camera, indicating compatibility with Alexa and Google Home, relevant for app pairing and smart home integration.
6. საოპერაციო ინსტრუქციები
Access all camera functions through the dedicated mobile application.
6.1 ცოცხალი View
Open the app and select your camera from the device list to view the live video feed. You can pinch to zoom and pan across the image.
6.2 ჩაწერა და დაკვრა
- ხელით ჩაწერა: პირდაპირ ეთერში დააჭირეთ ჩაწერის ღილაკს view ხელით ჩაწერის დასაწყებად/შესაჩერებლად.
- მოვლენის ჩაწერა: The camera automatically records when motion is detected. These recordings are stored on the installed microSD card (if any) or cloud storage (subscription may be required).
- დაკვრა: ჩანაწერებზე წვდომაtage through the "Playback" or "History" section in the app.
6.3 მოძრაობის აღმოჩენა და შეტყობინებები
Configure motion detection sensitivity and areas within the app settings. When motion is detected, the camera can send push notifications to your phone and trigger recording. The PIR sensor has a detection range of 6-12 meters.
6.4 Floodlight Control
The floodlight can be controlled manually via the app or set to activate automatically upon motion detection during specific times or low-light conditions. Adjust brightness and duration settings in the app.
6.5 ორმხრივი აუდიო
მიკროფონისა და დინამიკის ხატულების გამოყენება პირდაპირ ეთერში view to communicate with visitors or deter intruders. Press and hold the microphone icon to speak, and release to listen.
6.6 ღამის ხედვა
The camera features infrared (IR) night vision for clear black-and-white video in low-light conditions and can also utilize the floodlight for full-color night vision when activated. The night vision range is up to 12 meters.
7. მოვლა
7.1 დასუფთავება
Wipe the camera lens and floodlight panel with a soft, damp ნაჭერი მტვრისა და ჭუჭყის მოსაშორებლად. არ გამოიყენოთ უხეში ქიმიკატები ან აბრაზიული საწმენდები.
7.2 პროგრამული უზრუნველყოფის განახლებები
Periodically check the app for available firmware updates. Keeping your camera's firmware up-to-date ensures optimal performance and security features.
7.3 შენახვის მართვა
If using a microSD card, regularly check its status in the app. Format the card periodically to maintain performance. Back up important recordings before formatting.
8. Დიაგნოსტიკა
| პრობლემა | შესაძლო გამოსავალი |
|---|---|
| კამერა არ ირთვება. | Check power adapter connection and ensure the outlet is functional. |
| Wi-Fi-თან დაკავშირება შეუძლებელია. | Ensure the camera is within Wi-Fi range. Verify Wi-Fi password. Try resetting the camera and router. |
| ვიდეოს ცუდი ხარისხი. | Check Wi-Fi signal strength. Clean the camera lens. Ensure sufficient lighting. |
| მოძრაობის ამოცნობა არ მუშაობს. | Adjust motion detection sensitivity and area settings in the app. Ensure there are no obstructions. |
| Floodlight not activating. | Check floodlight settings in the app. Ensure it's set to activate on motion or during low light. |
9. სპეციფიკაციები
| ფუნქცია | დეტალი |
|---|---|
| მოდელის ნომერი | CP-F42A |
| რეზოლუცია | 4MP (Effective Still Resolution: 4 MP) |
| ვიდეო შეკუმშვა | H.265, MPEG |
| Viewing კუთხე | 110 გრადუსი |
| PIR მანძილი | 6-12 მეტრი |
| უკაბელო ტექნოლოგია | Wi-Fi |
| ღამის ხედვის დიაპაზონი | 12 Meters (Infrared, Night Color) |
| კადრების სიხშირე | 20 კადრი წამში |
| ოპტიკური ზუმი | 3x |
| დაცვის საერთაშორისო რეიტინგი | IP54 |
| გაფრთხილების ტიპი | მოძრაობა მხოლოდ |
| დენის წყარო | კაბელიანი ელექტრო |
| მოყვება კომპონენტები | ადაპტერი |
| ზომები (L x W x H) | 20 x 12 x 10 სანტიმეტრი |
| ნივთის წონა | 630 გ |
| შიდა/გარე გამოყენება | გარე |
| ფოტო სენსორის ტექნოლოგია | CMOS |
| რეკომენდებული გამოყენება | Home Security, Night Vision |
10. გარანტია და მხარდაჭერა
For warranty information and technical support, please refer to the official CP PLUS webსაიტზე ან დაუკავშირდით მათ მომხმარებელთა მომსახურების სამსახურს. შეინახეთ თქვენი შესყიდვის ქვითარი, როგორც შეძენის დამადასტურებელი საბუთი გარანტიის მოთხოვნის შემთხვევაში.
CP PLUS Official Webსაიტი: www.cpplusworld.com


