1. შესავალი
Thank you for choosing the VANBAR 4K Dash Cam. This device is designed to provide high-quality video recording of your journeys, offering peace of mind and crucial evidence in case of incidents. Equipped with advanced features such as 4K Ultra HD resolution, GPS tracking, Wi-Fi connectivity, and voice control, it ensures comprehensive coverage and ease of use.
Please read this manual thoroughly before using the product to ensure proper operation and to maximize its potential.
2. პროდუქტი დასრულდაview
2.1. პაკეტის შიგთავსი
- VANBAR 4K Dash Cam (Main Unit)
- Rear Camera (Waterproof)
- GPS მოდული
- მანქანის დამტენი (ტიპი-C)
- შეწოვის თასის მთა
- 64GB High-Durability SD Card
- მომხმარებლის სახელმძღვანელო
- Wiring Pry Tool
- გაფართოების კაბელი
- სარკის ქსოვილი
- SIM Ejector Pin (for SD card slot)

სურათი 1: მთავარი ბლოკი და თანდართული აქსესუარები.
2.2. ძირითადი მახასიათებლები
- 4K Ultra HD ჩაწერა: Front camera records in 3840*2160P, capturing clear details like license plates.
- Front & Rear Simultaneous Recording: Provides comprehensive coverage for both front and rear views.
- Wi-Fi კავშირი: Connects to a smartphone app (RoadCam) for instant video playback, download, and settings adjustment.
- GPS თვალის დევნება: Records driving speed and route data, viewable on PC with dedicated software.
- ხმის კონტროლი: Hands-free operation for common functions like taking photos, locking videos, and screen control.
- 24-საათიანი პარკირების მონიტორინგი: Utilizes time-lapse recording and G-sensor to protect your vehicle while parked.
- G-Sensor (Impact Detection): ავტომატურად ბლოკავს და ინახავს ვიდეო ფუსtagე შეჯახების აღმოჩენისთანავე.
- მარყუჟის ჩაწერა: Overwrites the oldest unlocked files when the SD card is full, ensuring continuous recording.
- HDR/WDR Technology: Enhances image quality in varying light conditions, including strong backlight and low light.
- სუპერ ღამის ხედვა: Equipped with F2.0 bright lens and IMX589 image sensor for clear night recordings.
- Waterproof Rear Camera: Durable design for external mounting.
- Type-C Power Cable: Improved charging speed, stability, convenience, durability, and heat resistance.

სურათი 2: დასრულდაview of 4K and Wi-Fi capabilities.
3. დაყენება
3.1. SD ბარათის ინსტალაცია
- დარწმუნდით, რომ დაფის კამერა გამორთულია.
- Locate the SD card slot on the side of the main unit.
- Insert the provided 64GB SD card into the slot until it clicks into place.
- ბარათის ამოსაღებად, ფრთხილად დააჭირეთ მას, სანამ არ ამოვარდება.
3.2. Dash Cam-ის დამონტაჟება
- გაწმინდეთ საქარე მინის ის ადგილი, სადაც დაფის კამერის დამონტაჟებას აპირებთ.
- Attach the suction cup mount to the main unit.
- მჭიდროდ დააჭირეთ შემწოვი ჭიქა საქარე მინაზე და გადაატრიალეთ ბერკეტი მის დასამაგრებლად.
- დაარეგულირეთ ტირე კამერის კუთხე, რათა უზრუნველყოთ ნათელი view წინ გზის.
3.3. უკანა კამერის დაკავშირება
- Connect the rear camera cable to the main unit's rear camera port.
- Route the cable neatly along the vehicle's interior trim using the provided pry tool.
- Mount the rear camera on the rear windshield or license plate area. For external mounting, ensure the surface is clean and dry before attaching.
- Connect the red wire of the rear camera cable to the vehicle's reverse light power source for backup assist functionality.
3.4. დენის კავშირი
- Connect the Type-C car charger to the dash cam's power input.
- მანქანის დამტენის მეორე ბოლო შეაერთეთ თქვენი მანქანის სიგარეტის სანთებლის ბუდეში.
- For 24-hour parking monitoring, a dedicated hardwire kit (sold separately) is required to connect directly to the vehicle's fuse box.
4. საოპერაციო ინსტრუქციები
4.1. ძირითადი ოპერაცია
- ჩართვა/გამორთვა: The dash cam will automatically power on and start recording when the vehicle engine starts. It will power off automatically when the engine is turned off. You can also manually power on/off by pressing and holding the power button.
- ჩაწერა: Once powered on, the dash cam automatically begins loop recording. A red dot or recording icon on the screen indicates active recording.
4.2. Wi-Fi Function and App Connection
The built-in Wi-Fi allows you to connect your smartphone to the dash cam for easy access to recordings and settings.
- Download the "RoadCam" app from your smartphone's app store (available for Android and iPhone).
- On the dash cam, navigate to the Wi-Fi settings and turn Wi-Fi ON.
- თქვენს სმარტფონზე გადადით Wi-Fi პარამეტრებში და დაუკავშირდით ვიდეორეგისტრატორის Wi-Fi ქსელს (SSID და პაროლი გამოჩნდება ვიდეორეგისტრატორის ეკრანზე).
- Open the RoadCam app. You can now view იცოცხლეtagე, ჩაწერილი ვიდეოების დაკვრა, ჩამოტვირთვა files თქვენს ტელეფონზე და შეცვალეთ პარამეტრები.

Figure 3: Wi-Fi connectivity for instant confirmation.
4.3. GPS ფუნქციონალობა
The external GPS module records your vehicle's speed, direction, and location data, which can be viewed alongside video footage using dedicated PC playback software.
- Ensure the GPS module is connected to the dash cam and properly positioned to receive satellite signals.
- After recording, transfer the video fileთქვენს კომპიუტერში.
- Install the dedicated GPS player software (usually provided on the included SD card or available for download from the manufacturer's webსაიტი).
- გახსენით ვიდეო files with the GPS player to view driving routes, speed, and other data on a map.

Figure 4: GPS tracking and dedicated playback software.
4.4. ხმის კონტროლი
Operate the dash cam hands-free using simple voice commands. This feature helps maintain focus on driving.
- Say "Take Photo" to capture a still image.
- Say "Open Wi-Fi" to activate the Wi-Fi function.
- Say "Lock Video" to protect the current recording from being overwritten.
- Say "Screen On" or "Screen Off" to control the display.
- Say "Front Camera" or "Back Camera" to switch camera views.

Figure 5: Voice control commands for hands-free operation.
4.5. Parking Monitoring and G-Sensor
The dash cam offers 24-hour parking surveillance. When the engine is off, the G-sensor detects impacts and automatically triggers recording, saving the footage as an emergency file.
- G-სენსორი: Detects sudden movements or impacts. Sensitivity can usually be adjusted in settings.
- Time-Lapse Parking Monitoring: Records continuously at a low frame rate (e.g., 1 frame per second) to save storage space while capturing extended periods.

Figure 6: Parking monitoring and impact recording features.
4.6. Backup Assist Function
When the rear camera is properly connected to the reverse light, the dash cam display will automatically switch to the rear camera view with parking guidelines when the vehicle is put into reverse.
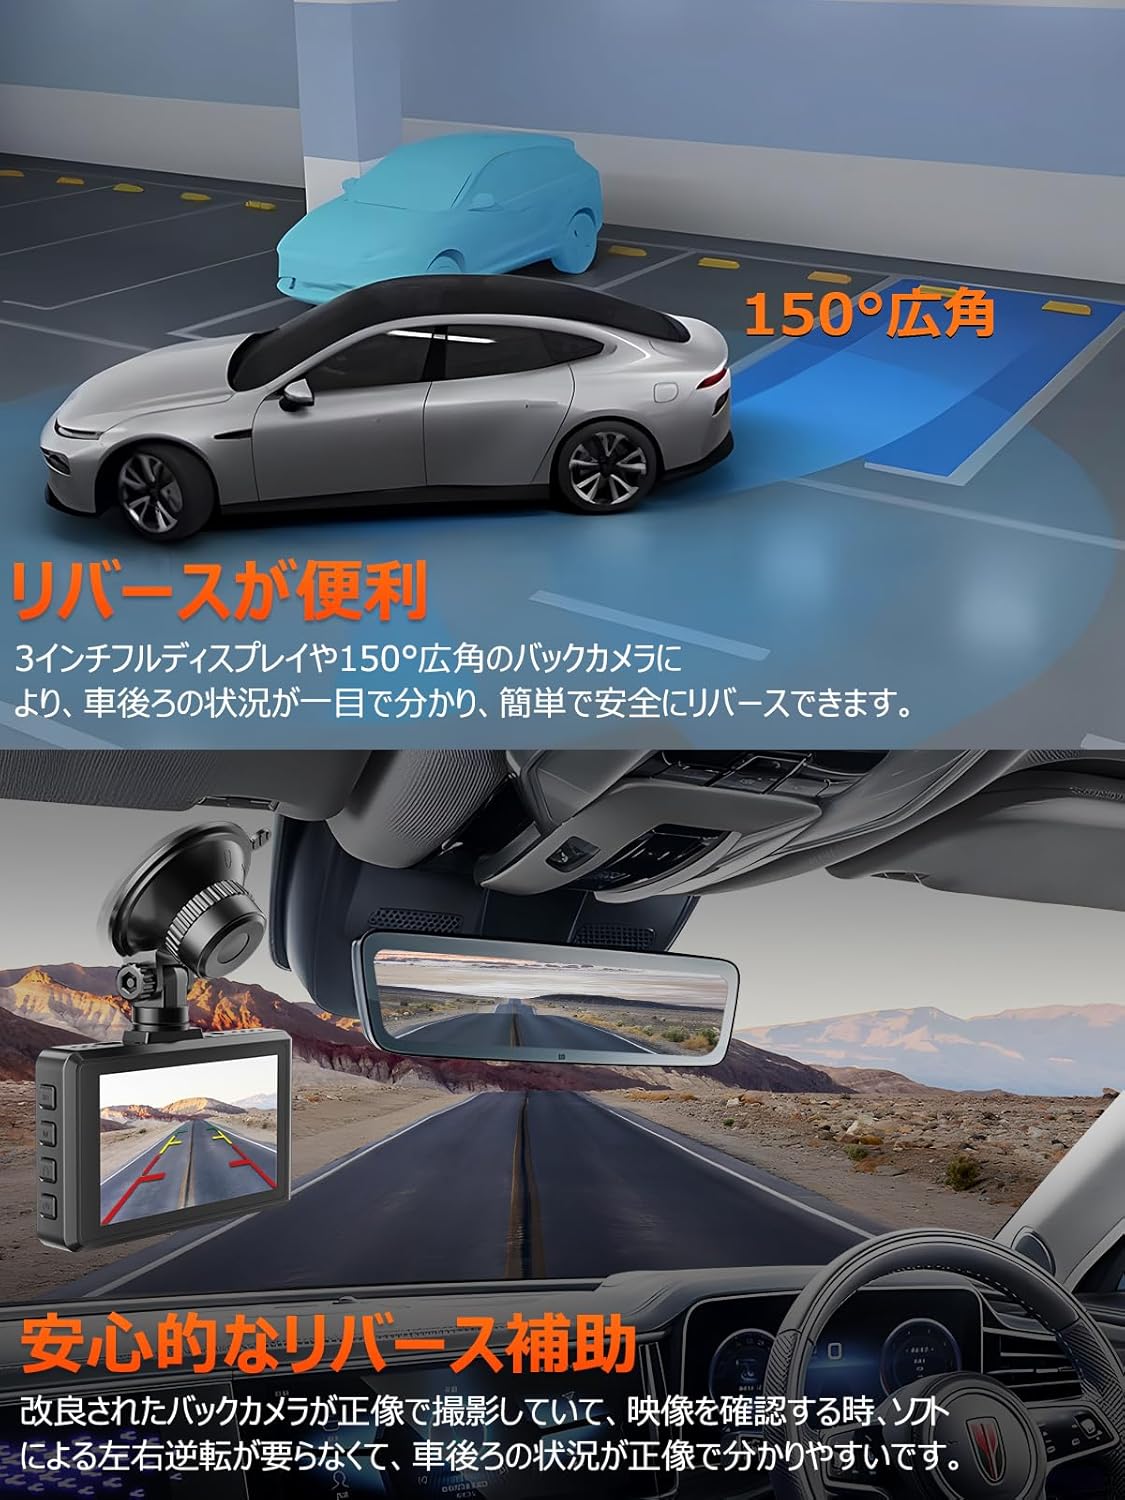
Figure 7: Rear camera view for convenient reversing.
5. მოვლა
5.1. მოწყობილობის გაწმენდა
- დაფის კამერის კორპუსის გასაწმენდად გამოიყენეთ რბილი, მშრალი ქსოვილი.
- For the lens, use a lens cleaning cloth (like the included mirror cloth) to gently wipe away dust or smudges. Do not use abrasive cleaners or solvents.
5.2. SD ბარათის მართვა
- It is recommended to format the SD card once a month to ensure optimal performance and prevent data corruption.
- To format, go to the dash cam's settings menu, find the "Format SD Card" option, and confirm. This will erase all data on the card, so back up any important fileპირველი.
6. Დიაგნოსტიკა
| პრობლემა | შესაძლო მიზეზი / გამოსავალი |
|---|---|
| ვიდეორეგისტრატორი არ ირთვება. | Check power connection. Ensure the car charger is properly plugged into both the dash cam and the vehicle's cigarette lighter. Test the cigarette lighter with another device. If using a hardwire kit, check fuse connections. |
| ჩაწერა ჩერდება ან იყინება. | SD card issue. Format the SD card (back up data first). Ensure the SD card is Class 10 or higher. Replace the SD card if the issue persists. |
| Wi-Fi კავშირი არასტაბილურია ან ვერ ხერხდება. | Ensure the "RoadCam" app is updated. Restart both the dash cam and your smartphone. Check Wi-Fi settings on the dash cam and phone. Ensure no other devices are interfering with the Wi-Fi signal. |
| თარიღი და დრო არასწორია. | Ensure the GPS module is connected and receiving a signal. The dash cam should automatically synchronize time via GPS. Manually set the date and time in the settings if GPS signal is weak or unavailable. |
| Video quality is poor (blurry, dark). | Clean the camera lens. Ensure the protective film is removed from the lens. Check settings for resolution and exposure. Ensure the windshield is clean. |
| ხმოვანი კონტროლი არ რეაგირებს. | Speak clearly and loudly. Ensure the microphone is not obstructed. Check voice control settings in the menu. |
7. სპეციფიკაციები
| ფუნქცია | სპეციფიკაცია |
|---|---|
| ბრენდი | ვანბარი |
| მოდელის ნომერი | DC600-4 |
| ეკრანის ზომა | 3 ინჩი |
| ვიდეო გადაღების გარჩევადობა | Front: 3840x2160P (4K), Rear: 1920x1080P |
| ობიექტივის დიაფრაგმა | F2.0 |
| წინა კამერის კუთხე | 170° Super Wide Angle |
| უკანა კამერის კუთხე | 150° ფართო კუთხე |
| შენახვის მხარდაჭერა | Up to 512GB (64GB SD card included) |
| სამონტაჟო ტიპი | წებოვანი მთა |
| კონტროლის მეთოდი | Voice, App Control |
| პროდუქტის ზომები | 3.8 x 8.5 x 5 სმ |
| ნივთის წონა | 0.74 კგ |
8. გარანტია და მხარდაჭერა
VANBAR products purchased on Amazon come with a standard 1-year warranty. Customers who register their product can extend this warranty to 3 years. To register for the 3-year extended warranty, please contact our customer service center with your order number.
We are committed to providing the best shopping experience and continuously improving our products based on customer feedback. We offer permanent free version updates for our dash cams.
For any inquiries, technical support, or warranty claims, please contact us through the following channels:
- ტელეფონი: Refer to the first page of your product manual for contact number.
- ელფოსტა: Refer to the first page of your product manual for email address.
- LINE Official Account: @645cthlb


