1. შესავალი
Thank you for choosing the Conentool 21V Cordless Impact Drill/Driver Kit. This tool is designed for various drilling and screwdriving tasks in wood, metal, plastics, and masonry. Please read this manual carefully before operating the tool to ensure safe and efficient use. Keep this manual for future reference.

Image 1.1: The Conentool 21V Cordless Impact Drill/Driver Kit, including the drill, two 2500mAh batteries, charger, and a variety of drill bits and accessories in a carrying case.
2. უსაფრთხოების ზოგადი ინსტრუქციები
გაფრთხილება: წაიკითხეთ უსაფრთხოების ყველა გაფრთხილება, ინსტრუქციები, ილუსტრაციები და სპეციფიკაციები, რომლებიც მოწოდებულია ამ ელექტრული ხელსაწყოთი. ქვემოთ ჩამოთვლილი ყველა ინსტრუქციის შეუსრულებლობამ შეიძლება გამოიწვიოს ელექტროშოკი, ხანძარი და/ან სერიოზული დაზიანება.
2.1 სამუშაო ადგილის უსაფრთხოება
- შეინახეთ სამუშაო ადგილი სუფთა და კარგად განათებული. დაბინძურებული ან ბნელი ადგილები იწვევს უბედურ შემთხვევებს.
- არ გამოიყენოთ ელექტრული ხელსაწყოები ფეთქებადი ატმოსფეროში, როგორიცაა აალებადი სითხეების, გაზების ან მტვრის არსებობისას. ელექტრული ხელსაწყოები ქმნიან ნაპერწკლებს, რამაც შეიძლება გაანათოს მტვერი ან ორთქლი.
- ელექტრული ხელსაწყოს მუშაობისას მოარიდეთ ბავშვებსა და მნახველებს. ყურადღების გაფანტვამ შეიძლება კონტროლის დაკარგვა გამოიწვიოს.
2.2 ელექტრო უსაფრთხოება
- ელექტრული ხელსაწყოს შტეფსელი უნდა ემთხვეოდეს გამოსასვლელს. არასოდეს შეცვალოთ დანამატი არანაირად.
- მოერიდეთ სხეულთან კონტაქტს დამიწებულ ან დამიწებულ ზედაპირებთან, როგორიცაა მილები, რადიატორები, ღობეები და მაცივრები. თუ თქვენი სხეული დამიწებულია ან დამიწებულია, იზრდება ელექტროშოკის რისკი.
- არ დაუშვათ ელექტრო იარაღები წვიმის ან სველი პირობების ქვეშ. ელექტრო ხელსაწყოში წყლის შეღწევა გაზრდის ელექტროშოკის რისკს.
2.3 პირადი უსაფრთხოება
- ყოველთვის გამოიყენეთ თვალის დამცავი. გამოიყენეთ დამცავი სათვალე, სათვალე ან სახის დამცავი ფარი.
- ხელსაწყოს ხანგრძლივი პერიოდის განმავლობაში მუშაობისას გამოიყენეთ სმენის დამცავი.
- ჩაიცვით სწორად. არ ჩაიცვათ თავისუფალი ტანსაცმელი ან სამკაულები. შეინახეთ თმა და ტანსაცმელი მოძრავი ნაწილებისგან მოშორებით.
- იყავით ფხიზლად, უყურეთ რას აკეთებთ და გამოიყენეთ საღი აზრი ელექტრო ხელსაწყოს მუშაობისას.
3. პაკეტის შიგთავსი
დარწმუნდით, რომ ქვემოთ ჩამოთვლილი ყველა ნივთი შედის თქვენს პაკეტში. თუ რომელიმე ნივთი აკლია ან დაზიანებულია, გთხოვთ, დაუკავშირდეთ მომხმარებელთა მხარდაჭერის სამსახურს.
- 1 x Conentool 21V Cordless Impact Drill/Driver
- 2 x 2500mAh ლითიუმ-იონური ბატარეა
- 1 x ელემენტის დამტენი
- 1 x მოქნილი ლილვის გაფართოება
- Various Drill Bits (for wood, metal, masonry)
- Various Screwdriver Bits
- სოკეტის გადამყვანები
- ტარების საქმე
- მომხმარებლის სახელმძღვანელო

სურათი 3.1: სრული გადახედვაview of the kit contents, including the drill, two batteries, charger, flexible shaft, various drill bits, screwdriver bits, and socket adapters, all neatly arranged.
4. პროდუქტი დასრულდაview
Familiarize yourself with the main components of your drill/driver:
- ჩაკი: იჭერს ბურღის და ხრახნისის პირებს.
- ბრუნვის მომენტის რეგულირების რგოლი: Selects the desired torque setting.
- Mode Selector Ring: Switches between screwdriving, drilling, and impact drilling modes.
- სიჩქარის შერჩევის გადამრთველი: Changes between high and low-speed gears.
- ტრიგერის გადამრთველი: Activates the tool and controls speed (variable speed).
- წინ/უკან გადახვევის სელექტორი: ცვლის ბრუნვის მიმართულებას.
- LED სამუშაო განათება: ანათებს სამუშაო ადგილს.
- ბატარეის პაკეტი: უზრუნველყოფს ხელსაწყოს ენერგიას.
- ბატარეის გაშვების ღილაკი: ბატარეის ამოსაღებად.
- სახელური: ერგონომიული სახელური კომფორტული გამოყენებისთვის.

სურათი 4.1: შიდა view highlighting the brushless motor, which provides increased power, efficiency, and a quieter operation with no sparks.
5. დაყენება
5.1 ბატარეის დატენვა
The battery pack is not fully charged at the time of purchase. It is recommended to fully charge the battery before first use.
- დამტენი შეაერთეთ სტანდარტულ დენის წყაროსთან.
- Slide the battery pack onto the charger base. Ensure it clicks into place.
- The charger indicator light will show the charging status. A red light typically indicates charging, and a green light indicates a full charge.
- სრულად დატენვის შემდეგ გამორთეთ დამტენი დენის განყოფილებიდან და ამოიღეთ ბატარეა.

Image 5.1: The battery charger connected to a wall outlet, with a battery pack inserted for charging. The red light indicates charging, and the green light indicates a completed charge.
5.2 ბატარეის დაყენება და ამოღება
- დასაყენებლად: Align the battery pack with the base of the tool handle and slide it in until it clicks securely into place.
- ამოსაღებად: Press the battery release button (usually located at the front of the battery) and slide the battery pack out of the tool.

სურათი 5.2: კუტეივი view of the 2500mAh battery pack, illustrating its internal lithium-ion cells and power management system, designed for up to 90 minutes of use per battery.
5.3 Installing and Removing Drill/Screwdriver Bits
- დასაყენებლად: Rotate the chuck counter-clockwise to open the jaws. Insert the desired bit into the chuck as far as it will go. Rotate the chuck clockwise to tighten the jaws firmly around the bit.
- ამოსაღებად: ყბების შესამსუბუქებლად და ბურღი გარეთ გამოსაწევად, მოატრიალეთ ჩამკეტი საათის ისრის საწინააღმდეგო მიმართულებით.
Ensure the bit is securely fastened to prevent it from slipping during operation.
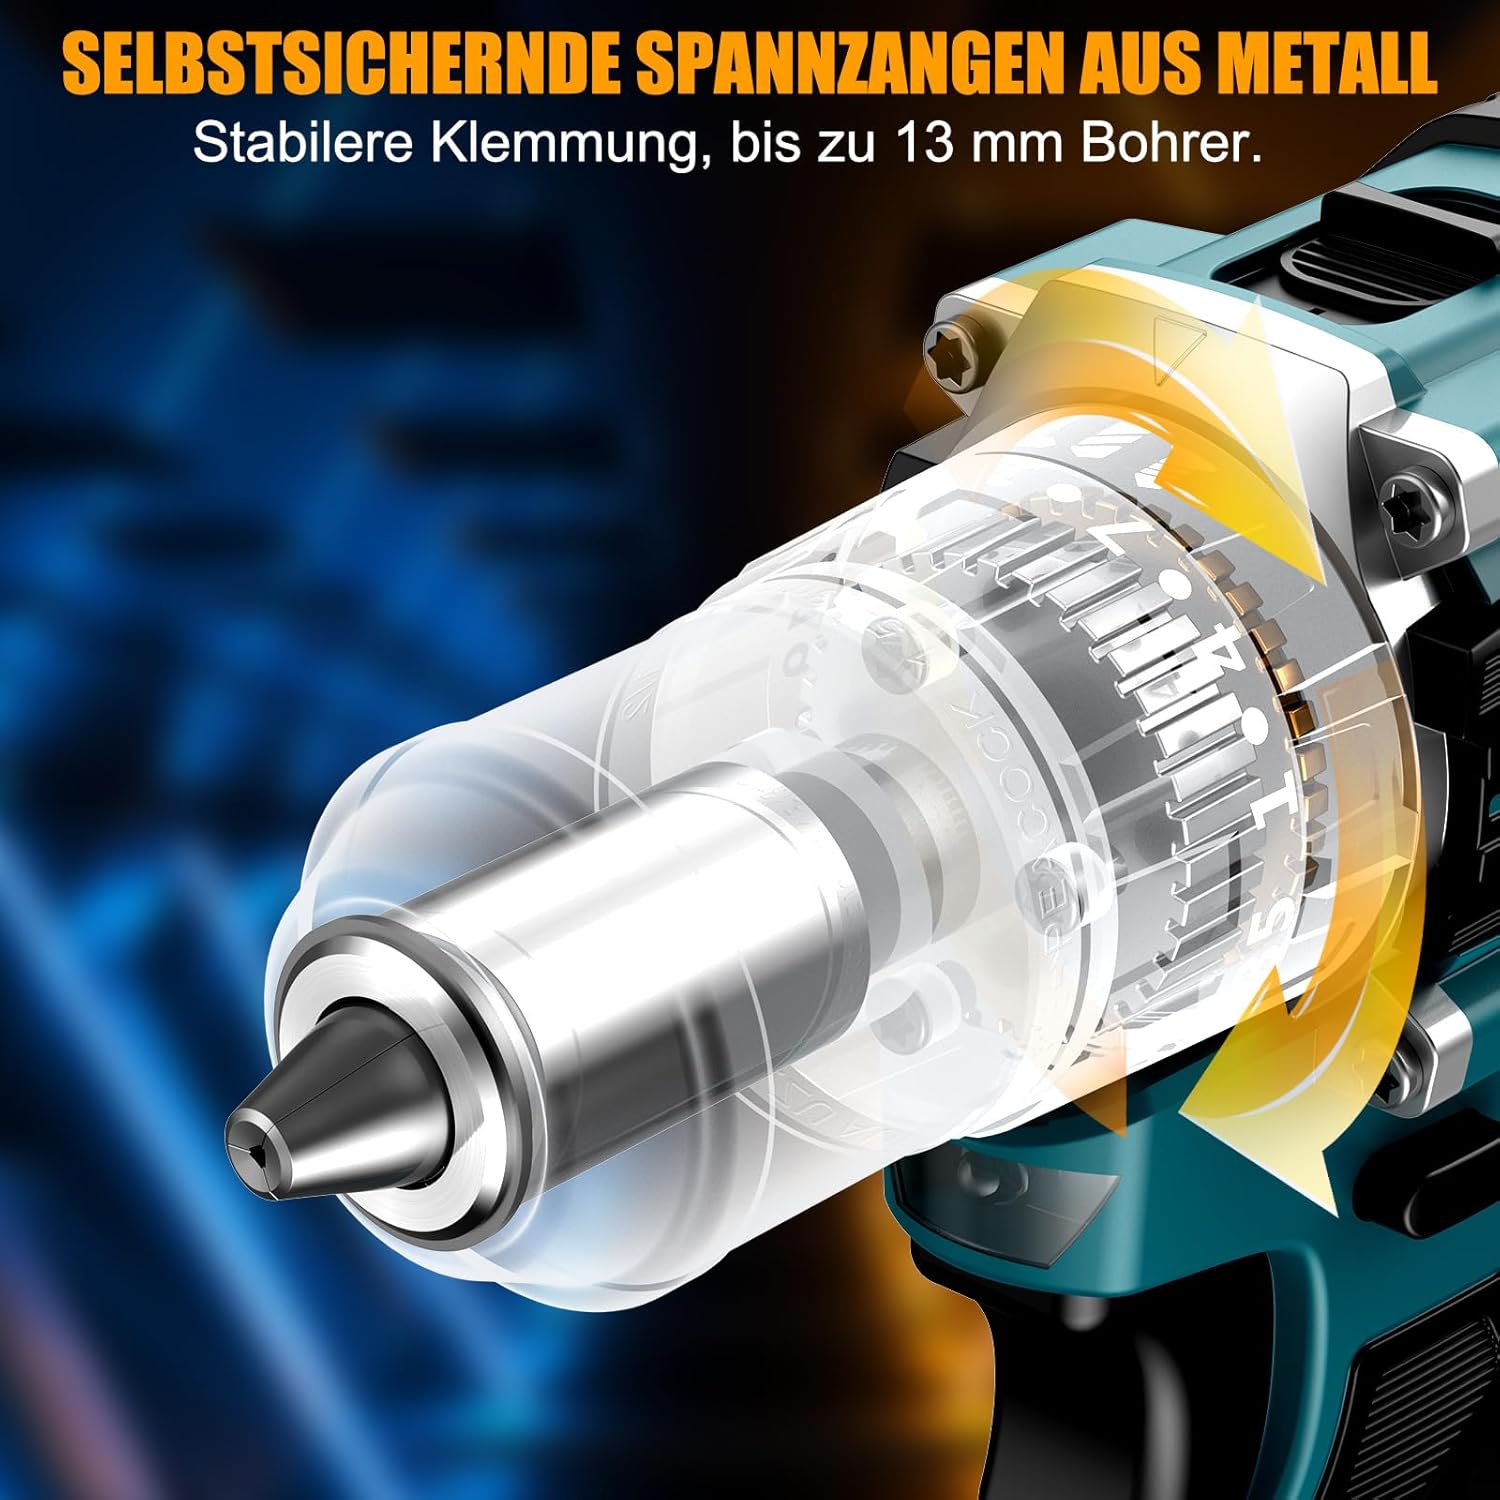
სურათი 5.3: დეტალური view of the self-locking metal chuck, demonstrating its stable clamping mechanism capable of holding drill bits up to 13mm securely.
6. საოპერაციო ინსტრუქციები
6.1 ჩართვა/გამორთვა და სიჩქარის კონტროლი
- To turn the tool ON, press the trigger switch. The speed is variable; press the trigger further for higher speed.
- ხელსაწყოს გამოსართავად, გაუშვით ჩამრთველი.
- ჩამრთველის დაჭერისას ინტეგრირებული LED სამუშაო განათება აინთება, რაც უზრუნველყოფს ხილვადობას სუსტად განათებულ ადგილებში.
6.2 წინ/უკან ბრუნვა
The forward/reverse selector switch is located above the trigger. Push it to the left for forward rotation (for screwdriving and drilling) and to the right for reverse rotation (for removing screws or freeing jammed bits). Ensure the tool is stopped before changing direction.
6.3 Speed Gear Selection
The drill features a 2-speed gear selector switch on top of the tool:
- გადაცემათა კოლოფი 1 (დაბალი სიჩქარე, 0-650 ბრ/წთ): Ideal for high-torque applications like driving large screws or drilling large holes.
- გადაცემათა კოლოფი 2 (მაღალი სიჩქარე, 0-1850 ბრ/წთ): Suitable for fast drilling in softer materials and smaller diameter holes.
Always select the appropriate gear for the task. Change gears only when the tool is completely stopped.
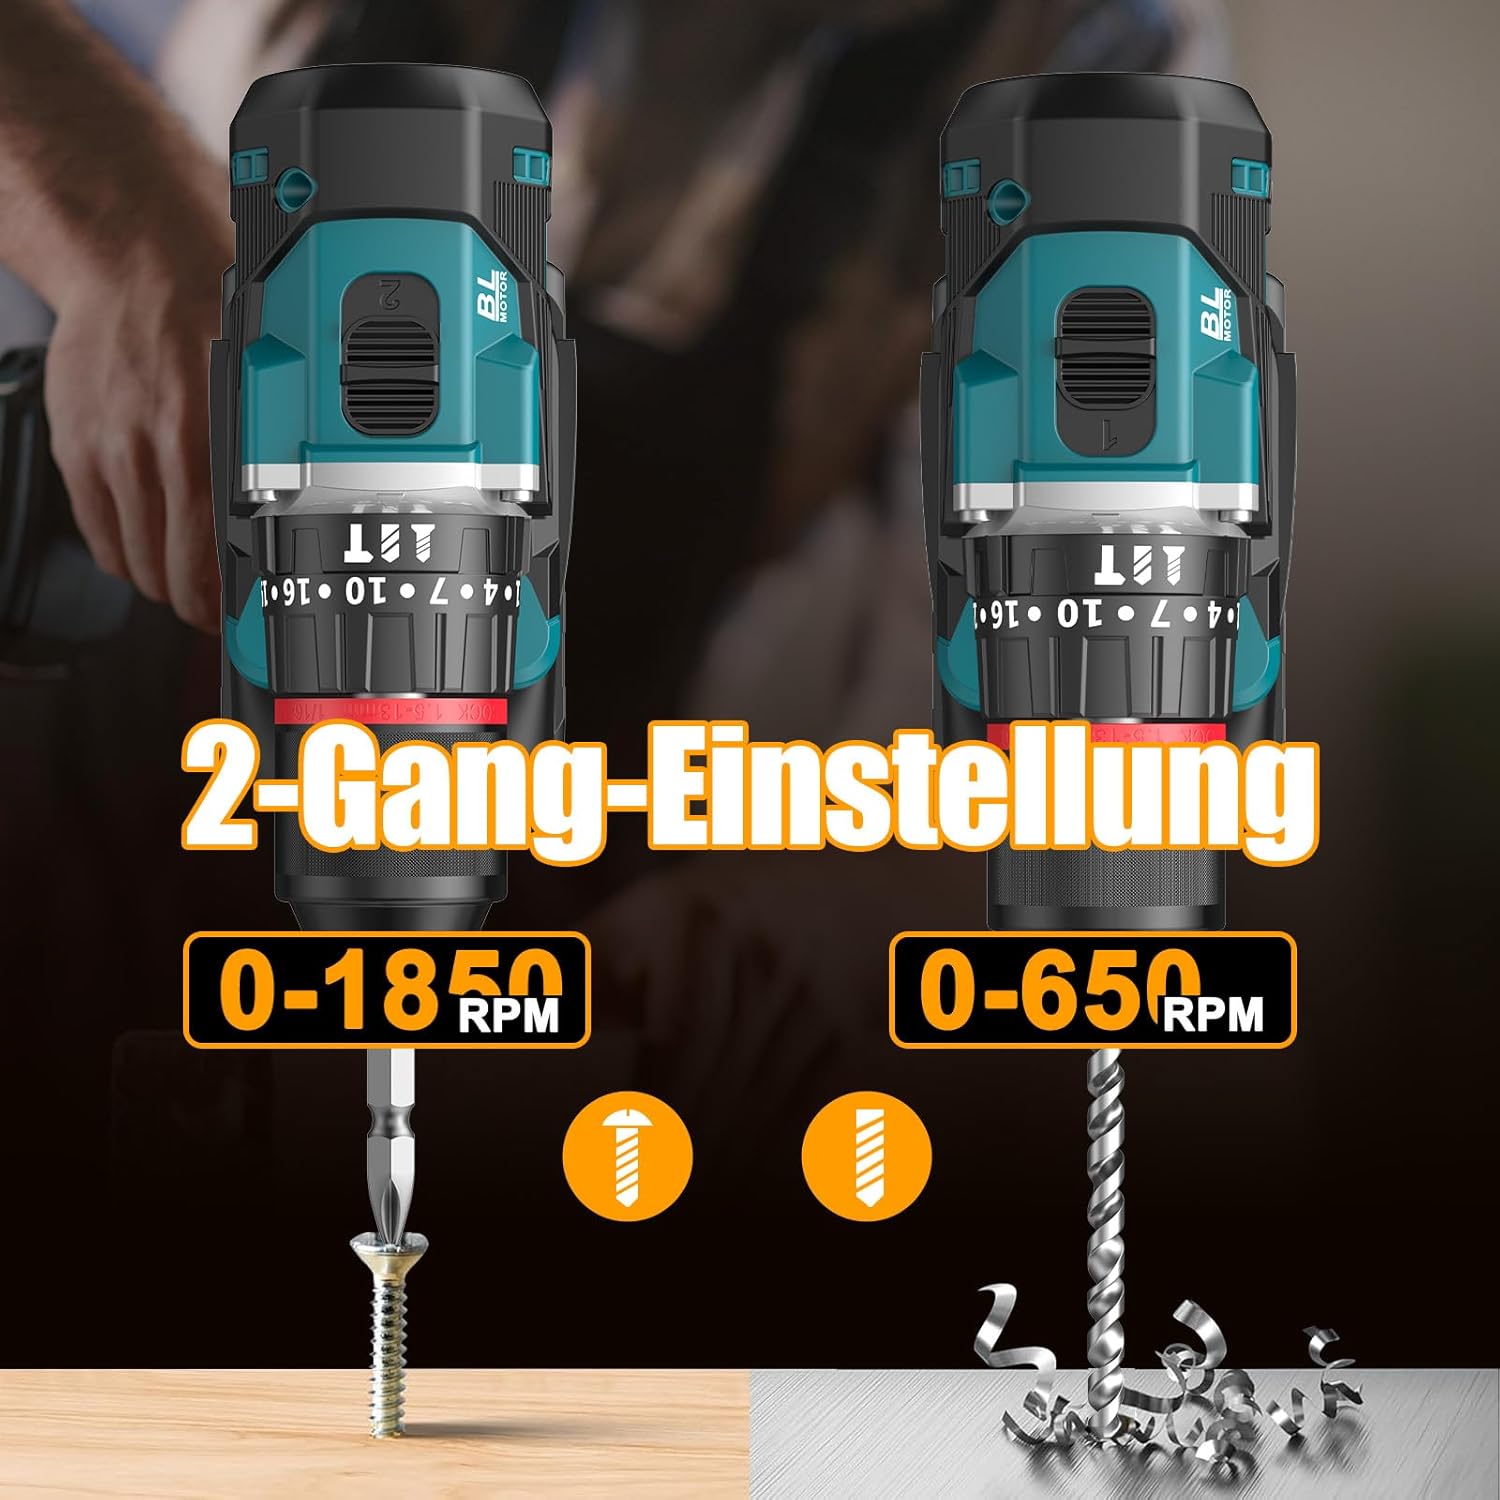
Image 6.1: An illustration demonstrating the two-speed gear settings: Gear 1 (0-650 RPM) for screwdriving and Gear 2 (0-1850 RPM) for drilling, allowing for optimal performance based on the application.
6.4 Torque Adjustment and Mode Selection
The torque adjustment ring allows you to set the desired torque for screwdriving applications, preventing overtightening or stripping screws. The mode selector ring allows you to switch between different operating modes.
- Screwdriving Mode (Torque Settings 1-35): Use these settings to match the torque to the screw size and material. Lower numbers for smaller screws/softer materials, higher numbers for larger screws/harder materials.
- ბურღვის რეჟიმი (ბურღის ხატულა): For general drilling without impact. The clutch is disengaged, providing maximum torque.
- დარტყმითი ბურღვის რეჟიმი (ჩაქუჩის ხატი): For drilling into masonry or concrete, providing a hammering action in addition to rotation.
The drill offers 35+3 settings, including 35 torque settings for screwdriving and 3 modes (screwdriving, drilling, impact drilling).

Image 6.2: A visual representation of the 35+3 torque and mode settings, indicating precise power control and a maximum torque of 55 N.m, suitable for various materials like wood, brick, plastic, and metal.
7. მოვლა
7.1 დასუფთავება
- ნებისმიერი გაწმენდის ან ტექნიკური მომსახურების ჩატარებამდე ყოველთვის გამორთეთ ბატარეის პაკეტი.
- გადახურების თავიდან ასაცილებლად, ხელსაწყოს ვენტილაციის ღიობები სუფთად შეინახეთ.
- გამოიყენეთ რბილი, დamp ქსოვილი ხელსაწყოს გასაწმენდად casinზ. არ გამოიყენოთ უხეში ქიმიკატები ან აბრაზიული საწმენდი საშუალებები.
7.2 შენახვა
- შეინახეთ ინსტრუმენტი და ელემენტები გრილ, მშრალ ადგილას, მოარიდეთ მზის პირდაპირ სხივებს და ტენიანობას.
- შეინახეთ ინსტრუმენტი მის ჩანთაში, რათა დაიცვათ იგი მტვრისგან და დაზიანებისგან.
- შეინახეთ ბავშვებისთვის მიუწვდომელ ადგილას.

Image 7.1: A person carrying the Conentool drill kit in its durable black carrying case, designed for convenient storage and transport of the tool and its accessories.
7.3 ბატარეის მოვლა
- არ შეინახოთ ელემენტები დაცლილ მდგომარეობაში. რეგულარულად დატენეთ ისინი, განსაკუთრებით თუ დიდი ხნის განმავლობაში არ იყენებთ.
- მოერიდეთ ბატარეების ექსტრემალურ ტემპერატურაზე ზემოქმედებას.
- არ სცადოთ ბატარეის პაკეტის დაშლა ან შეცვლა.
8. Დიაგნოსტიკა
| პრობლემა | შესაძლო მიზეზი | გამოსავალი |
|---|---|---|
| ინსტრუმენტი არ იწყება | ბატარეა არ არის დატენილი ან არასწორად არის დამონტაჟებული. | დარწმუნდით, რომ ბატარეა სრულად დატენილია და სწორად არის ჩასმული. |
| შემცირებული სიმძლავრე ან სიჩქარე | ბატარეის დატენვა დაბალია. | დატენეთ ბატარეა. |
| ბურღი ჩამკეტში სრიალებს | ჩაკი საკმარისად არ არის დაჭიმული. | Tighten the chuck firmly around the bit. Ensure the bit shank is clean. |
| გადახურება | ვენტილაციის ხვრელების დაბლოკვა; უწყვეტი ინტენსიური გამოყენება. | გაწმინდეთ ვენტილაციის ღარები. ხანგრძლივი გამოყენებისას ხელსაწყოს გაგრილების საშუალება მიეცით. |
9. სპეციფიკაციები
| ფუნქცია | სპეციფიკაცია |
|---|---|
| მოდელის ნომერი | ebvc-sd-de |
| ტtage | 21 ვოლტი |
| ბატარეის ტიპი | ლითიუმ-იონი |
| ბატარეის ტევადობა | 2500 mAh (თითოეული) |
| მაქს ბორკზე | 55 ნმ |
| ბრუნვის პარამეტრები | 35 + 3 Modes (Screwdriving, Drilling, Impact Drilling) |
| უტვირთო სიჩქარე (სიჩქარე 1) | 0-650 RPM |
| უტვირთო სიჩქარე (სიჩქარე 2) | 0-1850 RPM |
| ჩაკის ზომა | 13 mm (3/8 inch) Keyless |
| პროდუქტის ზომები | 35 x 31 x 10 სმ |
| წონა (ბატარეით) | 1.5 კგ |
10. გარანტია და მხარდაჭერა
Conentool products are manufactured to high-quality standards. In the unlikely event of a defect due to material or manufacturing fault, please contact your retailer or Conentool customer service. Please retain your proof of purchase for warranty claims.
For further assistance, technical support, or to inquire about spare parts, please refer to the contact information provided with your purchase or visit the official Conentool webსაიტი.


