1. შესავალი
The xTool P2 is a versatile and intelligent desktop CO2 laser cutter and engraver, designed for both hobbyists and small businesses. Equipped with a powerful 55W laser tube and dual 16MP smart cameras, it offers exceptional precision for a wide range of materials and applications. Its advanced features include automatic 3D model construction for curved surface engraving, intelligent shape recognition for batch processing, and automatic passthrough for extra-long materials.
This manual provides essential information for setting up, operating, maintaining, and troubleshooting your xTool P2 to ensure safe and efficient use.

Figure 1: The xTool P2 55W CO2 Laser Cutter.

სურათი 2: დასრულდაview of xTool P2's key features and capabilities.
პროდუქტი დასრულდაview ვიდეო
ვიდეო 1: ოვერview of the xTool P2, showcasing its versatility in various creative projects and applications.
2. დაყენება
Before operating your xTool P2, ensure proper setup by following these steps:
- ყუთის ამოღება და განთავსება: Carefully remove the machine from its packaging. Place the xTool P2 on a stable, level surface in a well-ventilated area, away from flammable materials.
- ამოიღეთ დამცავი მასალები: Open the lid and remove all internal foam packaging and protective films from the machine's components.
- Install Slats/Honeycomb Panel: Place the provided slats or honeycomb panel into the working area.
- Fill Coolant Reservoir: Locate the coolant reservoir (typically at the back or side of the machine). Unscrew the cap and carefully pour distilled water or recommended antifreeze (if ambient temperature is below 10°C/50℉) into the reservoir until it reaches the indicated fill line. Securely replace the cap.
- შეაერთეთ კვების ბლოკი და USB: Plug the power cable into the machine and a grounded electrical outlet. Connect the USB cable from the xTool P2 to your computer.
- პროგრამული უზრუნველყოფის ინსტალაცია: Download and install the xTool Creative Space (XCS) software from the official xTool webსაიტი. ინსტალაციისთვის მიჰყევით ეკრანზე მოცემულ ინსტრუქციებს.
- საწყისი ჩართვა: Press the power button on the machine. The indicator lights should illuminate, and the laser head will perform an initialization sequence.
3. საოპერაციო ინსტრუქციები
The xTool P2 offers intuitive operation for both cutting and engraving tasks. Familiarize yourself with its core functionalities:
3.1 ძირითადი ოპერაციების სამუშაო პროცესი
- მოამზადეთ მასალა: Place your chosen material (e.g., wood, acrylic, leather) onto the working bed. Ensure it lies flat and is secured if necessary.
- Software Setup (XCS): Open the XCS software. The dual HD cameras will provide a real-time preview of your material on the canvas.
- დიზაინის იმპორტი/შექმნა: თქვენი დიზაინის იმპორტი file (SVG, DXF, PNG, JPG, etc.) or create a new design directly within XCS.
- Position and Adjust: Drag and resize your design on the canvas to align it with your material. Utilize the precise positioning features of the dual cameras for accurate placement, especially for small objects.
- პარამეტრების დაყენება: Select the material type from the software's library or manually set the laser power, speed, and pass count based on your material and desired effect (cutting, engraving, scoring).
- დამუშავების დაწყება: Once all settings are configured, click the "Process" button in the software. The machine will begin its operation. Monitor the process through the transparent lid.

Figure 3: The powerful 55W CO2 laser cutting thick materials in a single pass.
3.2 გაფართოებული ფუნქციები
- Curved Surface Engraving: The xTool P2 can automatically construct 3D models of curved objects using its smart cameras, allowing for precise engraving on non-flat surfaces. This feature ensures consistent results across varying contours.

Figure 4: Engraving intricate designs on curved surfaces with ease.
Curved Surface Engraving Video
Video 2: Demonstration of the xTool P2's curved surface engraving capabilities.
- Automatic Passthrough: For extra-long materials, the xTool P2 supports an automatic conveyor feeder (sold separately) that allows continuous processing of materials up to 118 inches long. This is ideal for large-scale projects like signage.

Figure 5: The automatic passthrough feature for processing extended materials.
Automatic Conveying Video
ვიდეო 3: ჩვენებაasing the automatic conveying feature for continuous material processing.
- Dual HD Cameras: The integrated 16MP cameras provide a panoramic view for overall design preview and a close-range view for ultra-fine detail positioning, ensuring accurate placement and minimizing material waste.

Figure 6: The dual HD camera system for precise object positioning.
- DistiMaster™ Ranging System: This advanced LiDAR technology ensures precise auto-focus, delivering accurate distance measurements and consistent cut-through results every time.

Figure 7: The DistiMaster™ Ranging System for accurate auto-focus.
3.3 მასალის თავსებადობა
The xTool P2 is compatible with a wide array of materials, including but not limited to:
- Wood (various types, including black walnut, basswood, MDF)
- Acrylic (all colors)
- ტყავი
- რეზინი
- ქსოვილი
- Glass (engraving only)
- Ceramic (engraving only)
- Slate (engraving only)
- Coated Metal (engraving only)
- Anodized Aluminum (engraving only)
3.4 Business Applications
The xTool P2 is an excellent tool for various business ventures, enabling the creation of custom products and signage.

სურათი 8: მაგample of an Event Planner utilizing the xTool P2.

სურათი 9: მაგample of a Sign Maker utilizing the xTool P2.

სურათი 10: მაგample of a Jewelry Designer utilizing the xTool P2.

სურათი 11: მაგample of a Woodworker utilizing the xTool P2.
Easy Start Your Small Business Video
ვიდეო 4: ჩვენებაasing how the xTool P2 can help easily start a small business.
4. მოვლა
Regular maintenance ensures the longevity and optimal performance of your xTool P2.
- Lens and Mirror Cleaning: Regularly inspect and clean the laser lens and mirrors using a lint-free cloth and lens cleaning solution. Refer to the detailed instructions in the official user manual for proper cleaning procedures.
- Honeycomb Panel Cleaning: The honeycomb panel can accumulate residue from cutting. Periodically remove and clean it to maintain efficient smoke exhaust and prevent material staining.
- გამაგრილებლის დონის შემოწმება: Monitor the coolant level in the reservoir. Refill with distilled water or appropriate antifreeze as needed, especially if operating in temperatures below 10°C (50℉).
- Exhaust Fan Maintenance: Ensure the exhaust fan is clear of debris to maintain proper ventilation and smoke extraction.
5. Დიაგნოსტიკა
If you encounter issues with your xTool P2, consider the following common troubleshooting steps:
- მანქანა არ ჩართულია: Check the power cable connection to both the machine and the electrical outlet. Ensure the emergency stop button is not engaged.
- Laser Not Firing/Cutting: Verify that the lid is fully closed and latched. Check laser power and speed settings in the software; they might be too low for the material. Ensure the material is within the focal range.
- Poor Cut/Engrave Quality: This can be due to incorrect material settings, a dirty lens or mirrors, or improper focus. Clean optical components and recalibrate focus if necessary.
- პროგრამული უზრუნველყოფის დაკავშირების პრობლემები: Ensure the USB cable is securely connected. Restart both the machine and the software. Try a different USB port or cable.
- გაფრთხილება გადახურების შესახებ: Check the coolant level. Ensure the exhaust fan is working and not obstructed. Allow the machine to cool down before resuming operation.
For persistent issues, refer to the comprehensive troubleshooting guide in the official user manual or contact xTool customer support.
6. სპეციფიკაციები
| ფუნქცია | დეტალი |
|---|---|
| მოდელი | xTool P2 (MXP-K002-004) |
| ლაზერული სიმძლავრე | 55W (55000mW) CO2 Laser |
| გრავირების სიჩქარე | 600 მმ/წმ-მდე |
| საწოლის ზომა | 26" x 14" (660 მმ x 355 მმ) |
| Max. Engraving Height | 2.7" (68mm) (8.4" with Riser Base) |
| კამერები | Dual 16MP Smart Cameras (Panoramic & Close-range) |
| ავტოფოკუსი | DistiMaster™ Ranging System (LiDAR) |
| დაკავშირება | USB, Wi-Fi |
| პროდუქტის ზომები | 25 x 11 x 39.5 ინჩი |
| ნივთის წონა | 126.4 ფუნტი |
| უსაფრთხოების მახასიათებლები | Enclosed design, Automatic lock, Emergency stop button, Hydraulic support, Fire safety, Multiple warning systems |
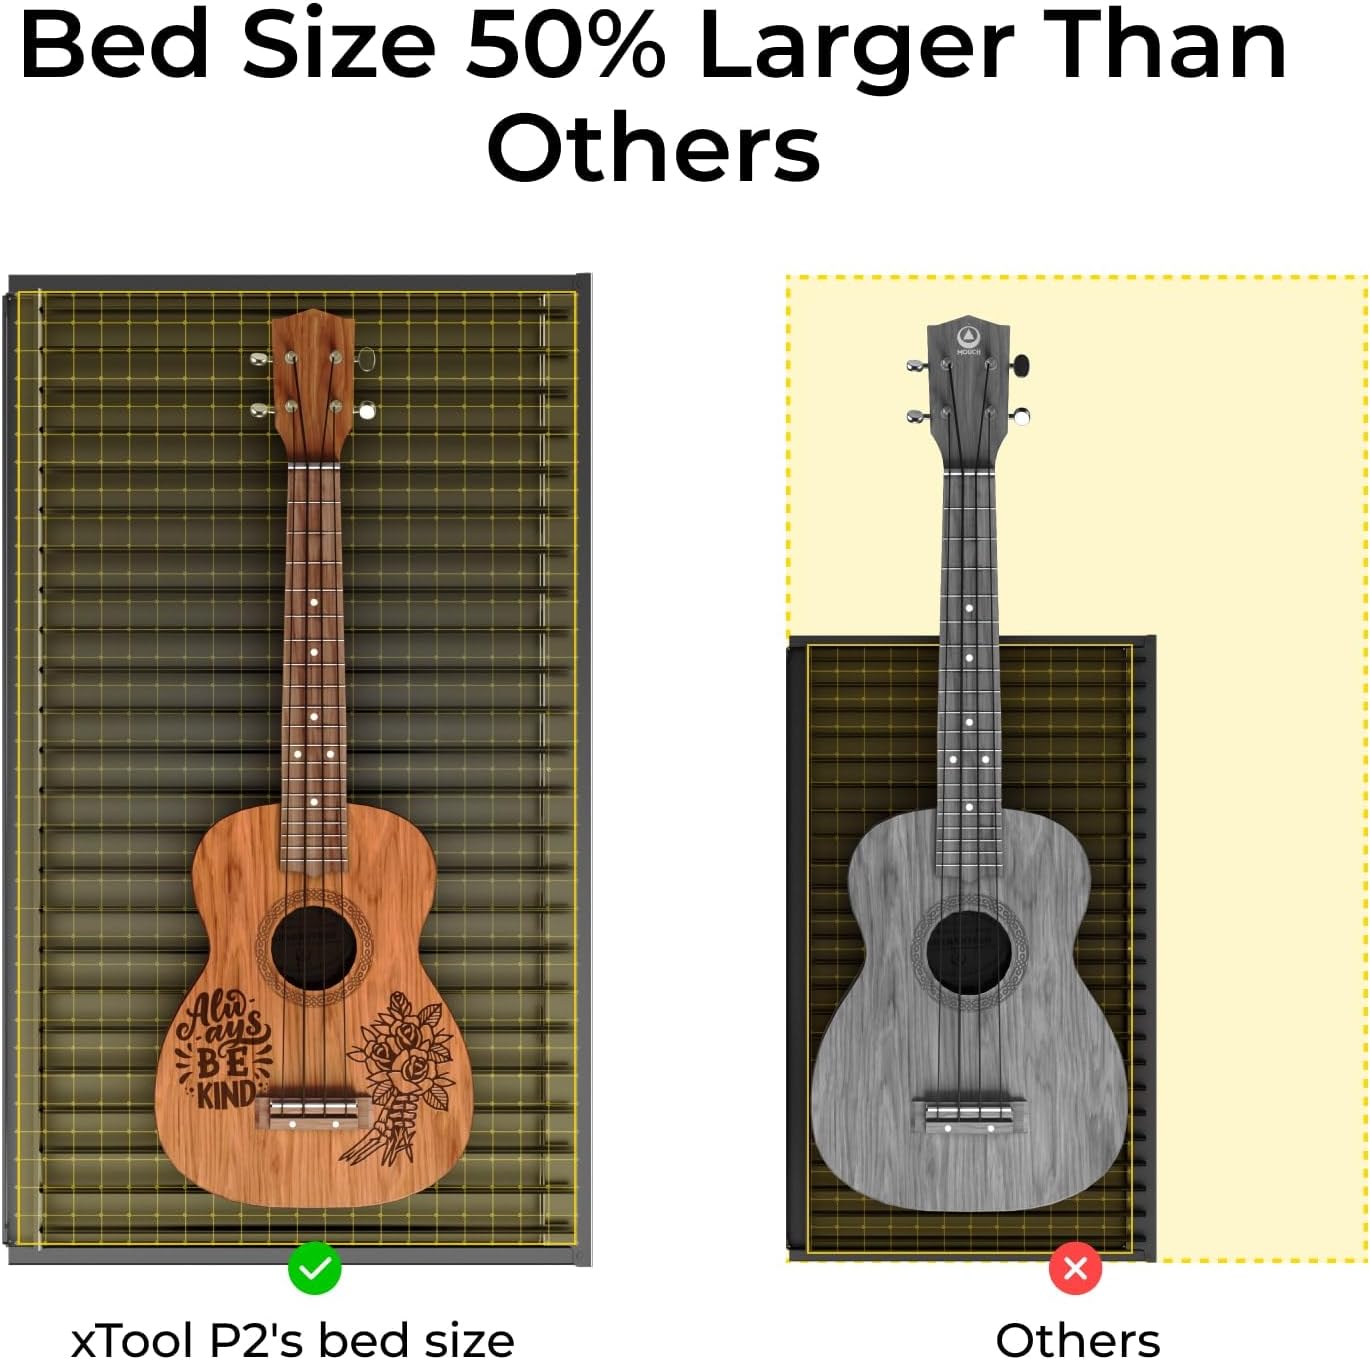
Figure 12: Comparison of xTool P2's bed size with other models.

Figure 13: Detailed feature comparison of xTool P2 against competitors.
7. გარანტია და მხარდაჭერა
xTool provides comprehensive support for its products:
- გარანტია: The xTool P2 comes with a 1-year warranty. Please retain your proof of purchase for warranty claims.
- მომხმარებელთა მხარდაჭერა: For technical assistance, troubleshooting, or any inquiries, you can reach xTool customer support through multiple channels:
- ელ.ფოსტის მხარდაჭერა
- Live chat on the official webსაიტი
- ტელეფონის მხარდაჭერა
- Facebook group for community support and discussions

Figure 14: xTool's multi-channel service options for customer support.

Figure 15: The dedicated xTool technical service team.


