1. შესავალი
The Wellue 24-Hour Ambulatory Blood Pressure Monitor (ABPM) is designed for continuous, automatic blood pressure measurement over a 24-hour period. This device helps to provide a comprehensive overview of blood pressure fluctuations, including during sleep, and can assist in identifying conditions such as white coat hypertension or masked hypertension. It is a clinically accurate device, certified by ESH IP 2010, and recommended by the European Society of Hypertension (ESH) and the British and Irish Hypertension Society (BIHS).

Image 1.1: The Wellue ABPM device enables continuous blood pressure monitoring throughout the day and night.
2. რა შედის ფასში
გთხოვთ, შეამოწმოთ პაკეტის შიგთავსი, რათა დარწმუნდეთ, რომ ყველა ნივთი ადგილზეა:
- 24-Hour Ambulatory Blood Pressure Monitor Unit
- USB Disk (containing ABPM software and user manual)
- მოწყობილობის კლიპი
- Adult Cuff (22-36 cm)
- Extra Large Cuff (33-43 cm)
- სილიკონის საფარი
- Disposable Sweat-Absorbing Inner Cuff
- USB მონაცემთა კაბელი
- Fast Charger (EU standard)

სურათი 2.1: დასრულდაview of all items included in the Wellue ABPM package.
3. დაყენება
3.1 მოწყობილობის დატენვა
Before first use, fully charge the monitor using the provided USB data cable and fast charger. Connect the USB cable to the monitor and the charger, then plug the charger into a power outlet. A full charge takes approximately 2.5 hours and supports up to 200 measurements.
3.2 Installing the Cuff
- Select the appropriate cuff size (22-36 cm or 33-43 cm) for your arm. The cuff should fit snugly but not too tightly.
- Attach the cuff to the monitor's air tube connector.
- Wrap the cuff around your upper arm, ensuring the artery mark on the cuff aligns with your brachial artery. The bottom edge of the cuff should be approximately 2-3 cm above the elbow joint.
- Secure the cuff firmly using the hook-and-loop fastener.
3.3 პროგრამული უზრუნველყოფის ინსტალაცია
The ABPM software is provided on the included USB disk. Insert the USB disk into your PC and follow the on-screen instructions to install the software. The software is compatible with Microsoft Windows operating systems (Win2003/WinXP/Win7/Win10/Win11).
3.4 კომპიუტერთან დაკავშირება
To transfer data or program the device, connect the monitor to your PC using the provided USB data cable. Ensure the software is running on your PC.

Image 3.1: Connecting the ABPM device to a PC for data transfer and programming.
4. მოწყობილობის მართვა
4.1 Starting a Measurement Session
Once the cuff is correctly applied and the device is charged, press the power button to turn on the monitor. The device will automatically begin measurements according to the programmed schedule. You can also initiate a manual measurement by pressing the designated button on the device.
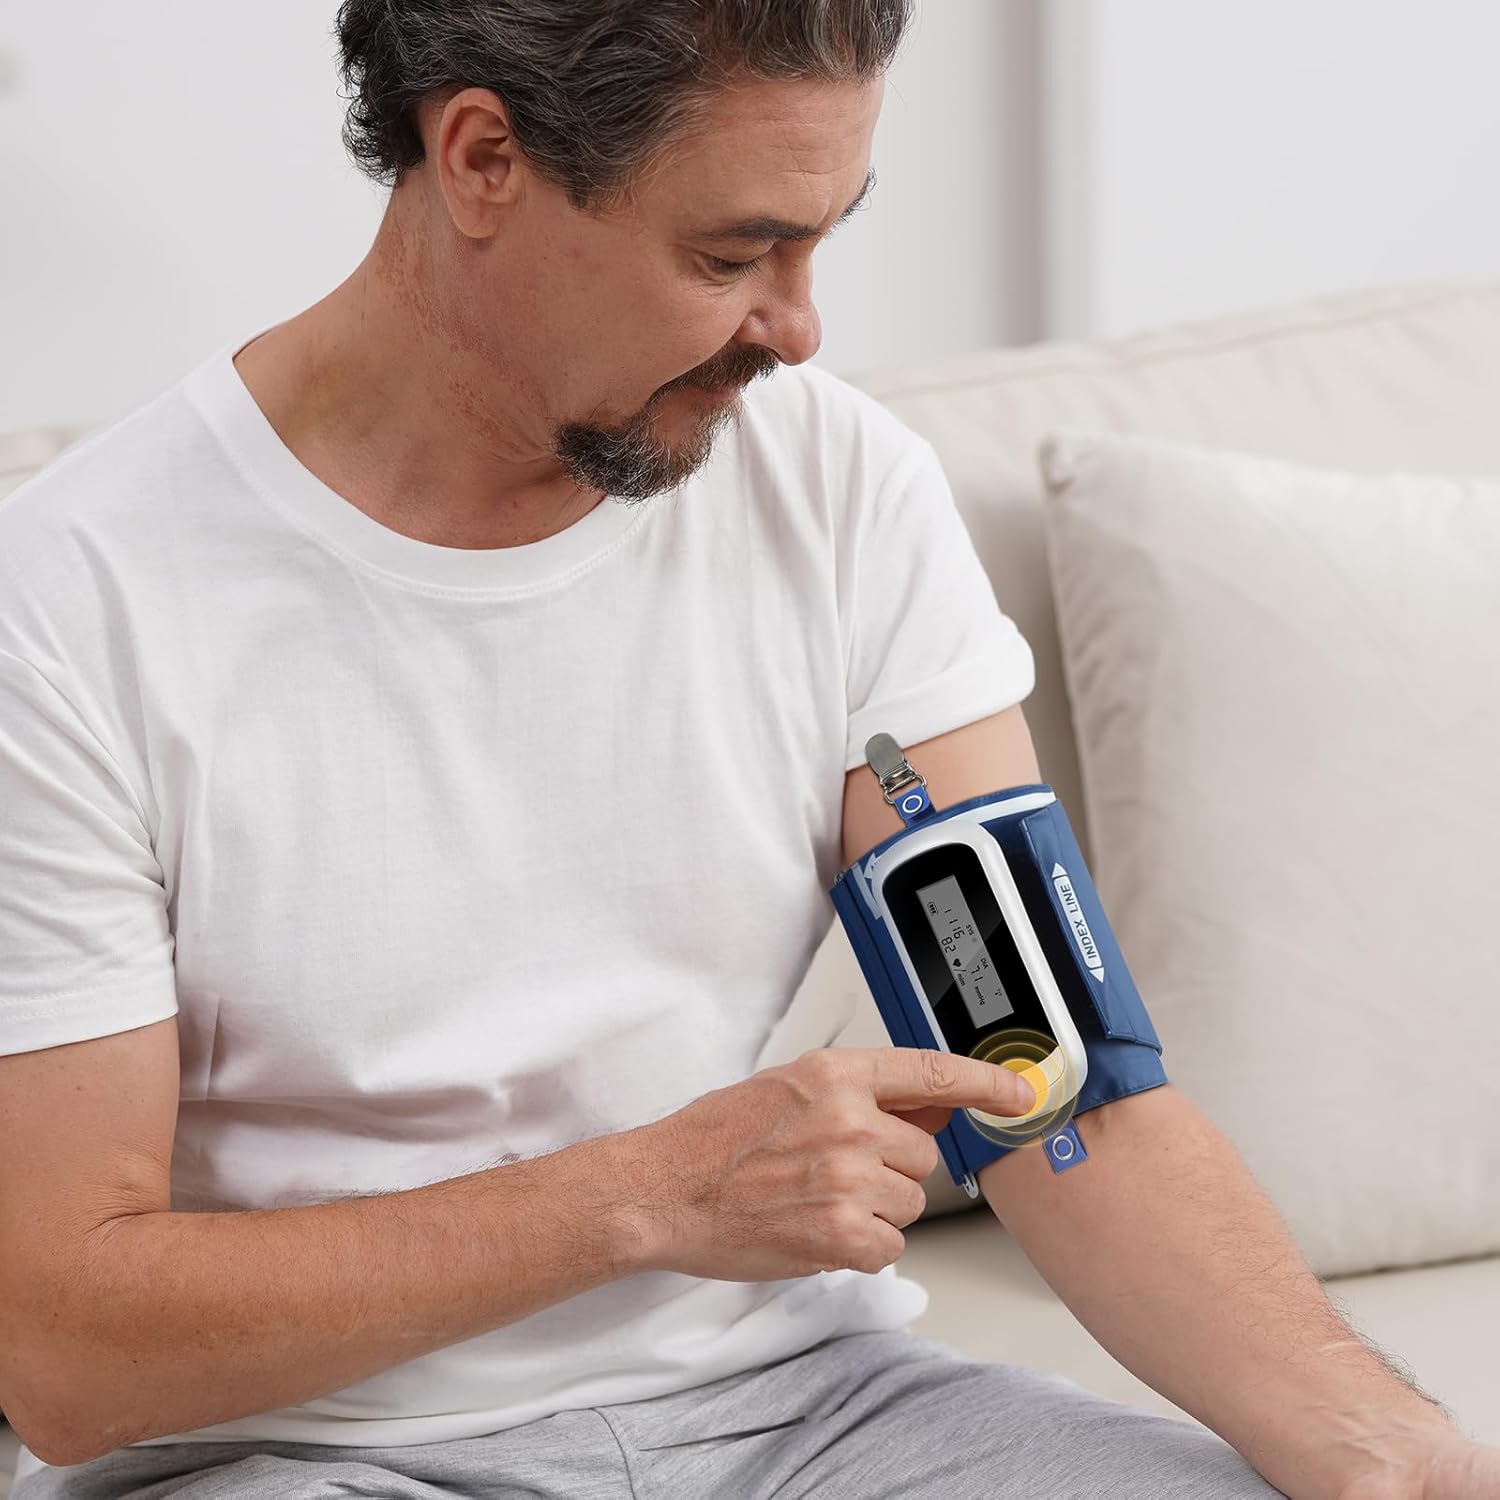
Image 4.1: Initiating a measurement on the Wellue ABPM device.
4.2 Programming Measurement Intervals
The device can be programmed via the PC software to take measurements at various intervals:
- Standard intervals: 5, 10, 15, 20, 30, 45, 60, 90, 120 minutes.
- You can define specific wake and sleep periods, as well as three special periods, for customized measurement schedules.
4.3 Data Transfer and Analysis with PC Software
After completing a monitoring session, connect the device to your PC to transfer the stored data. The software allows for comprehensive analysis:
- Advanced ABPM Analysis: Gain insights into nocturnal hypertension, morning surges, and correlations between DIA vs SYS and HR vs SYS. The Ambulatory Arterial Stiffness Index (AASI) can also be analyzed.
- Trend Graphs: Visualize up to 72 hours of data, showing blood pressure variations over time.
- Customizable Reports: Generate professional PDF reports. You can define report content, set hospital logos, and include signatures.
- მონაცემთა მენეჯმენტი: User-defined data saving paths, patient search function, and comparison of BP between different measurements for the same patient.
- Visual Customization: Set colors for systolic, diastolic, sleep period, and BP limits to suit individual preferences.
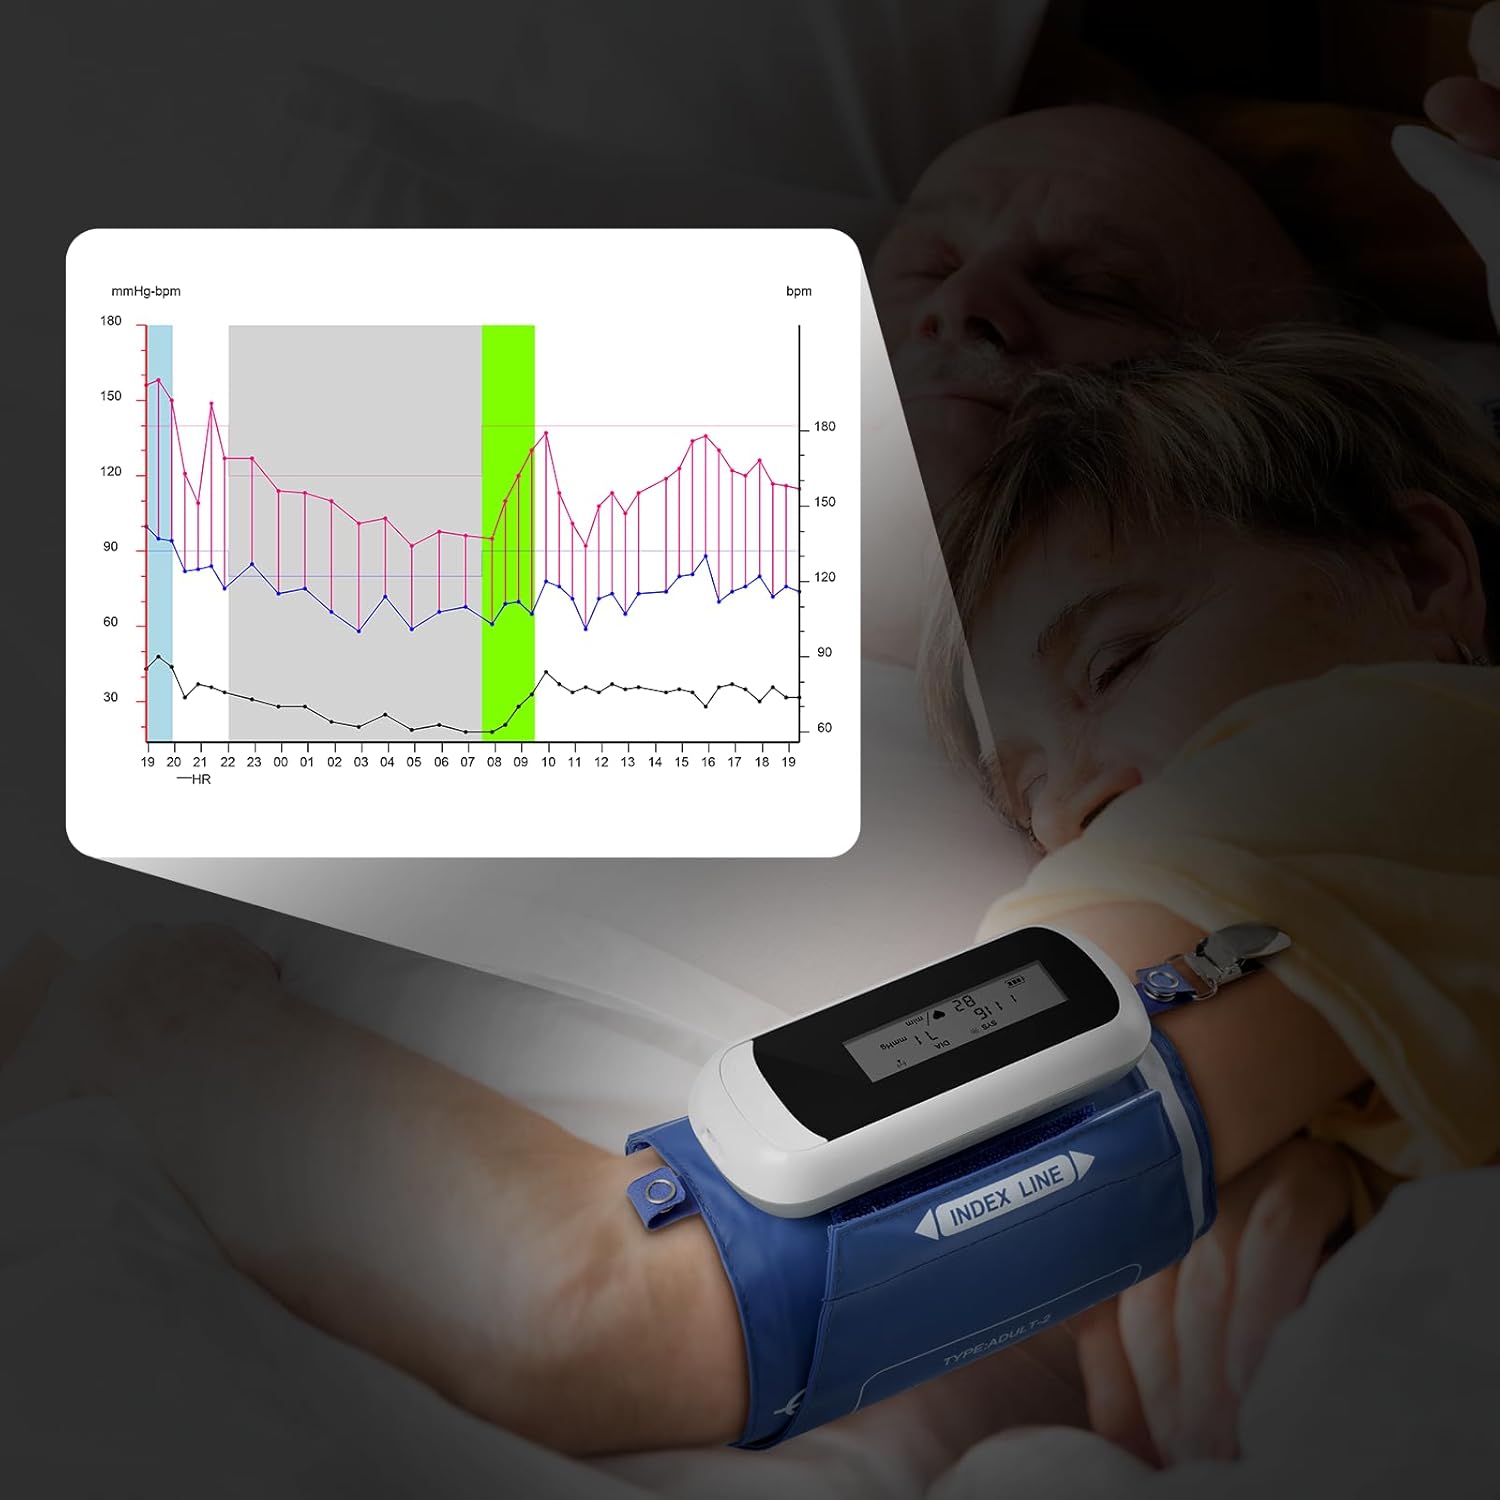
Image 4.2: Monitoring blood pressure during sleep and visualizing data trends.

Image 4.3: Analyzing comprehensive blood pressure data with the Wellue PC software.
5. მოვლა
5.1 Cleaning the Device and Cuffs
Wipe the monitor and cuffs with a soft, dry cloth. For disinfection, use a cloth lightly dampened with a mild disinfectant. Do not immerse the device in water or use abrasive cleaners.
5.2 ბატარეის მოვლა
The device uses a rechargeable Li-ion battery. To prolong battery life, avoid fully discharging the battery frequently. Recharge the device when the battery indicator is low. Store the device with a partial charge if not used for extended periods.
5.3 კალიბრაცია
For continued accuracy, the device requires calibration at least once every two years. Please contact Wellue customer support for calibration services.
5.4 შენახვის პირობები
Store the device in a clean, dry place away from direct sunlight and extreme temperatures. Ensure the storage area is well-ventilated and free from corrosive gases. Recommended storage temperature: -20℃ to +55℃; Relative humidity: below 95%; Atmospheric pressure: 70KPa to 106KPa.
6. Დიაგნოსტიკა
If you encounter issues with your Wellue ABPM, please refer to the following common problems and solutions:
- მოწყობილობა არ ირთვება: Ensure the battery is charged. Connect the device to the charger and try again.
- Cuff not inflating or deflating: Check that the cuff is securely connected to the monitor and that there are no kinks in the air tube. Ensure the cuff is correctly applied to the arm.
- არასწორი მაჩვენებლები: Ensure the cuff size is correct and applied properly. Avoid movement or talking during measurements. Consult a healthcare professional if readings consistently seem incorrect.
- პროგრამული უზრუნველყოფა ვერ აფიქსირებს მოწყობილობას: Verify the USB cable connection. Ensure the ABPM software is installed correctly and running. Try a different USB port on your PC.
- შეცდომის შეტყობინებები ეკრანზე: Refer to the detailed user manual on the USB disk for specific error code explanations and troubleshooting steps.
If problems persist, please contact Wellue customer support for assistance.
7. სპეციფიკაციები
| ფუნქცია | სპეციფიკაცია |
|---|---|
| მოდელი | WBP02A |
| ზომები | 119 x 52 x 21 მმ (4.7 x 2.1 x 0.8”) |
| წონა | 105 g (3.7 oz) (including battery) |
| მანჟეტის ზომები | Adult: 22-36 cm (8”-14”); Extra Large: 33-43 cm (13”-17”) |
| კომპიუტერის მოთხოვნები | USB port; Microsoft Win2003/WinXP/Win7/Win10/Win11 |
| ჩვენება | LED ეკრანი |
| სამუშაო პირობები | Temperature: 5℃~40℃; RH: 10%~95%; Atmospheric Pressure: 70KPa~106KPa |
| შენახვის პირობები | Temperature: -20℃~+55℃; RH: <95%; Atmospheric Pressure: 70KPa~106KPa |
| მაქსიმალური გაბერვის წნევა | 290 მმ Hg |
| გაზომვის მეთოდი | ოსცილომეტრია |
| ოპერაციის რეჟიმი | Automatic continuous operation |
| გაზომვის ინტერვალები | 5, 10, 15, 20, 30, 45, 60, 90, 120 min (programmable) |
| Measurement Range (Systolic) | 40-260 მმ Hg |
| Measurement Range (Diastolic) | 20-210 მმ Hg |
| Measurement Range (Pressure) | 0-290 მმ Hg |
| Measurement Range (Heart Rate) | 40 წთ - 200 წთ |
| Measurement Accuracy (Pressure) | ± 3 მმ Hg |
| Measurement Accuracy (Pulse) | B 3 დარტყმა წუთში |
| შიდა მეხსიერება | 300 კითხვამდე |
| მონაცემთა კავშირი | USB მონაცემთა კაბელი |
| ხმაურის დონე | 45 დბ |
| შეღწევის დაცვა | IP22 |
| ბატარეის ხანგრძლივობა | Supports 200 measurements per charge |
| დატენვის დრო | 2.5 საათი |
| რეიტინგული ტევადობა | 1000 mAh |
| ელექტრომომარაგება | 3.7V Li battery |

Image 7.1: Clinical accuracy certifications for the Wellue ABPM.
8. გარანტია და მხარდაჭერა
8.1 ინფორმაცია გარანტიის შესახებ
The Wellue 24-Hour Ambulatory Blood Pressure Monitor comes with a three-year warranty from the date of purchase. This warranty covers manufacturing defects and ensures reliable operation under normal use. Please retain your proof of purchase for warranty claims.
8.2 მომხმარებელთა მხარდაჭერა
For technical assistance, troubleshooting, calibration services, or warranty inquiries, please contact Wellue customer support. Contact details can typically be found on the Wellue official website or within the full user manual provided on the USB disk.


