1. შესავალი
The Thermalright Aqua Elite 360 ARGB is an all-in-one liquid CPU cooler designed to provide efficient cooling for high-performance processors. It features a 360mm radiator, a high-performance water block, and three 120mm PWM ARGB fans. This manual provides detailed instructions for installation, operation, and maintenance to ensure optimal performance and longevity of your cooler.

Image 1.1: Thermalright Aqua Elite 360 ARGB All-in-one CPU Liquid Cooler.
2. პაკეტის შიგთავსი
Please verify that all components are present in the package before proceeding with installation:
- AIO Water Cooler (Radiator with attached pump/water block and pre-installed fans)
- Mounting Brackets for AMD (AM4/AM5) and Intel (LGA1851/1700/115X/1200/2011/2066) sockets
- Backplates for Intel sockets
- Standoffs and Screws for various sockets
- თერმული ნაერთი
- Fan PWM Splitter Cable
- ARGB Lighting Sync Cable
- მომხმარებლის სახელმძღვანელო (ეს დოკუმენტი)

Image 2.1: Included components for the Thermalright Aqua Elite 360 ARGB V4 CPU Water Cooler.
3. თავსებადობა
The Thermalright Aqua Elite 360 ARGB CPU Water Cooler is compatible with a wide range of CPU sockets:
- Intel: LGA 1851, LGA 1700, LGA 1150, LGA 1151, LGA 1155, LGA 1156, LGA 1200, LGA 2011, LGA 2066
- AMD: AM4, AM5
For optimal installation, a PC case width greater than 250mm is recommended.
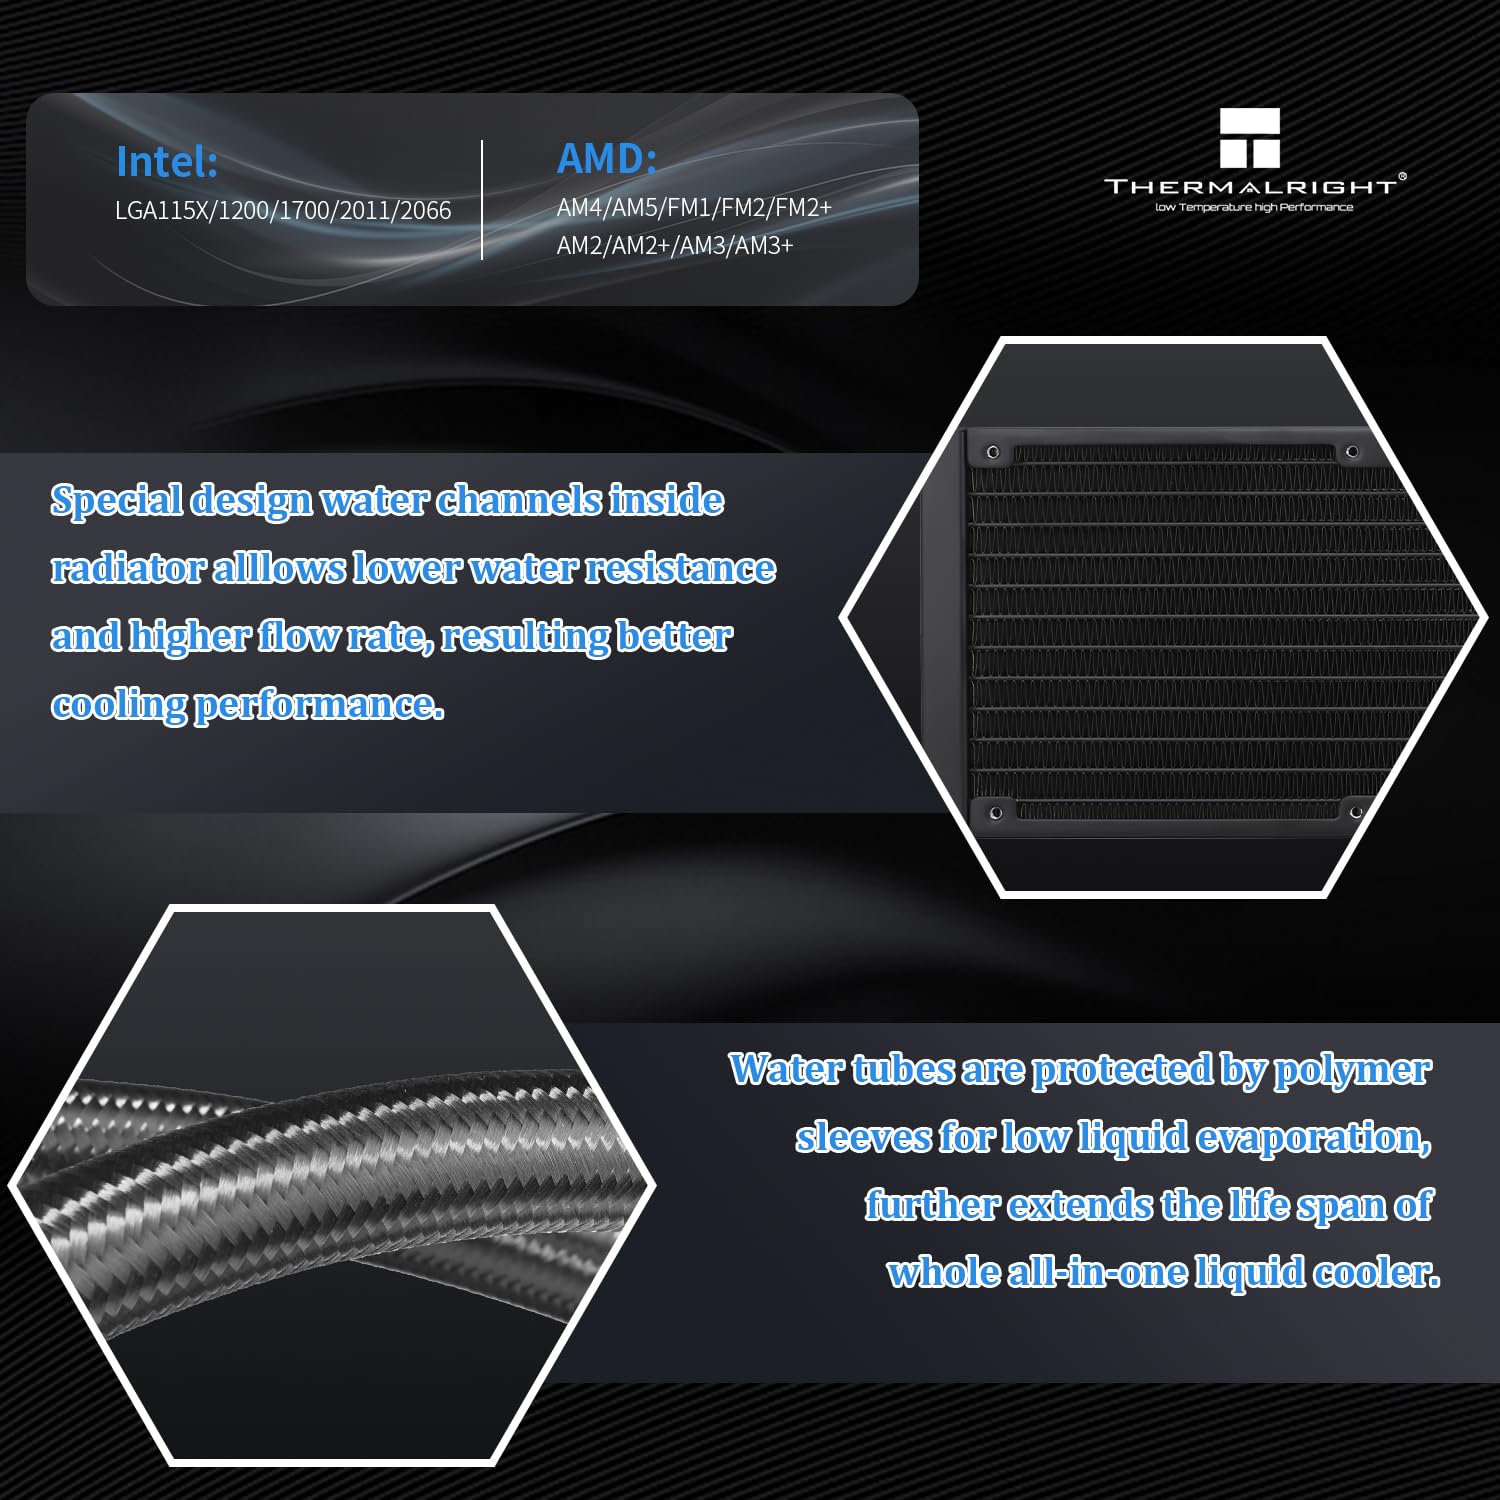
Image 3.1: Compatibility details for Intel and AMD sockets.
4. ძირითადი მახასიათებლები
- Enhanced Cooling Performance: Features a full purple copper mirror plane base, a 360mm black aluminum fin cooling plate, and polymer-protected water pipes for low resistance, high cooling efficiency, and extended lifespan.
- High-Performance Water Block: Utilizes a 0.1mm pitch high-quality copper base with a swirl design and illuminated logo. The pump has a lifespan of up to 40,000 hours and a speed of up to 6400RPM±10%.
- Three PWM ARGB Fans: Includes three TL-C12C-S ARGB balanced fans (120x120x25mm) with speeds up to 1550RPM±10%, noise levels ≤25.6dBA, air pressure of 1.53mmH2O (MAX), and air volume of 66.17CFM (MAX).
- S-FDB Bearings: Equipped with S-FDB bearings to minimize fan noise and extend fan life, providing maximum cooling performance when needed.
- მისამართებადი RGB განათება: Both the water block and fans feature ARGB lighting, controllable and synchronizable via supported motherboard software.
- მარტივი ინსტალაცია: Designed with dual-platform all-metal black fasteners and factory pre-mounted fans for a simplified installation process.

Image 4.1: Water block with Addressable RGB lighting interface.

Image 4.2: Features of the TL-C12C-S ARGB fan, including high airflow, S-FDB bearing, quiet operation, and 4-pin PWM connector.
5. ინსტალაციის სახელმძღვანელო
This section provides step-by-step instructions for installing your Thermalright Aqua Elite 360 ARGB CPU Water Cooler. Please refer to the video for a visual guide.
5.1. ინსტალაციის ვიდეო სახელმძღვანელო
Video 5.1: Official installation guide for the Thermalright Aqua Elite 360 ARGB V4 CPU Water Cooler. This video demonstrates the mounting process for both AMD and Intel platforms, as well as cable connections.
5.2. AMD AM4/AM5 Installation Steps
- Prepare Water Block: Remove the protective sticker from the coldplate. Align the arrow on the AMD bracket to the water block and rotate to install the AMD bracket onto the water block.
- თერმული ნაერთის გამოყენება: Apply an appropriate amount of thermal compound onto the CPU IHS (Integrated Heat Spreader).
- წყლის ბლოკის დამონტაჟება: Carefully place the water block onto the CPU, aligning the buckles on the AMD bracket with the motherboard's retention module.
- უსაფრთხო წყლის ბლოკი: Tighten both screws on the bracket with a screwdriver to apply even mounting pressure.

Image 5.2: Removing the protective sticker from the coldplate.

Image 5.3: Aligning the AMD bracket with the water block.

Image 5.4: Applying thermal compound to the CPU.

Image 5.5: Installing the water block onto the CPU using the AMD bracket buckles.

Image 5.6: Tightening the water block screws for proper mounting pressure.
5.3. Intel LGA1700 Installation Steps
- Prepare Backplate: For Intel LGA1700 motherboards, adjust the mounting hole position on the backplate to 1700.
- უკანა ფირფიტის დამონტაჟება: Install the backplate from the backside of the motherboard.
- Standoffs-ის დაყენება: Install the 1700 standoffs onto the backplate screws from the front side of the motherboard.
- Prepare Water Block: Remove the protective sticker from the coldplate. Align the arrow on the Intel bracket to the water block and rotate to lock it in place.
- თერმული ნაერთის გამოყენება: Apply an appropriate amount of thermal compound onto the CPU IHS.
- წყლის ბლოკის დამონტაჟება: Align the mounting holes on the bracket to the standoffs and install the water block.
- უსაფრთხო წყლის ბლოკი: Secure the metal brackets and water block with four nuts, applying appropriate mounting pressure.

Image 5.7: Adjusting the backplate for LGA1700 compatibility.

Image 5.8: Installing the backplate on the motherboard.

Image 5.9: Installing the standoffs for LGA1700.

Image 5.10: Attaching the Intel bracket to the water block.

Image 5.11: Applying thermal compound to the CPU.

Image 5.12: Placing the water block onto the standoffs.

Image 5.13: Securing the water block with nuts.
5.4. საკაბელო კავშირები
- ტუმბოს სიმძლავრე: Connect the pump power cable to the CPU_OPT or AIO_PUMP header on your motherboard.
- Fan Power (PWM): Connect the fan PWM cables to the fan splitter cable. Then, connect the PWM splitter cable to the motherboard's CPU_FAN socket to power the fans and allow for speed synchronization.
- ARGB განათება: Remove the protective caps from the ARGB 3-pin connectors. Connect the fan ARGB cables to the ARGB lighting sync cable. Then, connect the ARGB lighting cable to the motherboard's 3-pin +5V ARGB socket for lighting control. Note: Only supports 5V 3-pin ARGB, not 12V 4-pin RGB.

Image 5.14: Connecting the pump power cable to the motherboard.

Image 5.15: Connecting fan PWM cables to the splitter.

Image 5.16: Connecting the PWM splitter to the CPU_FAN header.

Image 5.17: Removing protective caps from ARGB connectors.

Image 5.18: Connecting fan ARGB cables for lighting synchronization.

Image 5.19: Connecting the ARGB lighting cable to the motherboard's +5V ARGB header.
6. ოპერაცია
Once installed and connected, the Thermalright Aqua Elite 360 ARGB CPU Water Cooler operates automatically. The PWM fans will adjust their speed based on CPU temperature, providing optimal cooling while minimizing noise.
- ვენტილატორის სიჩქარის კონტროლი: The 4-pin PWM connection allows your motherboard to automatically control fan speeds based on CPU temperature. You can typically configure fan curves in your motherboard's BIOS/UEFI settings or through manufacturer-provided software.
- ARGB განათების კონტროლი: The ARGB lighting can be controlled and synchronized using your motherboard's compatible ARGB software (e.g., ASUS Aura Sync, MSI Mystic Light Sync, Gigabyte RGB Fusion, ASRock Polychrome Sync). Ensure your motherboard has a 3-pin +5V ARGB header.
7. მოვლა
Regular maintenance helps ensure the longevity and optimal performance of your liquid cooler:
- მტვრისგან გაწმენდა: პერიოდულად გაწმინდეთ რადიატორის ფარფლები და ვენტილატორის პირები, რათა თავიდან აიცილოთ მტვრის დაგროვება, რამაც შეიძლება შეაფერხოს ჰაერის ნაკადი და შეამციროს გაგრილების ეფექტურობა. გამოიყენეთ შეკუმშული ჰაერი ან რბილი ჯაგრისი.
- მილების შემოწმება: Check the water pipes for any signs of leaks, kinks, or damage. While the polymer compilation protection water pipes are designed for durability, regular inspection is recommended.
- თერმული ნაერთი: The pre-applied thermal compound is effective for initial installation. If you ever need to remove and re-install the water block, it is recommended to clean off the old thermal compound and apply new thermal compound for best results.
- ვენტილატორის საკისრები: The S-FDB bearings are designed for long life and quiet operation. No specific lubrication is required.
8. Დიაგნოსტიკა
If you encounter issues with your Thermalright Aqua Elite 360 ARGB, refer to the following common troubleshooting steps:
- No Power to Pump/Fans:
- Ensure all power cables (pump, fan PWM splitter) are securely connected to the correct headers on the motherboard.
- Check your motherboard's BIOS/UEFI settings to ensure the CPU_FAN and AIO_PUMP/CPU_OPT headers are enabled and configured correctly.
- ვენტილატორები არ ბრუნავენ ან ნელა ბრუნავენ:
- Verify fan connections to the PWM splitter and the splitter to the motherboard.
- Check fan speed settings in BIOS/UEFI. Ensure they are not set to a very low RPM or a silent profile that might prevent them from spinning at low temperatures.
- ARGB განათება არ მუშაობს:
- Confirm the ARGB lighting cable is correctly connected to a 3-pin +5V ARGB header on your motherboard. Do not connect to a 4-pin +12V RGB header, as this can damage the LEDs.
- Ensure your motherboard's ARGB software is installed and configured correctly.
- Check for any loose connections in the ARGB daisy chain.
- მაღალი CPU ტემპერატურა:
- Verify that the water block is securely mounted to the CPU with adequate and even pressure.
- Ensure sufficient thermal compound was applied and spread evenly.
- Check if the pump is running (you might hear a faint hum or feel vibrations).
- Ensure the fans are spinning and that the radiator is not obstructed by dust or cables, allowing for proper airflow.
- არაჩვეულებრივი ხმები:
- A slight gurgling sound initially is normal as air settles in the loop. This should subside.
- If loud grinding or rattling occurs, check fan blades for obstructions or damage. If the pump is making excessive noise, contact support.
9. სპეციფიკაციები
Detailed technical specifications for the Thermalright Aqua Elite 360 ARGB CPU Water Cooler:
| კომპონენტი | სპეციფიკაცია |
|---|---|
| პროდუქტის ზომები | 2.83"L x 2.83"W x 1.89"H (Water Block) |
| ბრენდი | თერმოუფლება |
| დენის კონექტორის ტიპი | 4-Pin (PWM for fans, specific pump connector) |
| ტtage | 12 ვოლტი (DC) |
| გაგრილების მეთოდი | წყალი |
| თავსებადი მოწყობილობები | დესკტოპის პროცესორები |
| Noise Level (Fans) | ≤25.6 Decibels |
| მასალა | ალუმინი, სპილენძი, პლასტმასი |
| მაქსიმალური ბრუნვის სიჩქარე (ვენტილატორები) | 1550 RPM ±10% |
| ჰაერის ნაკადის მოცულობა (ვენტილატორები) | 66.17 Cubic Feet Per Minute (MAX) |
| Air Pressure (Fans) | 1.53mmH2O (MAX) |
| ტუმბოს სიჩქარე | 6400 RPM ±10% |
| ტუმბოს სიცოცხლის ხანგრძლივობა | 40,000 საათამდე |
| გულშემატკივართა ტარების ტიპი | S-FDB Bearing |
| რადიატორის ზომები | 397 მმ * 120 მმ * 27 მმ |
| წყლის ბლოკის ზომები | 72 მმ * 72 მმ * 48 მმ |
Image 9.1: Detailed specifications table for the Aqua Elite 360 ARGB.

10. გარანტია და მხარდაჭერა
Thermalright products are manufactured to high quality standards. For specific warranty information, please refer to the warranty card included with your product or visit the official Thermalright website. If you encounter any issues or require technical assistance, please contact Thermalright customer support through their official channels.
For the most up-to-date support information, product registration, and FAQs, please visit: www.thermalright.com