1. შესავალი
This manual provides essential instructions for the safe operation and maintenance of your VTech Advanced HD Plus 5.5" HD 1 Cam Video Baby Monitor. Please read this manual thoroughly before using the product to ensure proper setup and functionality. Keep this guide for future reference.

Image 1.1: The VTech Advanced HD Plus 5.5" HD 1 Cam Video Baby Monitor, featuring the parent unit and baby unit.
2. ძირითადი მახასიათებლები
The VTech Advanced HD Plus Video Baby Monitor is designed to provide reliable monitoring of your baby. Key features include:
- 5.5" HD IPS LCD Screen: Offers clear 720p video resolution with wide viewing angles and enhanced color accuracy.
- ბატარეის ხანგრძლივი ხანგრძლივობა: Up to 13 hours of continuous video streaming or 19 hours of audio-only streaming on a single charge.
- Pan-Tilt-Zoom Camera: Remote control for 360-degree panoramic view, 122-degree vertical view, and 4x digital zoom.
- ფართო კუთხით View: A 110-degree wide-angle lens captures more of the nursery.
- Adaptive Night Light: Touch-controlled, dimmable 7-color night light to create a soothing environment.
- ორმხრივი საუბარი: Allows communication with your baby from the parent unit.
- Lullabies & Soothing Sounds: Five calming melodies and five ambient sounds to help soothe your baby.
- ტემპერატურის მონიტორინგი: Displays the nursery's ambient temperature on the parent unit.
- მოძრაობისა და ხმის გაფრთხილებები: Notifies you of activity in the baby's room.
- ავტომატური ინფრაწითელი ღამის ხედვა: Provides clear video in low-light conditions.
- Secure 2.4GHz Wireless Connection: Ensures a private and interference-free connection up to 1,000 feet. No Wi-Fi required.

Image 2.1: Visual representation of the monitor's main features.
3. პაკეტის შიგთავსი
დარწმუნდით, რომ ყველა ნივთი თქვენს პაკეტშია:
- მშობელთა განყოფილება
- ბავშვის განყოფილება (კამერა)
- 2 AC Adapters (one for Parent Unit, one for Baby Unit)
- სწრაფი დაწყების სახელმძღვანელო
4. დაყენების ინსტრუქციები
4.1. მშობლის მოწყობილობის დატენვა
- Connect the small end of the parent unit power adapter to the power jack on the side of the parent unit.
- დენის ადაპტერის დიდი ბოლო შეაერთეთ კედლის სოკეტში.
- Charge the parent unit for at least 12 hours before initial use. The battery icon will indicate charging status.
4.2. ბავშვის ბლოკის (კამერის) ჩართვა
- Connect the small end of the baby unit power adapter to the power jack on the back of the baby unit.
- დენის ადაპტერის დიდი ბოლო შეაერთეთ კედლის სოკეტში.
- The baby unit will power on automatically once connected to power.
4.3. ბავშვის განყოფილების პოზიციონირება
მოათავსეთ ბავშვის ბლოკი ისეთ ადგილას, რომელიც უზრუნველყოფს გამჭვირვალე წვდომას. view of your baby in their crib or play area. For optimal performance:
- Place the baby unit at least 3 feet (1 meter) away from your baby to avoid potential hazards.
- Ensure the baby unit is on a flat, stable surface or securely mounted to a wall (mounting hardware not included).
- Avoid placing the baby unit near other electronic devices that may cause interference.
- Keep the power cords out of reach of children.
5. საოპერაციო ინსტრუქციები
5.1. მშობლის მოწყობილობის მართვა
Familiarize yourself with the buttons on your parent unit:
- მენიუ/არჩევა: Press to open the menu or confirm a selection.
- ისრის ღილაკები (ზემოთ, ქვემოთ, მარცხნივ, მარჯვნივ): Navigate menu options and control camera pan/tilt.
- VOL + / VOL -: დაარეგულირეთ მოსმენის ხმა.
- საუბარი: ბავშვის განყოფილების მეშვეობით თქვენს პატარასთან სასაუბროდ დააჭირეთ და გააჩერეთ.
- LCD ჩართვა/გამორთვა: Press to turn the screen on or off while audio monitoring continues.
- მასშტაბირება: Press to zoom in or out on the video feed.
- დენის ღილაკი: ხანგრძლივად დააჭირეთ მშობლის ერთეულის ჩართვის ან გამორთვისთვის.
5.2. Video Monitoring
Once both units are powered on and linked, the parent unit will automatically display live video from the baby unit. The 5.5" IPS screen provides a clear view.
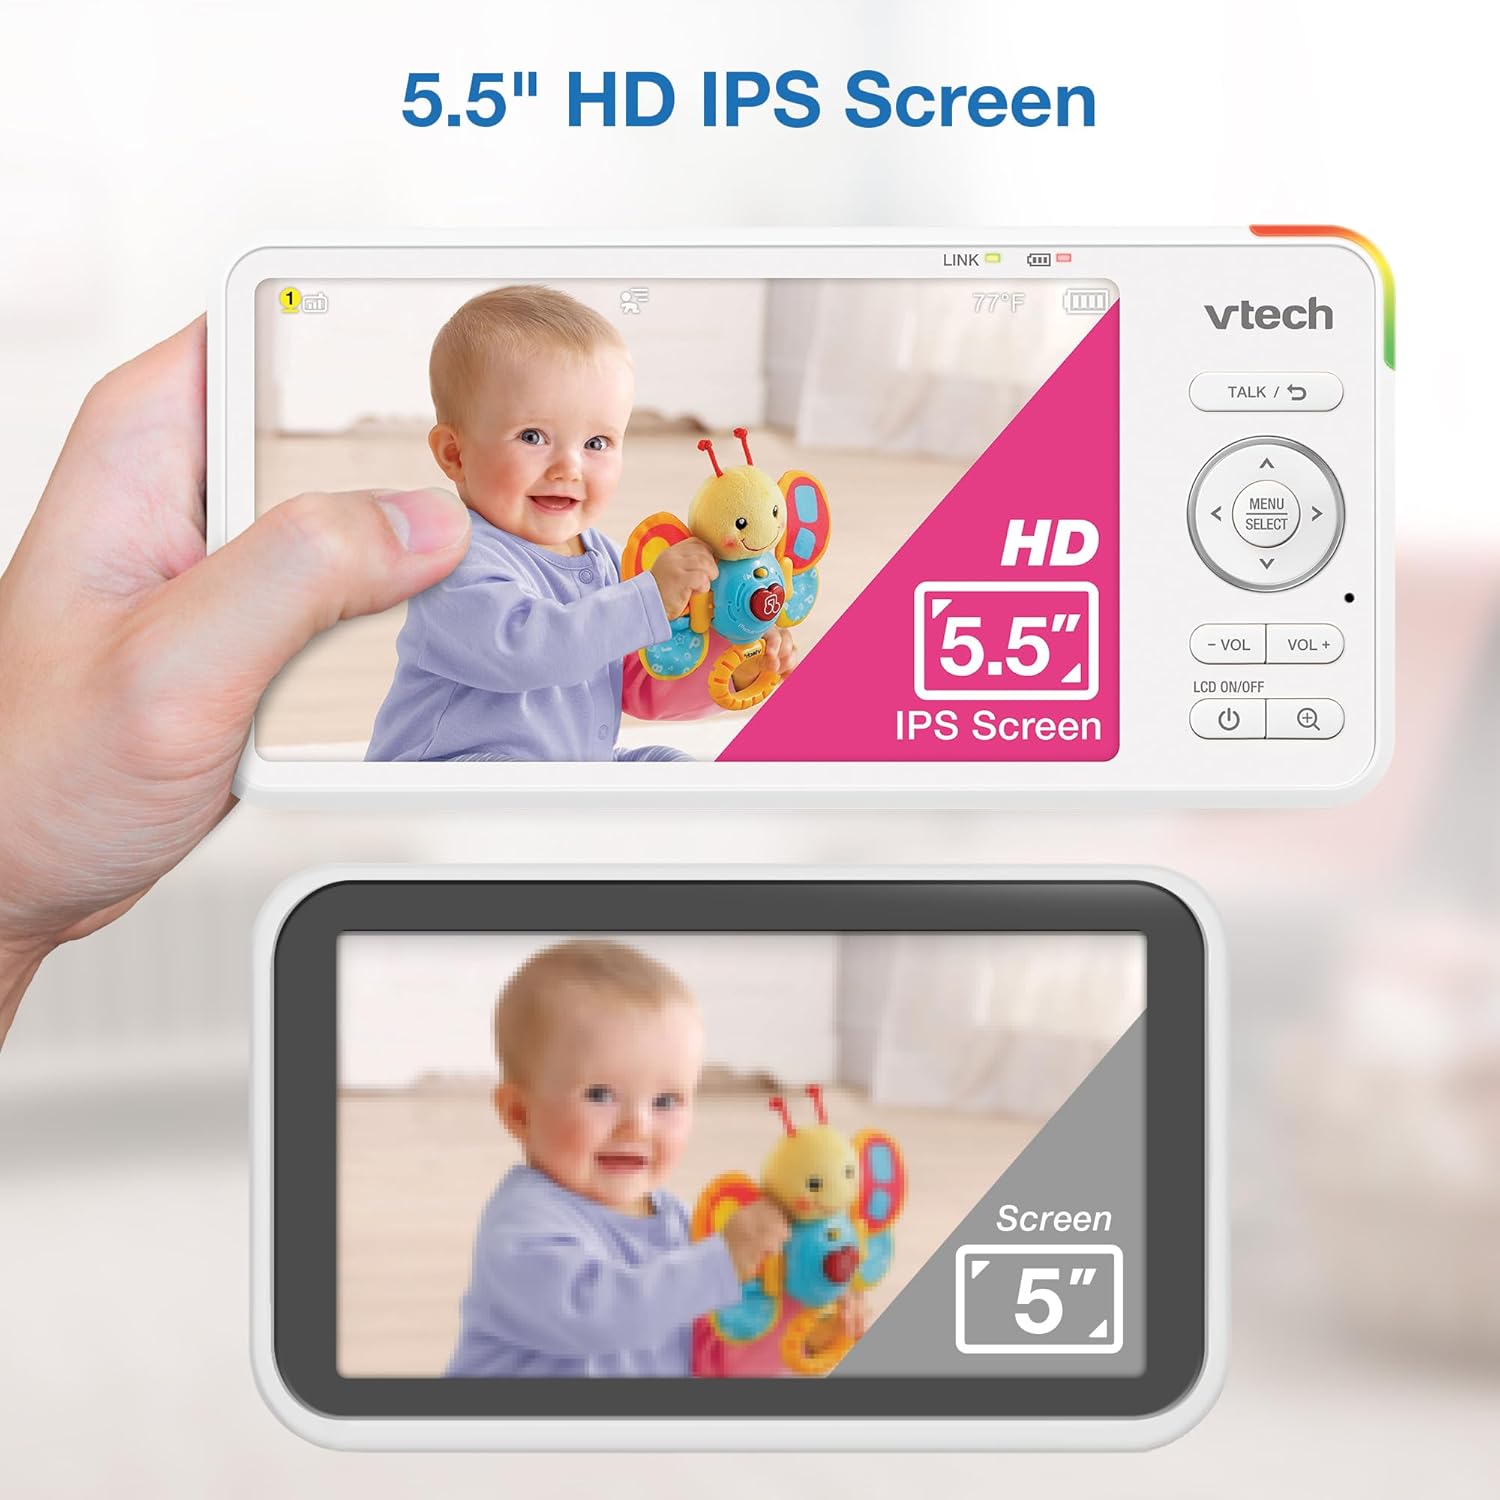
Image 5.1: The 5.5" HD IPS screen offers a larger and clearer view compared to standard screens.
5.3. Pan, Tilt, and Zoom
Use the arrow buttons on the parent unit to remotely adjust the camera's view:
- დააჭირეთ ზევით/ქვევით arrows to tilt the camera vertically (122-degree vertical view).
- დააჭირეთ მარცხნივ/მარჯვნივ arrows to pan the camera horizontally (360-degree panoramic view).
- დააჭირეთ ZOOM button to activate the 4x digital zoom for a closer look.

Image 5.2: Remote pan, tilt, and 4x zoom functionality for comprehensive nursery coverage.
5.4. ორმხრივი საუბარი
ბავშვთან სასაუბროდ, დააჭირეთ და გააჩერეთ საუბარი button on the parent unit. Release the button to stop talking and resume listening.

Image 5.3: Using the two-way talk feature to communicate with your baby.
5.5. Night Light, Lullabies, and Soothing Sounds
Access these features through the parent unit's menu:
- ღამის შუქი: Select the night light option to choose from 7 colors or adjust brightness. The adaptive feature adjusts to nursery brightness.
- Lullabies & Soothing Sounds: Choose from five melodies and five ambient sounds to play through the baby unit.
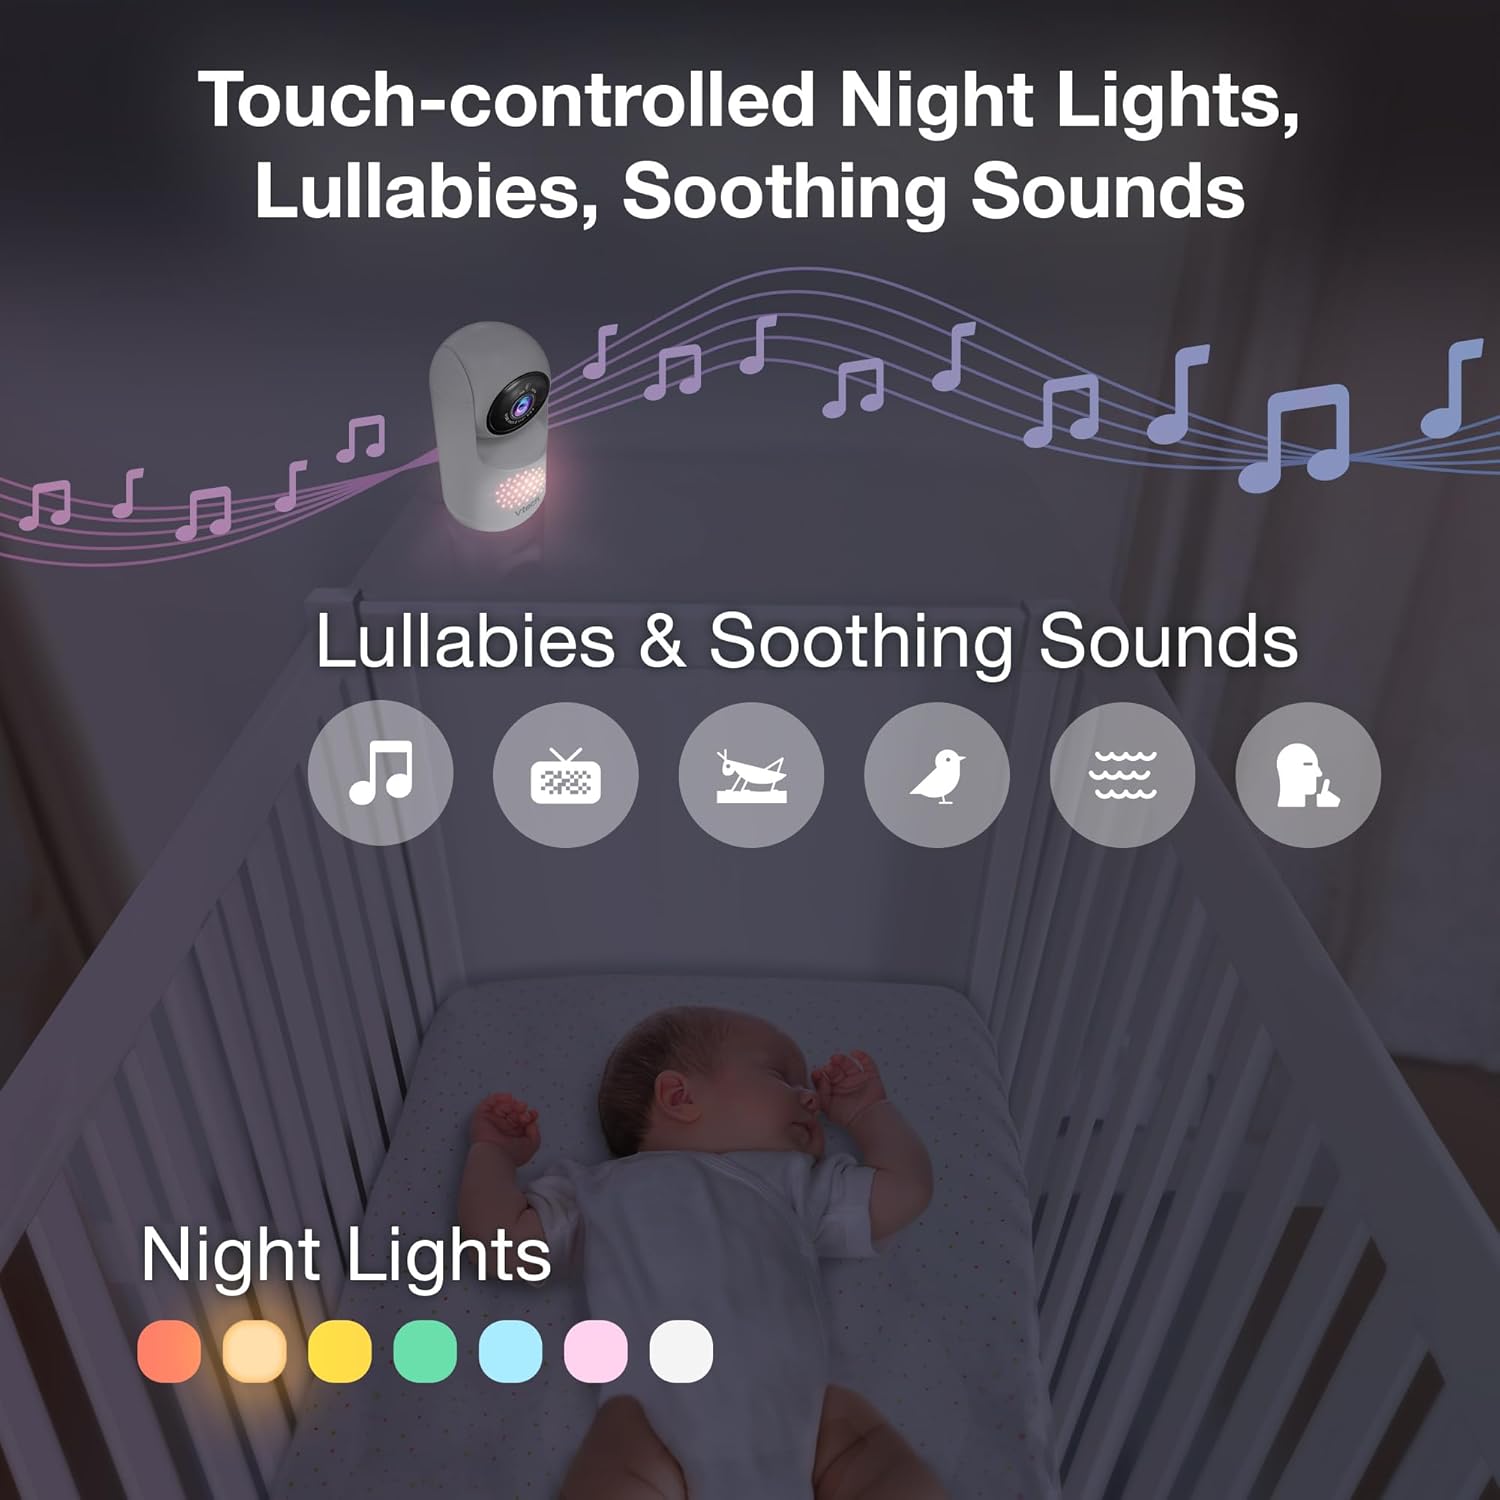
Image 5.4: The camera unit provides touch-controlled night lights, lullabies, and soothing sounds.
5.6. ტემპერატურის მონიტორინგი
The parent unit displays the current temperature of the baby's room, measured by the baby unit. This helps ensure a comfortable environment for your baby.
5.7. Motion and Sound Alerts
The monitor is equipped with motion and sound detection. When activity is detected, the parent unit will provide an alert. You can adjust the sensitivity settings in the menu.

Image 5.5: Motion and temperature alerts displayed on the parent unit.
5.8. ღამის ხედვა
The baby unit automatically activates infrared night vision in low-light conditions, providing a clear black-and-white image on the parent unit.

Image 5.6: Automatic infrared night vision for clear monitoring in the dark.
6. მოვლა
6.1. დასუფთავება
- მონიტორის ბლოკები გაწმინდეთ რბილი, დamp ქსოვილი.
- არ გამოიყენოთ საწმენდი სპრეი ან თხევადი გამწმენდი.
- Ensure units are unplugged before cleaning.
6.2. ბატარეის მოვლა
- To prolong battery life, fully charge the parent unit before first use.
- მოერიდეთ ექსტრემალურ ტემპერატურას, რამაც შეიძლება გავლენა მოახდინოს ბატარეის მუშაობაზე.
- თუ მოწყობილობას დიდი ხნის განმავლობაში ინახავთ, პერიოდულად დატენეთ ბატარეა.

Image 6.1: The 5,000mAh rechargeable battery provides extended monitoring time.
7. Დიაგნოსტიკა
If you experience issues with your VTech Advanced HD Plus monitor, refer to the following common solutions:
| პრობლემა | შესაძლო გამოსავალი |
|---|---|
| კავშირი არ არის / ცუდი კავშირი |
|
| სურათი არ არის / შავი ეკრანი |
|
| ხმა არ არის / დაბალი ხმა |
|
| ბატარეა სწრაფად იშლება |
|
If the problem persists after trying these solutions, please contact VTech customer support.
8. სპეციფიკაციები
| ფუნქცია | დეტალი |
|---|---|
| მოდელის სახელი | Advanced HD Plus |
| ეკრანის ზომა | 5.5 დიუმიანი IPS LCD |
| ვიდეო რეზოლუცია | 720p |
| დაკავშირების ტექნოლოგია | 2.4G FHSS Wireless (No Wi-Fi) |
| დიაპაზონი | 1,000 ფუტამდე (მხედველობის ხაზი) |
| ბატარეის ტევადობა | 5000 mAh |
| Battery Life (Video Streaming) | 13 საათამდე |
| Battery Life (Audio-only) | 19 საათამდე |
| პან კუთხე | 360 degrees panoramic |
| დახრის კუთხე | 122 degrees vertical |
| მასშტაბირება | 4x ციფრული |
| ფართო კუთხით View | 110 გრადუსი |
| ღამის ხედვა | ავტომატური ინფრაწითელი |
| შეტყობინებების ტიპები | აუდიო და მოძრაობა |
| დენის წყარო | ელექტრო კაბელი (5 ვ, 7.5 ვატი) |
| Dimensions (Parent Unit) | 6.58 x 3.23 x 0.71 ინჩი |
| ნივთის წონა | 1.6 ფუნტი (0.73 კგ) |
| UPC | 735078058157 |
9. მხარდაჭერა და გარანტია
For technical support, product registration, or warranty information, please visit the official VTech webსაიტზე ან დაუკავშირდით მომხმარებელთა მომსახურების სერვისს:
- Webსაიტი: www.vtechbabycare.com
- ელფოსტა: support@vtechbabycare.com
Please refer to your product packaging or the VTech website for specific warranty details applicable to your region.


