Pulse PRO Automate RTI Smart Shade Control-ის მომხმარებლის სახელმძღვანელო

PULSE PRO OVER-ის ავტომატიზაციაVIEW
გააუმჯობესეთ თქვენი Automate გამოცდილება Automate-ის მოტორიზებული ჟალუზების RTI კონტროლის სისტემებში შეუფერხებლად ინტეგრირებით. Automate Pulse PRO გთავაზობთ ძლიერ ინტეგრაციას დისკრეტული ჟალუზების კონტროლით და ორმხრივი კომუნიკაციით, რაც უზრუნველყოფს რეალურ დროში განახლებებს ჟალუზის პოზიციისა და ბატარეის დონის შესახებ. Ethernet (CAT 5) და 2.4 GHz უკაბელო კავშირის მქონე Pulse PRO უზრუნველყოფს სახლის ავტომატიზაციის შეუფერხებელ ინტეგრაციას ჰაბის უკანა მხარეს განთავსებული ადვილად მისაწვდომი RJ45 პორტის საშუალებით. თითოეული ჰაბი მხარს უჭერს 30-მდე ჟალუზს, რაც მას მრავალმხრივ გადაწყვეტად აქცევს ნებისმიერი სახლის ავტომატიზაციის სისტემისთვის.
დაწყება:
In order to integrate your motorized window treatments with RTI Control System, you will need to have:
- Downloaded the free Automate Pulse PRO via the Apple App Store (available under iPhone /iPad apps) or the Google Play Store.
- Purchased one or more Automate Pulse PRO depending on size of the space and additional repeaters if is required.
- Integrated your motorized window treatments onto Automate Shades App.
INSTRUCTIONS INCLUDED:
- Set up instructions for both the Automate Shades App & Automate Pulse PRO.
- RTI Driver Installation Specification.
- RTI Control System Driver Operating Guide.
- Integration Diagram.
- Integration FAQ’s.
გადასინჯვის ისტორია:
- Initial release of the driver.
ზოგადი ინფორმაცია:
- The Automate Pulse PRO Operating Guide for information on setup of the system. This driver is for control and feedback only. Setup of the Automate Pulse PRO Hub must be completed prior to setting up driver. Contact Rollease Acmeda for information on how to complete setup using the Hub and App. This driver is for the Automate Pulse PRO Hub only and control motors (i.e. shades) via TCP Communication.
კავშირის პარამეტრები: The Network TCP is the only method for communicating with the Pulse PRO Hub. Enter the IP Address of the Hub in the TCP Address field.
MOTOR COUNT (i.e. Shade Count): Enter the number of motors (Shades) that this Pulse PRO is controlling using the App to have the same capability on RTI Control System Driver.
MOTOR NAME (i.e. Shade Naming): Enter a unique name for each motor (i.e. shade). When the driver is running on the processor, the Motor or Shade name is updated automatically accordingly named on the Automate Shades App.
MOTOR ADDRESS (i.e. Shade Address): Enter the motor address that corresponds to the motor (i.e. shade) to be controlled. This address is acquired during the Automate App setup on the system.
DRIVER COMMAND: The control commands are available for movement of motors (i.e. shades) up and down as well as adjusting the shade to a discrete level by entering a value as a percentage.
DRIVER VARIABLES: Feedback variables are available for initialization state, connection state, and motor (i.e. shade) specific.
DRIVER INSTALATION:
- Unpack the Equipment:
• In this case, were used XP3 Processor and a KX3 Touch Panel to exemplify the communication between the RTI Control System and Automate Pulse PRO.
• XP3 – Use provided power supply to power up processor. Also connect to network (make sure to use ethernet connection and not RS-232). If you have a POE connection, then the XP-3 can be powered that way as well.
• KX3 – Use provided power supply (has a RJ-45 end) to power the KX3 through the Control Port on the back of the unit. Connect this to the network as well. If you have a POE connection, then the KX3 can be powered that way as well. - გათიშეთ file შეიცავს მძღოლს და s-სample fileდრაივერის კოპირება file (Rollease Pulse.rtidriver) to Integration Designer’s Control Driver Library (Documents\Integration Designer\Control Drivers). We will open the sample file in Integration Designer APEX
- Load Integration Designer APEX onto your computer and launch software.
- Open provided Integration Designer APEX file (როლეის პულსი Sample File.apex)-დან File მენიუ.

- Use the Automate Shades App to get the Hub IP address. On Manage Hub screen, you have the full Hub information. Enter “Hub IP Address” as one variable on the connection settings on Integration Designer Software.

- ამ ყოფილშიampმაგალითად, გამოყენებული იყო მხოლოდ 2 ძრავა/ჩრდილი. ძრავის „რიცხვის ნომერი“ განსაზღვრავს, თუ რამდენი ძრავი იქნება ნაჩვენები მის ქვემოთ მოცემულ სიაში. დაამატეთ უნიკალური „ძრავის სახელი“ ამ სიაში თითოეული ძრავისთვის და შეიყვანეთ „ძრავის მისამართი“ თითოეული ფერისთვის, მოწყობილობის ეკრანზე Automate Shades App-ში არსებული მონაცემების შესაბამისად.

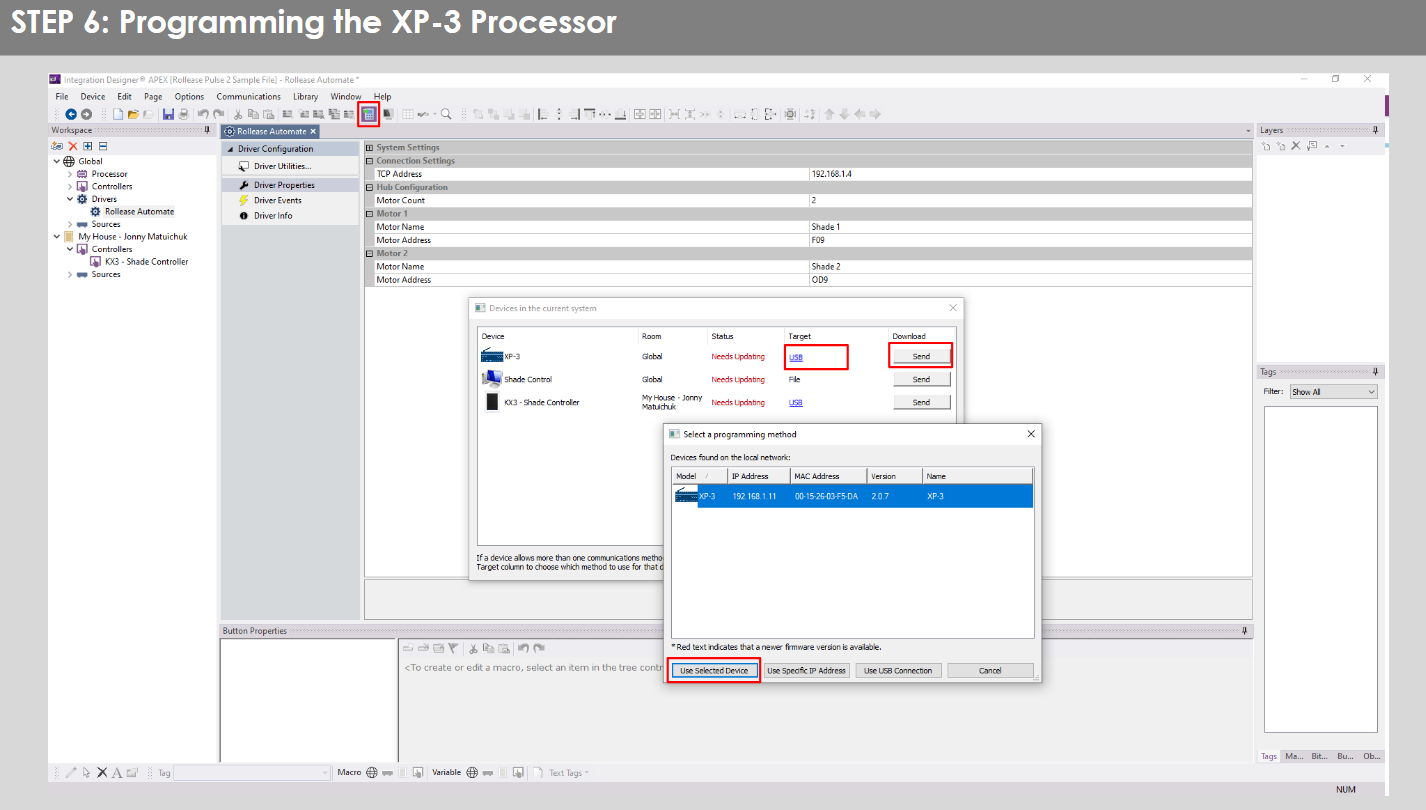
- Click on the “Download” icon from the top toolbar. This will open a screen with all devices available on Integration Designer. After that, click on the “USB” link that corresponds to your processor (in this case for the XP-3) in the Target column. When clicking that, a new window will open that shows all processors in your system. Select that one it corresponds to your processor and click on “Use Select Device”. Then after the window closes click the “Send” button in the Download column.
- Repeat the same process for KX3 Touch Pad.

- There is also a Virtual Panel control provided in the file რომელიც შექმნის კონტროლერს თქვენი კომპიუტერისთვის.


- To launch the Virtual Panel, click the “Send” button like you did with the previous devices. Since this is a virtual device you will be directed to save the Virtual Panel to a location on your computer.

- Once you save the Virtual Panel it will launch.

საერთო შეცდომები:
- Entering the wrong IP address in the “IP Address” configuration line.
If you’re failing to communicate with the devices, double check this!
RTI კონტროლის სისტემის კავშირი:

ხშირად დასმული კითხვები:
Q. No Pulse PRO detected.
A. Make sure that your Automate Pulse PRO is connected to the correct network and get an IP Address available and still communicating with the network using the Automate Shades App.
Q. ჩრდილის ლიმიტები სწორად არ არის დაყენებული.
A. Calibrate shade limits with your Rollease Acmeda remote before setting the appropriate open and close time within RTI Control System.
Q. Shade საერთოდ არ მოძრაობს.
A. Make sure the selected Pulse PRO Hub is the correct Pulse PRO Hub for the shade to be controlled. Confirm the correct bindings are set in the RIT Control System connections tab between the Pulse PRO Hub and Shade drivers.
Q. We get unexpected responses from the RTI system, or “?” symbols
A. დარწმუნდით, რომ ყველა კავშირი Ethernet პორტის ან Wi-Fi-ის გამოყენებით გამართულად მუშაობს. ცნობილია, რომ გამოტოვებული კავშირი იწვევს არასასურველ ან მოულოდნელ შედეგებს.
მხარდაჭერის რესურსები:
დამატებითი დახმარებისთვის დაუკავშირდით თქვენს საცალო ვაჭრობას, ეწვიეთ ჩვენს webსაიტი ზე www.rolleaseacmeda.com
დოკუმენტები / რესურსები
 |
AUTOMATE Pulse PRO ავტომატური RTI ჭკვიანი ჩრდილის კონტროლი [pdf] მომხმარებლის სახელმძღვანელო RTI, Pulse PRO ავტომატური RTI ჭკვიანი ჩრდილის კონტროლი, ავტომატური RTI ჭკვიანი ჩრდილის კონტროლი, ჭკვიანი ჩრდილის კონტროლი, ჩრდილის კონტროლი |