onset HOBO MX1101 Bluetooth ტენიანობისა და ტემპერატურის მონაცემები
მნიშვნელოვანი ინფორმაცია
მოყვება ნივთები:
- Command™ ზოლები
- ორმხრივი ლენტი
- Hook & loop სამაჯური
- ორი AAA 1.5 V ტუტე ბატარეა
საჭირო ნივთები:
- HOBOmobile აპლიკაცია
- iPhone, iPod touch, or iPad with iOS 7.1 or later and Bluetooth 4.0 or later
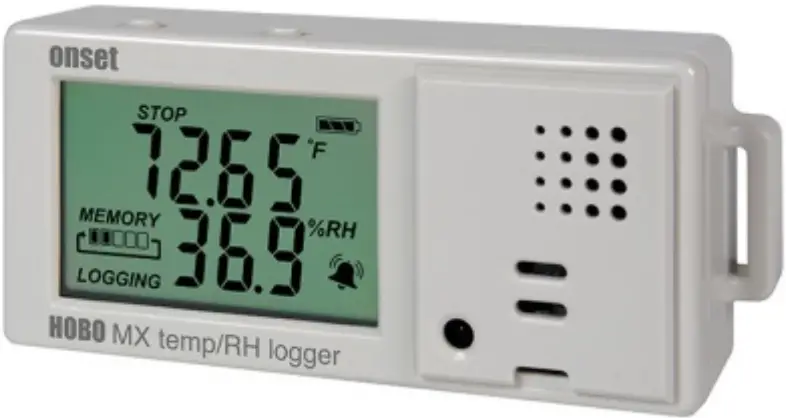
The HOBO MX Temp/RH data logger records and transmits temperature and relative humidity (RH) in indoor environments with its integrated sensors. This Bluetooth® Smart-enabled logger is designed for wireless communication with an iPhone®, iPod touch®, or iPad®. Using the HOBOmobile™ app for iOS, you can easily configure the logger, read it out, and view data on your mobile device, or export the data for further analysis. The logger can calculate minimum, maximum, average, and standard deviation statistics and be configured to trip audible or visual alarms at thresholds you specify. The logger also supports burst logging in which data is logged at a different interval when sensor readings are above or below certain limits. This compact data logger also has a built-in LCD screen to display the current temperature, relative humidity, logging status, battery use, memory consumption, and more.
სპეციფიკაციები
| ტემპერატურის სენსორი | |
| დიაპაზონი | -20°-დან 70°C-მდე (-4°-დან 158°F-მდე) |
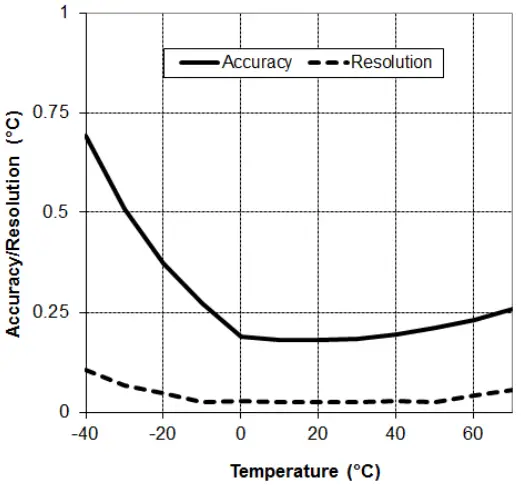
| სიზუსტე | ± 0.21 ° C 0 ° –დან 50 ° C– მდე (± 0.38 ° F 32 ° –დან 122 ° F), იხილეთ ნაკვეთი A |
| რეზოლუცია | 0.024 ° C 25 ° C ტემპერატურაზე (0.04 ° F 77 ° F), იხილეთ ნაკვეთი A |
| დრიფტი | <0.1 ° C (0.18 ° F) წელიწადში |
| RH სენსორი | |
| დიაპაზონი | 1%-დან 90%-მდე |
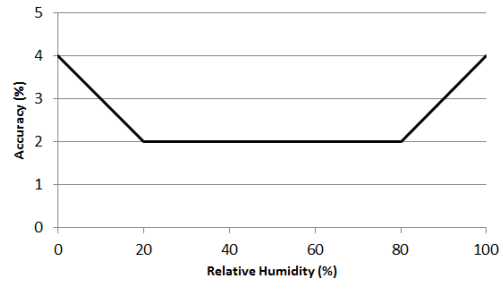
| სიზუსტე | ±2% from 20% to 80% typical at 25°C (77°F), see Plot B |
| ჰისტერეზი | ±2% RH |
| რეზოლუცია | 0.01% 25°C (77°F) |
| დრიფტი | <1% წელიწადში ტიპიური |
| რეაგირების დრო | |
| ტემპერატურა | 7:30 minutes in air moving 1 m/s (2.2 mph) |
| RH | 20 წამიდან 90% -მდე ჰაერის ნაკადში 1 მ/წმ (2.2 მილი/სთ) |
| Logger | |
| რადიო სიმძლავრე | 1 მვტ (0 დბმ) |
| გადაცემის დიაპაზონი | დაახლოებით 30.5 მ (100 ფუტი) ხედვის ხაზი |
| უსადენო მონაცემთა სტანდარტი | Bluetooth Smart (Bluetooth Low Energy, Bluetooth 4.0) |
| Logger ოპერაციული დიაპაზონი | -20° to 70°C (-4° to 158°F); 0 to 95% RH (non-condensing) |
| ხე დონის მაჩვენებელი | 1 წამიდან 18 საათამდე |
| ხეების რეჟიმები | ფიქსირებული ინტერვალი (ნორმალური, სტატისტიკა) ან ადიდებული |
| მეხსიერების რეჟიმები | შეფუთეთ როდესაც სავსეა ან გაჩერდით, როდესაც სავსეა |
| დაწყება რეჟიმები | დაუყოვნებლივ, დააჭირეთ ღილაკს, თარიღი და დრო, ან შემდეგი ინტერვალი |
| შეაჩერე რეჟიმები | როდესაც მეხსიერება სავსეა, დააჭირეთ ღილაკს, თარიღი და დრო, ან დაწესებული აღრიცხვის პერიოდის შემდეგ |
| გადატვირთვის რეჟიმი | დააჭირეთ ღილაკს |
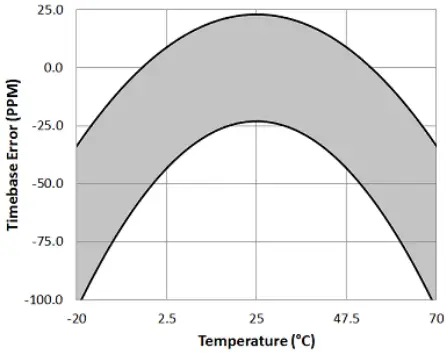
| დროის სიზუსტე | ±1 minute per month at 25°C (77°F), see Plot C |
| ბატარეის ხანგრძლივობა | 1 წელი, ტიპიურია ხე -ტყის ინტერვალით 1 წუთი. უფრო სწრაფი ჟურნალი და/ან სტატისტიკაampling intervals, entering burst logging mode, and remaining connected with HOBOmobile will impact battery life. Excessive readouts, checking of Full Status Details, audible alarms, and paging all impact battery life. Visual alarms and other events can have a marginal impact on battery life. |
| ბატარეის ტიპი | Two AAA 1.5 V alkaline batteries, user replaceable |
| მეხსიერება | 128 კბ (84,650 გაზომვა, მაქსიმალური) |
| მეხსიერების სრული ჩამოტვირთვა | დაახლოებით 60 წამი; შეიძლება მეტი დრო დასჭირდეს, რაც უფრო შორს არის მოწყობილობა ლოგერიდან |
| LCD | LCD ჩანს 0 ° -დან 50 ° C- მდე (32 ° -დან 122 ° F- მდე); LCD შეიძლება ნელა რეაგირებდეს ან ცარიელდეს ამ დიაპაზონის მიღმა ტემპერატურაზე |
| ზომა | 3.66 x 8.48 x 2.29 სმ (1.44 x 3.34 x 0.9 დუიმი) |
| წონა | 56 გ (1.98 უნცია) |
| გარემოსდაცვითი რეიტინგი | IP50 |
 |
CE მარკირება ადასტურებს, რომ ეს პროდუქტი შეესაბამება ევროკავშირის (EU) ყველა შესაბამის დირექტივას. |
| იხილეთ ბოლო გვერდი | |
Plot A: ტემპერატურის სიზუსტე და გარჩევადობა
Plot B: Typical RH Accuracy
Plot C: დროის სიზუსტე
Logger Components And Operation
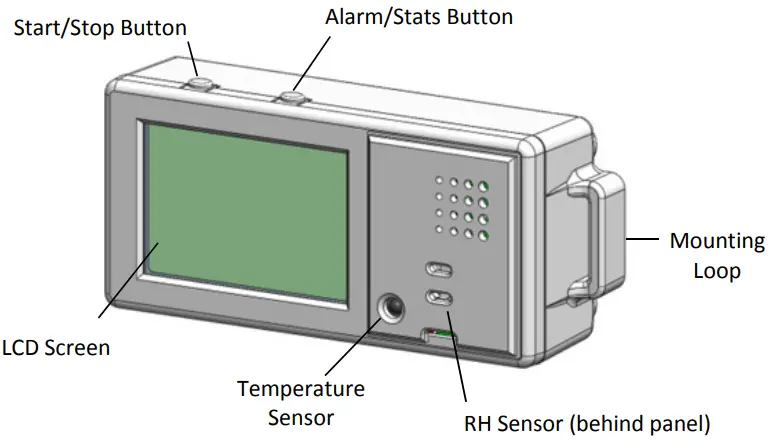
დაწყების/გაჩერების ღილაკი: Press this button for 3 seconds to start or stop logging data, or to resume logging on the next even logging interval. This requires configuring the logger in HOBOmobile with a push button start or stop, and with Allow Button Restart selected (see Setting up the Logger). You can also press this button for 1 second to record an internal event (see Recording Internal Logger Events), to silence a beeping alarm (see Setting up Alarms), or to turn the LCD screen on if the option to turn off the LCD has been enabled (see Setting up the Logger).
დააჭირეთ დაწყების/გაჩერების ღილაკებს და განგაშის/სტატისტის ღილაკებს ერთდროულად 3 წამის განმავლობაში, რათა აღადგინოთ ლოგერი პაროლი.
სიგნალიზაციის/სტატისტიკის ღილაკი: Press this button for 1 second to switch between statistics, alarm readings, and the current sensor readings as applicable or to silence a beeping alarm. Press this button for 3 seconds to clear a visual alarm if the logger was configured in HOBOmobile to maintain the visual alarm until
the alarm button was pressed (see Setting up Alarms).
სამონტაჟო მარყუჟები: გამოიყენეთ ორი სამონტაჟო მარყუჟი (დიაგრამაზე მხოლოდ ერთი ჩანს), რომ დაამონტაჟოთ ხე-ტყე კაუჭისა და მარყუჟის სამაჯურით (იხილეთ ლოგის დამონტაჟება).
ტემპერატურის სენსორი: This sensor is located in the lower left corner of the raised panel to the right of the LCD screen.
RH სენსორი: This sensor is located behind the vented panel in the logger case to the right of the LCD screen and the temperature sensor.
LCD ეკრანი: ეს ჟურნალი აღჭურვილია LCD ეკრანით, რომელიც აჩვენებს დეტალებს მიმდინარე სტატუსის შესახებ. ეს ყოფილიample აჩვენებს LCD ეკრანზე განათებულ ყველა სიმბოლოს, რასაც მოჰყვება თითოეული სიმბოლოს განმარტებები ცხრილში მომდევნო გვერდზე.
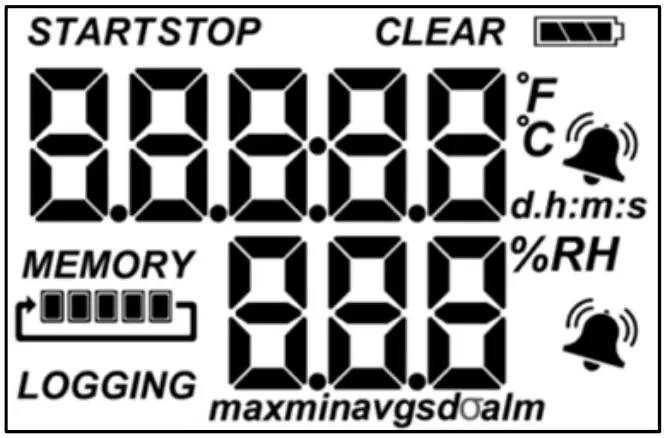
| LCD სიმბოლო | აღწერა |
| The logger is waiting to be started or restarted. Press and hold the Start/Stop button for 3 seconds to start the logger. |
|
| The logger has been started with push button stop enabled; press and hold the Start/Stop button for 3 seconds to stop the logger. | |
| ბატარეის ინდიკატორი აჩვენებს ბატარეის სავარაუდო ენერგიას. | |
 |
The logger has been configured to stop logging when memory fills. The memory bar indicates the approximate space remaining in the logger to record data. When first started, all five segments in the bar will be empty. In this example, ჟურნალის მეხსიერება თითქმის სავსეა (მეხსიერების ზოლში მხოლოდ ერთი სეგმენტი ცარიელია). |
 |
The logger has been configured to never stop logging (wrapping). The logger will continue recording data indefinitely, with newest data overwriting the oldest data until the batteries die or the logger is reconfigured. When first launched, all five segments in the memory bar will be empty. ამ ყოფილშიample, მეხსიერება სავსეა (ხუთივე სეგმენტი შევსებულია) და ახალი მონაცემები ახლა გადაწერს უძველეს მონაცემებს. ეს გაგრძელდება მანამ, სანამ ლოგერი არ შეჩერდება ან ბატარეა არ ამოიწურება. |
| ლოგერი ამჟამად მიმდინარეობს. | |
 |
A sensor reading is above or below the high or low alarm limit that you configured. Press and release the Alarm/Stats button until the “alm” symbol (described below) is displayed on the screen. This symbol at left will clear depending on how visual alarms were configured in HOBOmobile. If the visual alarm was set to clear when the logger is reconfigured, this symbol will remain on the LCD until the next time new configure settings are loaded onto the logger (see Setting up the Logger). Otherwise, it will clear when the sensor reading is back within the alarm limits or by pressing the Alarm/Stats button for 3 seconds. |
| A visual alarm is ready to be cleared. This will only appear if HOBOmobile was configured to maintain the visual alarm until the alarm button is pressed. Press the Alarm/Stats button for 3 seconds to clear the visual alarm. Note that an audible alarm can be silenced by pressing the Start/Stop button or Alarm/Stats button for 1 second. |
|
 |
These symbols show the maximum, minimum, average, and standard deviation values most recently calculated by the logger (if the logging mode has been set to Fixed Interval in HOBOmobile and each statistic has been selected; see Statistics Logging). Press the Alarm/Stats button for 1 second to cycle through the available statistics and then back to the current sensor reading (or to the alarm value if applicable). |
| This is the farthest out-of-range sample displayed during the logger deployment. Press the Alarm/Stats button to view ეს კითხვა კვლავ დააჭირეთ სიგნალიზაციის/სტატისტიკის ღილაკს, რომ გადახედოთ ნებისმიერ სტატისტიკას (განსაზღვრულია ზემოთ) და საბოლოოდ დაუბრუნდეთ მიმდინარე სენსორის კითხვას. | |
 |
ეს არის ყოფილიampტემპერატურის მაჩვენებელი. Temperature units are determined by the settings in HOBOmobile. To switch between Celsius and Fahrenheit, change the units in the HOBOmobile Settings (the logger must be reconfigured for units changes to take effect). |
 |
ეს არის ყოფილიample of RH კითხვა. |
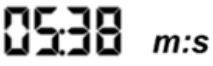 |
ჟურნალი არის კონფიგურირებული, რომ დაიწყოს შესვლა კონკრეტულ თარიღზე/დროს. ეკრანი ითვლის დღეებში, საათებში, წუთებსა და წამებში, სანამ ჩაწერა დაიწყება. ამ ყოფილშიampთუმცა, 5 წუთი და 38 წამი დარჩა ხე -ტყის დაწყებამდე. |
| The configure settings are being loaded onto the logger from HOBOmobile. | |
 |
An error occurred while loading the configure settings onto the logger from HOBOmobile. Try reconfiguring the logger. |
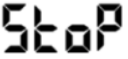 |
The logger has been stopped with HOBOmobile or because the memory is full. |
შენიშვნები:
- თქვენ შეგიძლიათ გამორთოთ LCD ეკრანი შესვლისას. გააუქმეთ „აჩვენე LCD“ ლოგერის დაყენებისას, როგორც ეს აღწერილია შემდეგ ნაწილში. როდესაც ეს პარამეტრი გამორთულია, თქვენ კვლავ შეგიძლიათ დროებით view LCD ეკრანი ღილაკს Start/Stop 1 წამის განმავლობაში. LCD ეკრანი დარჩება 10 წუთის განმავლობაში.
- The LCD screen refreshes every 15 seconds regardless of the logging interval selected in HOBOmobile. If you choose a logging interval less than 15 seconds, the data will be recorded at the faster interval, but the sensor readings will only be updated on the screen every 15 seconds.
- When the logger has stopped logging, the LCD screen will remain on with “STOP” displayed until the logger is offloaded to your mobile device (unless the logger was configured with the “Show LCD” option disabled). Once the logger has been offloaded, the LCD will turn off automatically after 2 hours. The LCD will turn back on the next time the logger connects with your device through HOBOmobile.
- The LCD screen flashes “HELLO” when you page the logger from HOBOmobile (see Downloading HOBOmobile and Connecting to a Logger).
- LCD ეკრანი ციმციმებს „CHIRP OFF“ როდესაც ხმოვანი განგაშის გასუფთავება მოხდება.
Downloading HOBOmobile And Connecting To A Logger
დააინსტალირეთ HOBOmobile აპი ლოგერთან დასაკავშირებლად და მასთან მუშაობისთვის.
- Download HOBOmobile. Go to the App Store and download HOBOmobile to your iPhone, iPod touch, or iPad.
- დააინსტალირეთ ბატარეები. Open the battery door on the back of the logger and insert two AAA batteries observing polarity (see Battery Information). Reinsert the battery door and snap it back into place.
- გახსენით HOBOmobile. Enable Bluetooth in your device settings if prompted (go to Settings > Bluetooth and make sure it is marked as “On”).
- დაკავშირება ლოგერთან. შეეხეთ
 . The logger should appear in the Recently Seen/In Range list as shown here.

Tap the row in the list to connect to the logger. If it does not appear in the list, make sure the logger is within range of your mobile device. Note that current sensor readings are always visible in this list even if the logger is not logging.
Tips for connecting:
- დარწმუნდით, რომ ლოგერი თქვენი მობილური მოწყობილობის დიაპაზონშია. წარმატებული უკაბელო კომუნიკაციის დიაპაზონი არის დაახლოებით 30.5 მ (100 ფუტი) სრული მხედველობით.
- თუ თქვენს მოწყობილობას შეუძლია წყვეტილად დაუკავშირდეს ლოგერს ან დაკარგა კავშირი, მიუახლოვდით ლოგერს, თუ ეს შესაძლებელია.
- If the logger appears in the Recently Seen/In Range list, but you cannot connect to it, close HOBOmobile and power cycle the mobile device. This forces the previous Bluetooth connection to close.
ლოგერთან დაკავშირების შემდეგ შეგიძლიათ აირჩიოთ შემდეგი ქმედებებიდან ერთ-ერთი:
- კონფიგურაცია. Select logger settings and load them onto the logger to start logging. See Setting up the Logger.
- Readout. Offload logger data. See Reading Out the Logger.
- Full Status Details. Check the battery level and view ლოგერისთვის ამჟამად არჩეული კონფიგურაციის პარამეტრები.
- Start Logging or Restart Logging. These options appear depending on the Start Logging and Stop Logging settings selected in the next section.
- შეწყვიტეთ ხე. Stop the logger from recording data (this overrides any Stop Logging settings described in Setting up the Logger).
- გვერდი. Press and hold the Page icon and the logger will beep to help you locate a deployed logger (tap the Page icon if you only want the logger to beep once). “HELLO” also appears on the LCD when the logger is paged.
- Clear Audible Alarm. If audible alarms are enabled as described in Setting up Alarms, use this to clear a beeping alarm on the logger.
- Logger Password. Select this to create a password for the logger that will be required if another mobile device attempts to connect to it. To reset a password, simultaneously press both the Start/Stop button and the Alarm/Stats button on the top of the logger for 3 seconds or tap Reset to Factory Default in the Set Logger Password screen.
- განაახლეთ Firmware. When new logger firmware is available, this action appears in the list. Select it and follow the instructions on the screen. Note that if there is a communication failure during the firmware update process, the logger will revert to the previous firmware.
- Force Offload. This may appear if an error was encountered when loading configure settings. Select this to offload all the data on the logger before reconfiguring the logger.
Setting Up The Logger
Use HOBOmobile to set up the logger, including setting alarms, selecting the options to start and stop logging, and choosing a logging mode. These steps provide an overview of setting up the logger. For complete details, see the HOBOmobile User’s Guide.
- შეეხეთ and select a logger in the Recently Seen/In Range list to connect to it.
- დაკავშირების შემდეგ, შეეხეთ კონფიგურაციას.

- Tap Label and type a name for the logger up to 20 characters (optional). Tap Done.
- შეეხეთ ჯგუფს, რათა დაამატოთ ლოგერი რჩეულების ჯგუფში, არსებულ მორგებულ ჯგუფში, ან შექმნათ ახალი ჯგუფის სახელი 20-მდე სიმბოლოთი (სურვილისამებრ). შეეხეთ შესრულებულია.
- შეეხეთ შესვლის დაწყებას და აირჩიეთ, როდის დაიწყება შესვლა:
- ახლა. შესვლა დაიწყება კონფიგურაციის ეკრანზე დაწყებაზე შეხებისთანავე.
- შესვლის შემდეგი ინტერვალის შესახებ. აღრიცხვა დაიწყება მომდევნო ლუწი ინტერვალში, როგორც ეს განსაზღვრულია შესვლის არჩეული ინტერვალით.
- ღილაკზე დაჭერით. Logging will begin once you press the Start/Stop logging button on the logger for 3 seconds.
- თარიღი / დრო. Logging will begin at a date and time you specify. Select the Date and time Tap Done.
- შეეხეთ შესვლის შეწყვეტას და აირჩიეთ ოფციები, როდის დასრულდება ჟურნალი.
a. აირჩიეთ მეხსიერების ორი ვარიანტიდან ერთი:- როდესაც მეხსიერება ივსება. ლოგერი გააგრძელებს მონაცემთა ჩაწერას მეხსიერების შევსებამდე.
- არასოდეს (შეფუთეთ როდესაც სავსეა). ლოგერი აგრძელებს მონაცემების ჩაწერას განუსაზღვრელი ვადით, უახლესი მონაცემების გადაწერა უძველესზე. ეს ოფცია მიუწვდომელია, თუ Logging Mode დაყენებულია Burst-ზე (იხ. ადიდებული ჩანაწერი).
b. Select On Button Push if you want to be able to stop logging by pushing the Start/Stop button on the logger for 3 seconds. Note that if you also choose On Button Push for the Start Logging option, then you will not be able to stop logging until 30 seconds after logging begins.
If you select On Button Push for the Stop Logging option, then you also have the option to select Allow Button Restart. This allows you to stop and then resume logging during the deployment by pushing the Start/Stop button on the logger for 3 seconds.
მნიშვნელოვანია: When Allow Button Restart is selected and you use the Start/Stop button to stop and restart logging, logging will restart on the next even logging interval, not at the time the button was pushed. For example, a logger started logging at 7:00 AM with a logging interval set to 1 hour. If you press the Start/Stop button to stop the logger at 8:45 AM and then press the button again at 10:15 AM, logging will not begin immediately at 10:15 AM. Instead, logging will begin again at 11:00 AM, which is the next even interval time based on your 1-hour logging interval.
Therefore, depending on the logging interval, the gap between the time you press the button to resume logging and the time actual logging begins could be significant. The faster the logging interval, the less time will elapse before logging resumes.
c. აირჩიეთ დროის შემდეგი ვარიანტებიდან ერთ – ერთი, თუ როდის უნდა შეწყვიტოთ შენახვა: - არასოდეს. აირჩიეთ ეს, თუ არ გსურთ, რომ ლოგერი შეჩერდეს წინასწარ განსაზღვრულ დროში.
- თარიღი / დრო. Select this if you want the logger to stop logging on a specific date and time. Select the date and time and then tap Done.
- შემდეგ. Select this if you want to control how long the logger should continue logging once it starts. Choose the amount of time you want the logger to log data and then tap Done. For exampშემდეგ, აირჩიეთ 30 დღე, თუ გსურთ, რომ ლოგერმა შეასრულოს მონაცემები 30 დღის განმავლობაში, შესვლის დაწყებიდან.
d. შეეხეთ შესრულებულია.
- აირჩიეთ სენსორის გაზომვის ტიპები, რომლებიც ჩაწერილი იქნება.
By default, both the temperature and RH sensors are enabled. Both sensors are required to calculate dew point, which is an additional data series available for plotting after reading out the logger. You can also set up alarms to trip when a sensor reading rises above or falls below a specified value. See Setting up Alarms for details on enabling sensor alarms and selecting the associated audible and visual alarm settings. - Tap Logging Mode. Select either fixed interval logging or burst logging. With fixed interval logging, the logger records data for all enabled sensors and/or selected statistics at the logging interval selected (see Statistics Logging for details on choosing statistics options). In burst mode, logging occurs at a different interval when a specified condition is met. See Burst Logging for more information. Tap Done.
- Enable or disable Show LCD, which controls whether the LCD on the logger will remain illuminated while the logger is logging. If you disable Show LCD, the LCD on the logger will not show the current reading, status, or other information while the logger is logging. You will, however, be able to
temporarily turn the LCD screen on by pressing the Start/Stop button on the logger for 1 second. In addition, you can always view ნებისმიერი შიდა დიაპაზონის ლოგერის სტატუსი თქვენს მობილურ მოწყობილობაზე, განურჩევლად ლოგერის LCD პარამეტრისა (შესაძლოა მოითხოვდეს ლოგერის პაროლი, შესაბამისად). - Tap Start in the upper right corner of the Configure screen to load the settings onto the logger if you are ready to start.

Logging will begin based on the settings you selected.
Deploy the logger using the mounting materials (see Mounting the Logger). After logging begins, you can read out the logger at any time (see Reading Out the Logger for details).
Setting Up Alarms
შეგიძლიათ დააყენოთ მაღვიძარა ჩამრთველზე, როდესაც სენსორი კითხულობს ზემოთ მითითებულ მნიშვნელობას. ამან შეიძლება გაგაფრთხილოთ პრობლემები, ასე რომ შეგიძლიათ გამოსასწორებელი ზომების მიღება. მაღვიძარას დასაყენებლად:
- შეეხეთ and select a logger in the Recently Seen/In Range list to connect to it.
- დაკავშირების შემდეგ, შეეხეთ კონფიგურაციას.
- In Sensor & Alarm Setup, tap an enabled sensor.
- Enable the High Alarm if you want an alarm to trip when the sensor reading rises above the high alarm value. Drag the slider to the reading that will trip the alarm or tap the value field and type a specific reading. In this exampმაღვიძარა ჩაირთვება, როდესაც ტემპერატურა 85°F-ზე მაღლა აიწევს.
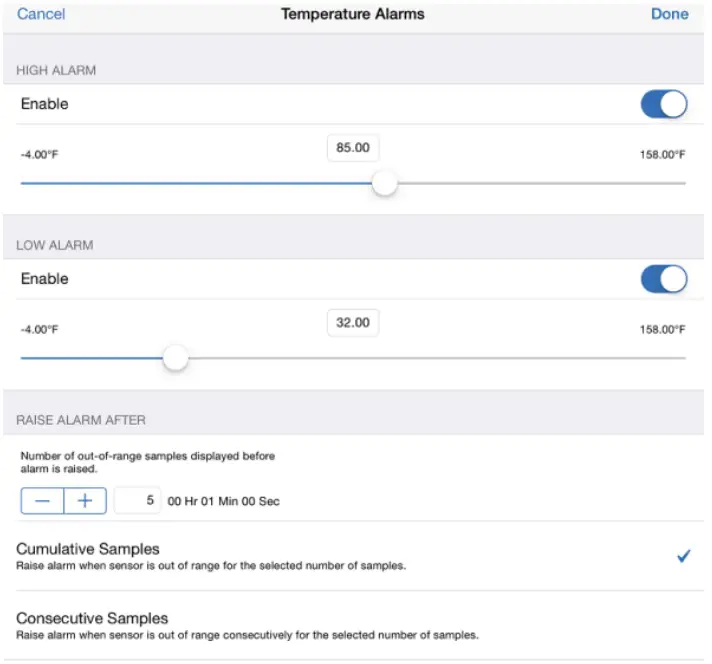
- ჩართეთ დაბალი სიგნალიზაცია, თუ გსურთ, რომ მაღვიძარა ჩაირთვება, როდესაც სენსორის მაჩვენებელი დაეცემა განგაშის დაბალი მნიშვნელობის ქვემოთ. გადაიტანეთ სლაიდერი იმ საკითხზე, რომელიც ააქტიურებს სიგნალიზაციას ან შეეხეთ მნიშვნელობის ველს და აკრიფეთ კონკრეტული კითხვა. ყოფილშიampასევე, მაღვიძარა კონფიგურირებულია იმისთვის, რომ გააქტიურდეს, როდესაც ტემპერატურა დაეცემა 32°F-ზე დაბლა.
შენიშვნა: მაღალი და დაბალი განგაშის ლიმიტების რეალური მნიშვნელობები დაყენებულია ლოგერის მიერ მხარდაჭერილ უახლოეს მნიშვნელობაზე. - Under Raise Alarm After, select how many out-of-range samples are needed to trigger the alarm. For example, if Raise Alarm After is set to 5 as shown above, then there needs to be 5 sensor readings above 85°F or below 32°F before the alarm will trip. The time displayed next to the sample number indicates how long it would take for the alarm to trip based on the number of samples you entered and the fixed 15-second LCD refresh interval.
- Select either Cumulative Samples or Consecutive Samples. თუ აირჩევთ კუმულატიურ Samples, then the alarm will trip after a specific number of samples are outside the limits at any point during logging. If you select Consecutive Samples, then the alarm will trip after a specific number of samples outside the limits are displayed in a row. For example, if there are 5 readings in a row above 85°F, then an alarm will trip. However, if Cumulative Samples was selected instead, then the 5 readings could have taken place at any time during the deployment for the alarm to trip.
- შეეხეთ შესრულებულია და სურვილის შემთხვევაში გაიმეორეთ ნაბიჯები 3–8 სხვა სენსორისთვის.
- Back in the Configure screen, enable Audible Alarms if you want a beep to sound on the logger every 30 seconds when the sensor alarm trips. The beeping will continue until the alarm is cleared from HOBOmobile, either button on the top of the logger is pressed, or 7 days have passed. Battery life will be slightly reduced when this setting is enabled. It is recommended that you only enable this feature if you have regular access to the logger so that you can easily turn off the beeping.
- Also in the Configure screen, select one of the following options to determine how long the alarm icon will remain illuminated on the logger LCD screen after an alarm trips:
- Logger ხელახლა კონფიგურირებულია. The alarm icon will remain visible on the LCD until the next time the logger is reconfigured.
- სენსორი ლიმიტებში. The alarm icon will remain visible on the LCD until the sensor reading returns to the normal range between any configured high and low alarm limits.
- Alarm Button Pressed. The alarm icon will remain visible until you press the Alarm/Stats button on the logger.
- Tap Start in the Configure screen to load the alarm settings onto the logger if you are ready to start.
შენიშვნები:
- The alarm icon will be illuminated on the logger LCD when the alarm trips. You can also press the Alarms/Stats button on the logger to view the farthest out-of-range value during the deployment. Alarm limits are checked when the logger’s LCD screen refreshes every 15 seconds.
- სიგნალიზაციის მაღალი და დაბალი ლიმიტების ფაქტობრივი მნიშვნელობები დადგენილია უახლოეს მნიშვნელობაზე, რომელსაც მხარს უჭერს ჟურნალი. ყოფილიample, the closest value to 85°F that the logger can record is 84.990°F and the closest value to 32°F is 32.043°F. In addition, alarms can trip or clear when the sensor reading is within the logger specifications of 0.02°C resolution. This means the value that triggers the alarm may differ slightly than the value entered. For exampთუმცა, თუ მაღვიძარა დაყენებულია 75.999 ° F- ზე, განგაში შეიძლება დაიხუროს, როდესაც სენსორის მაჩვენებელი 75.994 ° F (რაც 0.02 ° C რეზოლუციის ფარგლებშია).
- როდესაც წაიკითხავთ ლოგერს, განგაშის მოვლენები შეიძლება გამოჩნდეს ნაკვეთზე ან მონაცემებში file. See Recording Internal Logger Events.
- Once cleared, an audible alarm will start beeping again if the sensor values go out of the normal range. Even if an audible alarm is cleared, a visual alarm may remain on the logger LCD and in HOBOmobile depending on the settings selected for maintaining visual alarms or because the alarm condition may still be in effect. In addition, an audible alarm will continue beeping when the sensor values have returned to the normal range until it is cleared as described in step 9.
- Although an audible alarm and a visual alarm can occur at the same time when a sensor alarm is tripped, they are cleared in different ways. The audible alarm can be cleared as described in step 9. Meanwhile, a visual alarm is cleared as determined by the setting selected for Maintain Visual Alarm Until in the Configure screen. This means you could clear a beeping audible alarm and the visual alarm will remain on the LCD and in HOBOmobile until the logger is reconfigured, the sensor is in limits, or the alarm button is pressed–whichever setting you selected.
- If the logger was configured to stop logging with a button push, any tripped alarms will be cleared automatically when logging is stopped and no Alarm Cleared event will be logged in the data file. This ensures that the logger will start checking for alarm conditions when logging resumes (if the logger was configured with Allow Button Restart selected).
ადიდებული ხე
urst logging is a logging mode that allows you to set up more frequent logging when a specified condition is met. For example, a logger is recording data at a 5-minute logging interval and burst logging is configured to log every 30 seconds when the temperature rises above 85°F (the high limit) or falls below 32°F (the low limit). This means the logger will record data every 5 minutes as long as the temperature remains between 85°F and 32°F. Once the temperature rises above 85°F, the logger will switch to the faster logging rate and record data every 30 seconds until the temperature falls back to 85°F.
ამ დროს, ხე-ტყის აღება განახლდება ყოველ 5 წუთში ერთხელ, ჩვეულებრივი ჭრის ინტერვალით. ანალოგიურად, თუ ტემპერატურა დაეცემა 32°F-ზე დაბლა, მაშინ ლოგერი კვლავ გადადის ადიდებული ჟურნალის რეჟიმში და ჩაწერს მონაცემებს ყოველ 30 წამში. მას შემდეგ, რაც ტემპერატურა 32°F-მდე მოიმატებს, ლოგერი დაბრუნდება ნორმალურ რეჟიმში, ყოველ 5 წუთში ერთხელ.
შენიშვნა: სენსორების სიგნალიზაცია, სტატისტიკა და შეჩერების ჩანაწერის ვარიანტი „გადახვევა როცა სავსეა“ არ არის ხელმისაწვდომი ადიდებული ჟურნალის რეჟიმში.
ადიდებული ჟურნალის დასაყენებლად:
- შეეხეთ and select a logger in the Recently Seen/In Range list to connect to it.
- დაკავშირების შემდეგ, შეეხეთ კონფიგურაციას.
- შეეხეთ Logging Mode-ს და შემდეგ შეეხეთ Burst Logging.
- შეეხეთ სენსორს Burst Sensor Limits-ის ქვეშ.
- ჩართეთ მაღალი ლიმიტი, თუ გსურთ, რომ ადიდებული ჟურნალი მოხდეს მაშინ, როდესაც სენსორის მაჩვენებელი აწევს კონკრეტულ მაჩვენებელს. გადაიტანეთ სლაიდერი წაკითხვამდე, რომელიც გამოიწვევს ადიდებულ ჟურნალს ან შეეხეთ მნიშვნელობის ველს და აკრიფეთ კონკრეტული კითხვა. ამ ყოფილშიample, the logger will switch to burst logging when the temperature rises above 85°F.

- ჩართეთ დაბალი ლიმიტი, თუ გსურთ, რომ ადიდებული ჟურნალი მოხდეს, როდესაც სენსორის კითხვა დაეცემა კონკრეტულ მაჩვენებელს. გადაიტანეთ სლაიდერი წაკითხვამდე, რომელიც გამოიწვევს ადიდებულ ჟურნალს ან შეეხეთ მნიშვნელობის ველს და აკრიფეთ კონკრეტული კითხვა. ყოფილშიample, the logger will switch to burst logging when the temperature falls below 32°F.
- შეეხეთ შესრულებულია და სურვილის შემთხვევაში გაიმეორეთ ნაბიჯები 4–7 სხვა სენსორისთვის.
- Tap Burst Logging Interval and select an interval faster than the logging interval. Keep in mind that the more frequent the burst logging rate, the greater the impact on battery life and the shorter the logging duration. Tap Done.
- შეეხეთ შესრულებულია შესვლის რეჟიმის ეკრანიდან გასასვლელად.
- შეეხეთ დაწყებას კონფიგურაციის ეკრანზე, რათა ჩატვირთოთ ადიდებული პარამეტრები ლოგერზე, თუ მზად ხართ დასაწყებად.
შენიშვნები:
- Once the logger is configured, the high and low burst limits are only checked when the logger’s LCD screen refreshes once every 15 seconds. Therefore, if you set the logging interval to less than 15 seconds and the sensor reading falls outside the levels, the burst logging will not begin until the next 15-second refresh cycle.
- თუ მაღალი და/ან დაბალი ლიმიტები კონფიგურირებულია ერთზე მეტ სენსორზე, მაშინ ადიდებული აღრიცხვა დაიწყება, როდესაც ნებისმიერი მაღალი ან დაბალი მდგომარეობა გადის დიაპაზონს. ადიდებული აღრიცხვა არ დასრულდება მანამ, სანამ ყველა სენსორზე ყველა მდგომარეობა ნორმალურ დიაპაზონში არ დაბრუნდება.
- ადიდებული ხეების ლიმიტების ფაქტობრივი მნიშვნელობები დადგენილია უახლოეს მნიშვნელობაზე, რომელსაც მხარს უჭერს ჟურნალი. ყოფილიample, უახლოესი მნიშვნელობა 85 ° F- მდე, რომელსაც შეუძლია ჩაწეროს ხე, არის 84.990 ° F და უახლოესი მნიშვნელობა 32 ° F არის 32.043 ° F.
- Burst logging mode can begin or end when the sensor reading is within the logger specifications of 0.02°C resolution. This means the value that triggers burst logging may differ slightly than the value entered. For exampთუმცა, თუ ტემპერატურის სიგნალიზაციის მაღალი ლიმიტი დადგენილია 75.999 ° F- ზე, ადიდებული ჩანაწერი შეიძლება დაიწყოს, როდესაც სენსორის კითხვა 75.994 ° F (რაც 0.02 ° C რეზოლუციის ფარგლებშია).
- მაღალი ან დაბალი მდგომარეობის გასუფთავებისთანავე, შესვლის ინტერვალის დრო გამოითვლება მონაცემების ბოლო ჩაწერილი წერტილის გამოყენებით აყვავებული აღრიცხვის რეჟიმში და არა "ნორმალურ რეჟიმში" ჩაწერილი მონაცემთა ბოლო წერტილის გამოყენებით. ყოფილიample, დავუშვათ, რომ მრიცხველს აქვს 10 წუთიანი შესვლის ინტერვალი და ჩაწერილია მონაცემთა წერტილი 9:05 საათზე. შემდეგ, მაღალ ზღვარს გადააჭარბა და ადიდებული ჭრა დაიწყო 9:06 საათზე. ადიდებული ჩაწერა შემდეგ გაგრძელდა 9:12 საათამდე, როდესაც სენსორის კითხვა დაბლა დაბლა დაბლა დავიდა. ნორმალურ რეჟიმში დაბრუნების შემდეგ, მომდევნო შესვლის ინტერვალი იქნება 10 წუთის ბოლო ადიდებული შესვლის წერტილიდან, ან ამ შემთხვევაში 9:22. ადიდებული ჩანაწერი რომ არ მომხდარიყო, მომდევნო მონაცემების წერტილი იქნებოდა 9:15 საათზე.
- A New Interval event is created each time the logger enters or exits burst logging mode. See Recording Internal Logger Events for details on plotting and viewing the event. In addition, if the logger is stopped with a button push while in burst logging mode, then a New Interval event is automatically logged and the burst condition is cleared, even if the actual high or low condition has not cleared. The logger will check the high and low conditions when logging resumes (if the logger was configured with Allow Button Restart selected).
სტატისტიკა შესვლა
დროს ფიქსირებული ინტერვალით ჟურნალი, logger ჩანაწერები მონაცემების ჩართული სენსორების და/ან შერჩეული სტატისტიკის დროს log ინტერვალით არჩეული. სტატისტიკა გამოითვლება შემდეგნაირადampling rate თქვენ მიუთითეთ შედეგებით sampლინგის პერიოდი ჩაწერილია ყოველი ჭრის ინტერვალზე. თითოეული სენსორისთვის შესაძლებელია შემდეგი სტატისტიკის ჩაწერა:
- მაქსიმალური, ან უმაღლესი, სampled value,.
- მინიმალური, ან ყველაზე დაბალი, სampled value,.
- საშუალოდ ყველა სampled values, and.
- სტანდარტული გადახრა საშუალოდან ყველა sampled ღირებულებები.
მაგample, a logger is configured with both the temperature and RH sensors enabled, and the logging interval set to 5 minutes. The logging mode is set to fixed interval logging with Normal and all four statistics enabled and with a statistics sampლინგის ინტერვალი 30 წამი. მას შემდეგ, რაც ჟურნალი დაიწყება, ლოგერი გაზომავს და ჩაიწერს ფაქტობრივ ტემპერატურასა და RH სენსორის მნიშვნელობებს ყოველ 5 წუთში. გარდა ამისა, ლოგერი მიიღებს ტემპერატურას და RH sampყოველ 30 წამში და დროებით შეინახეთ ისინი მეხსიერებაში. შემქმნელი გამოთვლის მაქსიმალურ, მინიმალურ, საშუალო და სტანდარტულ გადახრას s- ის გამოყენებითamples შეიკრიბა წინა 5 წუთიანი პერიოდის განმავლობაში და შეაფასა შედეგად მიღებული მნიშვნელობები. ჟურნალის წაკითხვისას, ეს გამოიწვევს 10 მონაცემთა სერიას (მათ შორის არცერთ წარმოებულ სერიას, მაგალითად, dew წერტილს): ორ სენსორულ სერიას (ტემპერატურისა და RH მონაცემების შესვლისას ყოველ 5 წუთში) დამატებული რვა მაქსიმალური, მინიმალური, საშუალო და სტანდარტული გადახრის სერია (ოთხი ტემპერატურისთვის და ოთხი RH– სთვის, მნიშვნელობები გამოთვლილი და შესული ყოველ 5 წუთში 30 წამის განმავლობაშიampლინგი).
სტატისტიკის დასაწერად:
- შეეხეთ and select a logger in the Recently Seen/In Range list to connect to it.
- დაკავშირების შემდეგ, შეეხეთ კონფიგურაციას.
- შეეხეთ Logging Mode და შემდეგ აირჩიეთ Fixed Interval Logging.
- აირჩიეთ ნორმალური, რათა ჩაწეროთ მიმდინარე კითხვა თითოეული ჩართული სენსორისთვის ეკრანის ზედა ნაწილში ნაჩვენები ჟურნალის ინტერვალში. არ აირჩიოთ ეს, თუ გსურთ მხოლოდ სტატისტიკის შესვლა.
- შეარჩიეთ სტატისტიკა, რომლის დარეგისტრირებაც გსურთ logger- მა, თითოეული შესვლის ინტერვალში: მაქსიმალური, მინიმალური, საშუალო და სტანდარტული გადახრა (სტანდარტული გადახრის არჩევისას საშუალო ავტომატურად ჩართულია). სტატისტიკა შევა ყველა ჩართული სენსორისთვის. გარდა ამისა, რაც უფრო მეტ სტატისტიკას აფიქსირებთ, მით უფრო მოკლეა ლოგერის ხანგრძლივობა და მეტი მეხსიერებაა საჭირო.
- შეეხეთ სტატისტიკას Sampling ინტერვალით და აირჩიეთ მაჩვენებელი, რომელიც გამოიყენება სტატისტიკის გამოსათვლელად. განაკვეთი უნდა იყოს ნაკლები და კოეფიციენტი, ვიდრე ჭრის ინტერვალი. მაგample, თუ შესვლის ინტერვალი არის 1 წუთი და აირჩიეთ 5 წამი sampling rate, მაშინ ლოგერი დასჭირდება 12 წმampწაკითხვები ყოველი ჭრის ინტერვალს შორის (ერთი წმampყოველ 5 წამში ერთი წუთის განმავლობაში) და გამოიყენეთ 12 წმamples ჩაწეროს მიღებული სტატისტიკა ყოველ 1-წუთიან შესვლის ინტერვალში. გაითვალისწინეთ, რომ რაც უფრო ხშირია სampხანგრძლივობა, რაც უფრო დიდია გავლენა ბატარეის მუშაობაზე.
- შეეხეთ შესრულებულია.
- კვლავ შეეხეთ შესრულებულია, რათა გამოხვიდეთ ჟურნალის რეჟიმის ეკრანიდან.
- შეეხეთ დაწყებას კონფიგურაციის ეკრანზე, რათა ჩატვირთოთ სტატისტიკის პარამეტრები ლოგერზე, თუ მზად ხართ დასაწყებად.
Once logging begins, click the Alarm/Stats button on the logger to cycle through the current maximum, minimum, average, and standard deviation data on the LCD screen. Note that the logger will always display the current sensor readings in HOBOmobile even if they are not being logged. You can plot the statistics series once you read out the logger.
Reading Out The Logger
მონაცემების გადმოტვირთვა ლოგერიდან:
- შეეხეთ .
- Find the logger you wish to offload in the Recently Seen/In Range list and tap that row.
- Once connected, tap Readout.
- შეეხეთ
 რომ view a mini-graph of the offloaded data.
 - შეეხეთ მინიგრამას view გრაფიკის უფრო დიდი ვერსია ან გაზიარება file.
See the HOBOmobile User’s Guide for details on viewing graphs and sharing data.
შიდა ჟურნალის მოვლენების ჩაწერა
The logger records the following internal events to track logger operation and status. To plot events in HOBOmobile, tap a mini-graph and then tap ![]() . Select the events you wish to plot and then tap
. Select the events you wish to plot and then tap ![]() again. You can also view მოვლენები გაზიარებულ ან ექსპორტირებულ მონაცემებში files.
again. You can also view მოვლენები გაზიარებულ ან ექსპორტირებულ მონაცემებში files.
| შიდა ღონისძიების სახელი | განმარტება |
| მასპინძელი დაკავშირებულია | ჟურნალი დაკავშირებულია მობილურ მოწყობილობასთან. |
| დაიწყო | The Start/Stop button was pressed to begin or resume logging. |
| გაჩერდა | The logger received a command to stop recording data (from HOBO mobile or by pushing the Start/Stop button). |
| ღილაკი ზემოთ/ღილაკი ქვემოთ | დაწყება/გაჩერების ღილაკს დააჭირეთ 1 წამი. |
| Chan <#> მაღვიძარა შეეშალა | A sensor alarm has tripped; <#> is the sensor number, where 1 is temperature and 2 is RH. |
| Chan <#> მაღვიძარა გასუფთავებულია | A sensor alarm has cleared; <#> is the sensor number, where 1 is temperature and 2 is RH. This event also contains the value that was furthest out of range for the sensor before the alarm cleared, which is only available in a shared or exported file. |
| ახალი ინტერვალი | მწერალი შევიდა ან გამოვიდა ადიდებული აღრიცხვის რეჟიმში. |
| უსაფრთხო გამორთვა | ბატარეის დონე დაეცა 2.5 ვ -ზე ქვემოთ; ჟურნალი ასრულებს უსაფრთხო გამორთვას. |
Mounting The Logger
ხე -ტყის დამონტაჟების რამდენიმე გზა არსებობს მასალების გამოყენებით:
- გამოიყენეთ ოთხი მაგნიტი ლოგერის კორპუსის უკანა მხარეს, რომ დაამაგროთ იგი მაგნიტურ ზედაპირზე.
- მიამაგრეთ ბრძანების ზოლები ლოგერის უკანა მხარეს, რომ დაამაგროთ იგი კედელზე ან სხვა ბრტყელ ზედაპირზე. გააორმაგეთ ორი Command ზოლები ისე, რომ ისინი გამოვიდეს მაგნიტების გვერდით.
- გამოიყენეთ ორმაგი ცალმხრივი ლენტი, რომ მოათავსოთ ლოგერი ზედაპირზე.
- ჩადეთ კაუჭისა და მარყუჟის სამაჯური სამონტაჟო მარყუჟების მეშვეობით ხე-ტყის ორივე მხარეს, რათა დაიკიდოთ იგი მოსახვევ ზედაპირზე, მაგალითად მილსადენზე ან მილში.
Protecting The Logger
ხე -ტყე განკუთვნილია შიდა გამოყენებისთვის და შეიძლება სრულად დაზიანდეს კოროზიისგან, თუ ის სველდება. დაიცავით იგი კონდენსაციისგან. თუ შეტყობინება FAIL CLK გამოჩნდება LCD ეკრანზე, მოხდა შიდა ხის საათის უკმარისობა, შესაძლოა კონდენსაციის გამო. დაუყოვნებლივ ამოიღეთ ბატარეა და გააშრეთ მიკროსქემის დაფა.
შენიშვნა: სტატიკურმა ელექტროობამ შეიძლება გამოიწვიოს ლოგერის შეჩერება.
ხე -ტყე შემოწმებულია 8 კვ -ზე, მაგრამ თავიდან აიცილეთ ელექტროსტატიკური გამონადენი დამიწებით, რომ დაიცვათ ხე -ტყე. დამატებითი ინფორმაციისთვის მოძებნეთ "სტატიკური გამონადენი" ჩართული onsetcomp.com.
ინფორმაცია ბატარეის შესახებ
ლოგერი მოითხოვს ორ მომხმარებლის მიერ შეცვლას AAA 1.5 V ტუტე ან სურვილისამებრ ლითიუმის ბატარეას, რომ მუშაობდეს ხე-ტყის ექსტრემალურ უკიდურეს ბოლოებზე. ბატარეის სავარაუდო ხანგრძლივობა იცვლება გარემოს ტემპერატურის მიხედვით, სადაც განლაგებულია ლოგერი, ხე -ტყე ან სampლინგის ინტერვალი, გადმოტვირთვის სიხშირე და მობილურ მოწყობილობასთან დაკავშირება, აქტიური არხების რაოდენობა, ხმოვანი სიგნალიზაციის ხანგრძლივობა, ადიდებული რეჟიმის გამოყენება ან სტატისტიკის აღრიცხვა და ბატარეის მუშაობა. ახალი ბატარეები, როგორც წესი, ძლებს 1 წელიწადს, 1 წუთზე მეტი ჭრის ინტერვალით. განლაგება უკიდურესად ცივ ან ცხელ ტემპერატურებზე, 1 წუთზე უფრო სწრაფად ჭრის ინტერვალით, ან როგორცampლინგის ინტერვალმა 15 წამზე სწრაფად შეიძლება გავლენა მოახდინოს ბატარეის მუშაობაზე. შეფასებები არ არის გარანტირებული ბატარეის საწყის პირობებში და სამუშაო გარემოს გაურკვევლობის გამო.
ბატარეების დასაყენებლად ან შესაცვლელად:
- გახსენით ბატარეის კარი ლოგის უკანა მხარეს.
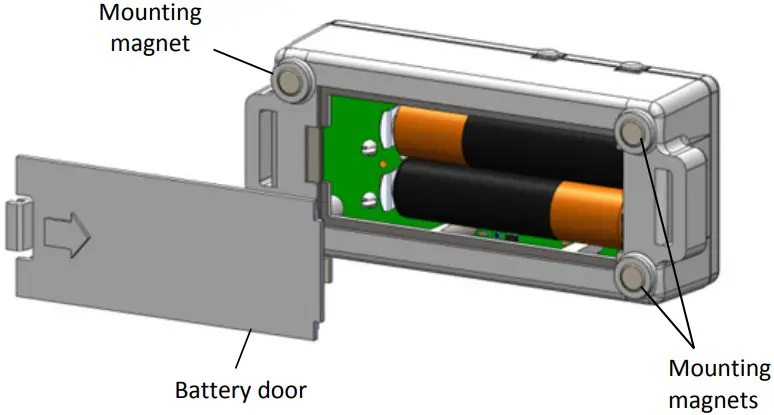
- ამოიღეთ ძველი ბატარეები.
- ჩადეთ ორი ახალი ბატარეა პოლარობის დაცვით.
- დააბრუნეთ ბატარეის კარი და მიაბრუნეთ იგი თავის ადგილას.
![]() გაფრთხილება: არ გაჭრათ გახსნა, დაწვა, გაცხელება 85°C-ზე (185°F) ზემოთ და არ დატენოთ ლითიუმის ბატარეები. ბატარეები შეიძლება აფეთქდეს, თუ ლოგერი ექვემდებარება ექსტრემალურ სიცხეს ან პირობებს, რამაც შეიძლება დააზიანოს ან გაანადგუროს ბატარეის კორპუსი. არ გადააგდოთ ტყვია და ბატარეები ცეცხლში. არ დაუშვათ ბატარეების შიგთავსი წყალში. გადაყარეთ ბატარეები ლითიუმის ბატარეების ადგილობრივი რეგულაციების შესაბამისად.
გაფრთხილება: არ გაჭრათ გახსნა, დაწვა, გაცხელება 85°C-ზე (185°F) ზემოთ და არ დატენოთ ლითიუმის ბატარეები. ბატარეები შეიძლება აფეთქდეს, თუ ლოგერი ექვემდებარება ექსტრემალურ სიცხეს ან პირობებს, რამაც შეიძლება დააზიანოს ან გაანადგუროს ბატარეის კორპუსი. არ გადააგდოთ ტყვია და ბატარეები ცეცხლში. არ დაუშვათ ბატარეების შიგთავსი წყალში. გადაყარეთ ბატარეები ლითიუმის ბატარეების ადგილობრივი რეგულაციების შესაბამისად.
Fcc განცხადება
ფედერალური კომუნიკაციების კომისიის ჩარევის განცხადება
ეს მოწყობილობა შემოწმდა და აღმოჩნდა, რომ შეესაბამება B კლასის ციფრული მოწყობილობის ლიმიტებს, FCC წესების მე-15 ნაწილის შესაბამისად. ეს შეზღუდვები შექმნილია იმისათვის, რომ უზრუნველყოს გონივრული დაცვა საცხოვრებელ ინსტალაციაში მავნე ჩარევისგან. ეს მოწყობილობა გამოიმუშავებს გამოყენებას და შეუძლია რადიოსიხშირული ენერგიის გამოსხივება და, თუ არ არის დაინსტალირებული და გამოყენებული ინსტრუქციის შესაბამისად, შეიძლება გამოიწვიოს მავნე ჩარევა რადიოკავშირში. თუმცა, არ არსებობს გარანტია, რომ ჩარევა არ მოხდება კონკრეტულ ინსტალაციაში. თუ ეს მოწყობილობა იწვევს საზიანო ჩარევას რადიოს ან ტელევიზიის მიღებაზე, რაც შეიძლება განისაზღვროს აღჭურვილობის გამორთვით და ჩართვით, მომხმარებელი ურჩევს შეეცადოს ჩარევის გამოსწორება ერთ-ერთი შემდეგი ზომით:
- მიმღების ანტენის გადაადგილება ან გადაადგილება
- გაზარდეთ დაშორება აღჭურვილობასა და მიმღებს შორის
- შეაერთეთ მოწყობილობა განყოფილებაში, რომელიც განსხვავდება მიმღებისგან
- დახმარებისთვის მიმართეთ დილერს ან გამოცდილ რადიო/ტელე ტექნიკოსს
ეს მოწყობილობა შეესაბამება FCC წესების მე-15 ნაწილს. ოპერაცია ექვემდებარება შემდეგ ორ პირობას:
- ამ მოწყობილობამ შეიძლება არ გამოიწვიოს მავნე ჩარევა და.
- ამ მოწყობილობამ უნდა მიიღოს ნებისმიერი მიღებული ჩარევა, მათ შორის ჩარევა, რამაც შეიძლება გამოიწვიოს არასასურველი ოპერაცია.
FCC სიფრთხილე: ნებისმიერმა ცვლილებამ ან მოდიფიკაციამ, რომელიც პირდაპირ არ არის დამტკიცებული მხარის მიერ, რომელიც პასუხისმგებელია შესაბამისობაზე, შეიძლება გააუქმოს მომხმარებლის უფლებამოსილება გამოიყენოს ეს მოწყობილობა.
მრეწველობის კანადის განცხადებები
ეს მოწყობილობა შეესაბამება Industry Canada-ს ლიცენზიით გათავისუფლებულ RSS სტანდარტ(ებ)ს. ოპერაცია ექვემდებარება შემდეგ ორ პირობას:
- ამ მოწყობილობამ შეიძლება არ გამოიწვიოს ჩარევა და
- ამ მოწყობილობამ უნდა მიიღოს ნებისმიერი ჩარევა, მათ შორის ჩარევა, რამაც შეიძლება გამოიწვიოს მოწყობილობის არასასურველი მუშაობა.
FCC და კანადის ინდუსტრიის RF რადიაციული ზემოქმედების ლიმიტების შესასრულებლად ზოგადი პოპულაციისთვის, HOBO MX1101 ლოგერები უნდა იყოს დაყენებული, რათა უზრუნველყოს მინიმუმ 20 სმ მანძილი ყველა ადამიანისგან და არ უნდა იყოს განლაგებული ან მუშაობდეს სხვა ანტენასთან ან ერთად. გადამცემი.
მომხმარებელთა მხარდაჭერა
1-800-LOGGERS (564-4377)
508-759-9500
www.onsetcomp.com
loggerhelp@onsetcomp.com
© 2014 Onset Computer Corporation. All rights reserved. Onset, HOBO, and HOBOmobile are trademarks or registered trademarks of Onset Computer Corporation. iPhone, iPad, and iPod touch are registered trademarks of Apple Inc. Bluetooth and Bluetooth Smart are registered trademarks of Bluetooth SIG, Inc. All other trademarks are the property of their respective companies.
ავრცელებს MicroDAQ.com, შპს.
www.MicroDAQ.com
603-746-5524

დოკუმენტები / რესურსები
 |
onset HOBO MX1101 Bluetooth Humidity and Temperature Data Logger [pdf] ინსტრუქციები HOBO MX1101 Bluetooth Humidity and Temperature Data Logger, HOBO MX1101, Bluetooth Humidity and Temperature Data Logger, Temperature Data Logger, Data Logger |